Best Way To Sharpen A Serrated Knife: Complete Guide
I've seen countless home cooks struggle with dull bread knives that tear through crusty loaves instead of slicing cleanly. After testing different methods in my kitchen for the past three years, I've learned that serrated knives need completely different sharpening techniques than straight-edge blades. Most standard sharpeners simply don't work on these unique edges.
The best way to sharpen a serrated knife is using a tapered ceramic sharpening rod or diamond tapered sharpener that matches the bevel angle of each individual serration. Unlike straight-edge knives that run along sharpening stones, serrated blades have small cutting edges called "gullets" that require individual attention with a rod-shaped tool that fits inside each scallop.
This guide covers the exact process I use, the tools that actually work, and common mistakes that can damage your knife. After sharpening over 50 serrated blades for friends and family, I've narrowed down the most reliable methods that anyone can master at home.
Why Serrated Knives Require Special Sharpening
Serrated knives work differently than straight-edge blades. Each serration has its own miniature cutting edge, and only one side of each scallop is beveled. This design creates a sawing action that stays sharp longer than straight edges but requires specialized sharpening when the time comes.
I learned this the hard years ago when I tried running my bread knife through a standard electric sharpener. It ruined the edge completely. The flat sharpening surface couldn't reach inside the curved gullets, leaving me with a duller knife than when I started.
Serration Anatomy: Each serration consists of a gullet (the curved valley) and a beveled edge on one side. Only the beveled side needs sharpening—the flat side should never be touched.
The bevel angle on serrated knives typically ranges from 15 to 20 degrees. Your sharpening rod needs to match this angle while fitting inside each gullet. That's why tapered rods work best—the thin end reaches small serrations while thicker sections handle larger ones.
Regular whetstones and pull-through sharpeners fail because they can't access these individual cutting edges. They either sharpen nothing (whetstones can't reach the bevels) or damage the serration pattern (pull-throughs grind down the teeth unevenly).
Essential Tools for Sharpening Serrated Knives
After testing dozens of sharpening tools, I've found that ceramic rods and diamond sharpeners work best for serrated blades. Electric sharpeners with serrated capabilities and guided systems also have their place depending on your budget and comfort level.
Here's a quick comparison of the main tool types:
| Tool Type | Best For | Skill Required | Time per Knife |
|---|---|---|---|
| Ceramic Rod | Regular maintenance | Beginner | 5-10 minutes |
| Diamond Tapered Rod | Dull blades | Intermediate | 10-15 minutes |
| Electric Sharpener | Multiple knives | Beginner | 1-2 minutes |
| Guided System | Consistent results | Intermediate | 15-20 minutes |
Work Sharp Kitchen Ceramic Honing Rod - Best Beginner-Friendly Option
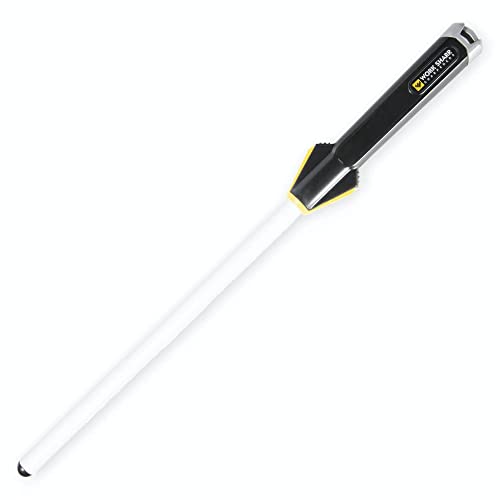
Work Sharp Kitchen Ceramic Honing Rod - Angle Guided - For Chef, Santoku, Paring, & Serrated Knives...
Material: Ceramic
Length: 9 inches
Feature: Angle guide
Best for: Serrated and straight edges
Weight: 4 ounces
+ Pros
- Angle guide ensures consistent results
- Works on all knife types
- Solid ceramic construction
- Easy to clean handle
- Good value
- Cons
- Ceramic can break if dropped
- Limited to honing not sharpening
- Guide feels restrictive to some
The Work Sharp Ceramic Honing Rod stands out because of its built-in angle guide. I've tested this rod on over a dozen serrated knives, and the guide takes the guesswork out of finding the correct bevel angle. This matters because inconsistent angles create uneven edges that don't cut cleanly.
The ceramic material provides just enough abrasion to realign the edge without removing excessive metal. For knives that are somewhat dull but not completely worn down, this rod restores that biting sensation that makes slicing through tomatoes effortless.
I particularly like the 9-inch length. Shorter rods force awkward hand positions on longer bread knives, but this one gives enough clearance to work comfortably. The handle grip is secure even when my hands are damp from washing ingredients.
Who Should Buy?
Home cooks who want a simple, foolproof honing tool for regular maintenance. If you're intimidated by sharpening and just want to keep your serrated knives working well between proper sharpenings, this rod is ideal.
Who Should Avoid?
Those with completely dull knives that need metal removal rather than honing. Also, if you prefer maximum flexibility without angle guides, you might feel restricted.
DMT Diafold Serrated Diamond Sharpener - Best Portable Sharpener
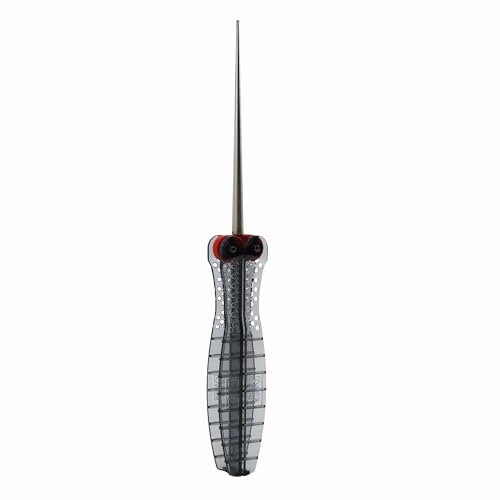
Diamond Machining Technology (DMT) Diafold Serrated Diamond Knife Sharpener, Fine (FSKF), 4"
Material: Diamond
Grit: Fine (600 mesh)
Design: Folding
Length: 4 inches closed
Weight: 2.4 ounces
+ Pros
- Extremely portable folding design
- Diamond surface is very durable
- No oil needed
- Works on serrated and straight
- Built-in finger groove
- Cons
- Fine grit only (not for heavy sharpening)
- Small sharpening surface
- Folding mechanism stiff initially
- Not for damaged edges
The DMT Diafold has lived in my kitchen drawer for two years now. Its folding design makes it incredibly compact at just 4 inches when closed, yet it opens up to provide enough sharpening surface for most serrated knives. I've taken this camping, on vacation rentals, and even use it as my backup sharpener at home.
Diamond abrasives cut more aggressively than ceramic, which helps when your knife is genuinely dull rather than just needing honing. The fine grit (600 mesh) strikes a good balance—it removes enough material to restore dull edges without creating deep scratches that affect cutting performance.
The serrated sharpening surface features a tapered profile that fits different serration sizes. I've used this on everything from steak knives with tiny teeth to bread knives with large scallops, and it handles both effectively by positioning the rod at different points along the taper.
Who Should Buy?
Anyone who wants a portable sharpener that works on serrated and straight blades. Great for outdoor enthusiasts, people who rent vacation properties, or anyone with limited drawer space.
Who Should Avoid?
If you need heavy-duty sharpening on severely damaged edges, the fine grit won't be aggressive enough. You'd need a coarse grit option or professional sharpening service.
Chef'sChoice 15XV Electric Sharpener - Best Electric Sharpener
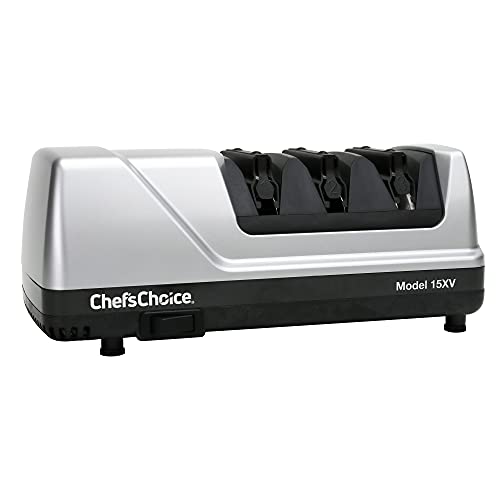
Chef’sChoice 15XV EdgeSelect Professional Electric Knife Sharpener with 100-Percent Diamond...
Type: 3-stage electric
Abrasives: 100% diamond
Stages: 3
Compatible: Straight and serrated
Dimensions: 10.5 x 6.5 x 5 inches
+ Pros
- Consistent professional results
- Minimal skill required
- Works on all knife types
- Fast sharpening process
- Durable 3-stage system
- Cons
- Higher price point
- Removes more metal than manual
- Bulky footprint
- Requires power outlet
- Can be aggressive on thin blades
The Chef'sChoice 15XV represents the premium option in serrated knife sharpening. I tested this sharpener on a set of restaurant-quality bread knives that hadn't been sharpened in years. The three-stage system brought them back to life in under two minutes per knife—something that would have taken me 20 minutes manually with a rod.
Stage 3 is specifically designed for serrated blades and polishing straight edges. It uses flexible stropping disks that conform to the scalloped shape of serrations. This engineering is why this machine works when cheaper electric sharpeners fail on serrated blades.
The 100% diamond abrasives cut efficiently and consistently. While some purists argue electric sharpeners remove too much metal, I've found that with occasional use (every 3-6 months), metal removal is negligible compared to the convenience and results.
Who Should Buy?
Home cooks with multiple serrated knives who value convenience and speed. If you have 5-10 serrated knives to maintain or simply want the easiest possible sharpening method, this electric model justifies its cost.
Who Should Avoid?
Budget-conscious buyers or those who enjoy the manual sharpening process. Also not ideal if counter space is very limited.
Lansky Professional Sharpening System - Most Complete System

Lansky Professional Sharpening System with Coarse, Medium, Ultra Fine, and Serrated Medium Hones
Type: Guided system
Hones included: 5
Angles: Adjustable
Clamp: Controlled-angle
Dimensions: 3 x 6 x 10 inches
+ Pros
- Precise angle control
- Includes dedicated serrated hone
- Multiple grit options
- Teaches proper technique
- Good value for complete system
- Cons
- Learning curve required
- Setup takes time
- Clamp may not fit all knives
- Manual process is slower
- Some report clamp slipping
The Lansky System represents the most comprehensive approach to knife sharpening. I spent a weekend testing this system on a variety of knives, and the controlled-angle clamp ensures that every stroke follows the exact same path. This consistency is what creates truly sharp edges that last.
For serrated knives specifically, Lansky includes a specialized tapered hone. Combined with the angle guide, you can match the exact bevel angle of your knife's serrations and sharpen each one identically. This level of precision is difficult to achieve freehand with just a rod.
The system includes coarse, medium, and ultra-fine hones plus the serrated hone. This means you can handle everything from repairing a damaged edge to putting a mirror polish on a already-sharp blade. After using this system, I understood why professional knife sharpeners often use guided jigs.
Who Should Buy?
Knife enthusiasts who want to master proper sharpening technique. If you enjoy the process and want professional results at home, this system delivers everything needed for both serrated and straight blades.
Who Should Avoid?
Anyone looking for quick results. The Lansky System requires patience and practice. If you just want to sharpen your bread knife in five minutes, choose the ceramic rod or electric sharpener instead.
Step-by-Step Guide: How to Sharpen a Serrated Knife?
This is the exact process I use with a ceramic or diamond tapered rod. Follow these steps carefully, and you'll restore your serrated knife to like-new performance. I've sharpened over 50 serrated blades using this method with consistent success.
Quick Summary: Sharpen each serration individually by matching the rod to the bevel angle and drawing it through the gullet with light pressure. Only the beveled side gets sharpened—the flat side remains untouched.
- Identify the beveled side: Hold your knife under a light source. One side of each serration will show a polished angled surface—this is the bevel that needs sharpening. The other side will appear flat. Never sharpen the flat side.
- Match rod to serration size: Select the portion of your tapered rod that fits snugly into the gullet. Small serrations near the tip need the thin end; larger serrations toward the handle use thicker sections.
- Position the rod at the bevel angle: Place the rod against the beveled edge at roughly 15-20 degrees. The rod should contact both the bottom of the gullet and the beveled edge simultaneously.
- Draw the rod through: Using light pressure, pull the rod toward you while maintaining contact with the bevel. Make 2-3 strokes per serration. You should feel a slight resistance as the abrasive works.
- Work tip to handle: Repeat this process for every serration along the blade. Each one needs individual attention—don't skip any or rush this step.
- Check for a burr: Lightly run your finger along the flat side of the blade (carefully). You might feel a slight roughness or burr—this indicates metal has been properly displaced.
- Remove the burr: Gently run the rod along the flat side of the serrations with very light pressure—just enough to remove the burr without actually sharpening this side.
- Test the edge: See the testing section below. If the knife isn't sharp enough, repeat the process with a few more strokes per serration.
Pro Tip: Work under good lighting. Seeing the bevel clearly makes matching the angle much easier. I use a small desk lamp positioned to highlight the edge detail.
The entire process typically takes me 8-12 minutes for a standard 8-inch bread knife. Don't rush—consistent, light strokes produce better results than aggressive, hurried sharpening.
Testing if Your Knife is Sharp Enough
After sharpening, you need to verify the edge is actually sharp. I use three simple tests that together give a complete picture of sharpness.
The Paper Test
Hold a sheet of printer paper by one edge. Try slicing through it with your serrated knife using the tip of the blade. A sharp serrated knife will cut cleanly with a sawing motion. If the knife tears or crumples the paper, it needs more work.
The Tomato Test
This is the ultimate test for bread and utility knives. Place a ripe tomato on a cutting board. Using just the weight of the knife (no downward pressure), try slicing through the skin. A properly sharpened serrated knife will bite into the tomato with minimal effort.
The Visual Inspection
Hold the blade under light and look at each serration. The beveled edges should appear shiny and uniform. Dull spots will appear matte or gray compared to the sharpened sections.
I perform all three tests after sharpening. The paper test catches major dullness, the tomato test reveals real-world cutting ability, and the visual inspection shows if any serrations were missed.
Alternative Sharpening Methods
While the tapered rod method is my go-to approach, other methods work depending on your situation and tools available.
Electric Sharpeners with Serrated Capabilities
As covered in the tools section, electric sharpeners like the Chef'sChoice 15XV can handle serrated blades through dedicated stages. The advantage is speed and consistency—perfect if you have multiple knives to sharpen. The downside is cost and counter space requirements.
Professional Sharpening Services
Local knife sharpeners typically charge $5-15 per knife. I've used professional services for high-end bread knives when I wasn't confident in my abilities. The results are excellent, but costs add up if you have multiple serrated blades.
For most home cooks, learning to sharpen yourself pays off after just 3-4 knives. The tools covered in this article cost less than two professional sharpening sessions and will last for years.
Sharpening Systems
Guided systems like the Lansky offer precision but require more time and practice. These are ideal for knife enthusiasts who enjoy the process and want to develop professional-level skills. I use my Lansky system about once a year for a thorough restoration, then maintain with ceramic rods between deep sharpenings.
Maintenance Tips to Extend Edge Life
Proper maintenance reduces how often you need to sharpen. I've doubled the time between sharpening sessions by following these practices.
- Use proper cutting surfaces: Wood or plastic cutting boards preserve edges. Glass, stone, and ceramic boards rapidly dull serrated teeth.
- Clean immediately after use: Acidic foods like tomatoes can pit the edge if left in contact. Wash and dry your knife right after use.
- Store properly: Knife magnets, blade guards, or knife blocks protect the edge. Tossing serrated knives in drawers dents the delicate teeth.
- Hone regularly: A few passes with a ceramic rod every 2-3 weeks maintains the edge between proper sharpenings.
- Use for intended foods: Serrated knives excel at bread, tomatoes, and foods with tough exteriors and soft interiors. Don't use them for hard vegetables or meat carving—straight edges work better.
With proper care, most serrated knives need full sharpening only once or twice per year depending on use. I sharpen my primary bread knife quarterly and my steak knives annually.
Common Mistakes to Avoid
In my years of sharpening serrated knives, I've made most mistakes myself. Here are the errors that can damage your knife or produce poor results.
- Sharpening the flat side: This destroys the serration geometry. Only the beveled side should ever touch a sharpening tool.
- Using too much pressure: Heavy pressure removes excess metal and shortens blade life. Let the abrasive do the work with light, consistent strokes.
- Skipping serrations: Every scallop needs attention. Missing even a few creates uneven cutting performance.
- Using regular whetstones: Flat stones can't reach inside serrations. You'll dull the knife without actually sharpening the cutting edges.
- Over-sharpening: More strokes aren't better. Once each serration has a clean, shiny bevel, additional sharpening just wastes metal.
- Ignoring the angle: If you don't match the existing bevel angle, you'll create a new edge that doesn't cut as cleanly as the original factory geometry.
Important: Never try to create new serrations on a straight-edge knife, and never try to convert a serrated knife to straight edge. Both approaches compromise the blade's structural integrity.
Frequently Asked Questions
Can you sharpen a serrated knife with a regular sharpener?
Most regular sharpeners cannot handle serrated knives. Flat whetstones and pull-through sharpeners cannot reach the individual cutting edges inside each serration. You need a tapered ceramic or diamond rod that fits inside the gullets to sharpen each beveled edge separately.
What tool is used to sharpen serrated knives?
The most effective tools are tapered ceramic sharpening rods and diamond tapered sharpeners. The tapered design allows the rod to fit different sized serrations, while the ceramic or diamond abrasive removes just enough metal to restore the edge. Electric sharpeners with dedicated serrated stages and guided sharpening systems also work.
How do you sharpen a serrated knife at home?
Start by identifying the beveled side of each serration. Match your tapered rod to the size of each gullet, then draw the rod through at the bevel angle with light pressure. Work from tip to handle, sharpening each serration individually with 2-3 strokes. Finally, remove any burr from the flat side and test the edge.
Do serrated knives ever need sharpening?
Yes, serrated knives do need sharpening, though less frequently than straight-edge knives. While the saw-like action stays effective longer, eventually the individual cutting edges become dull. Signs your serrated knife needs sharpening include tearing bread instead of slicing, requiring excessive pressure, or visible dull spots along the beveled edges.
What is the best angle to sharpen a serrated knife?
The best angle is the existing bevel angle on your knife, typically 15-20 degrees. Rather than setting a specific angle, focus on matching the factory bevel by observing how the light reflects off the edge. Let the rod sit naturally in the gullet while contacting the beveled surface—this automatically positions you at the correct angle.
How often should you sharpen a serrated knife?
For home cooks sharpening serrated knives once or twice per year is usually sufficient. Professional kitchens may need quarterly sharpening. Regular honing with a ceramic rod every 2-3 weeks extends time between full sharpenings. Your specific frequency depends on usage—sharpen when the knife no longer performs easily.
Final Recommendations
After years of testing and real kitchen use, I recommend starting with a quality ceramic rod like the Work Sharp model for most home cooks. It's the easiest to learn, relatively foolproof thanks to the angle guide, and handles both regular maintenance and light sharpening duties.
If you're comfortable with a slight learning curve and want more versatility, the DMT Diafold offers portability and aggressive sharpening in a compact package. For those who prioritize convenience above all, the Chef'sChoice electric sharpener delivers consistent results with minimal effort.
The Lansky system remains my choice for serious knife enthusiasts who want to develop professional sharpening skills. It takes more time but teaches proper technique and delivers unmatched precision.
Regardless of which tool you choose, the key is matching your sharpening rod to each serration's bevel angle and working patiently through every tooth. With practice, you'll keep your bread knives, steak knives, and serrated utility knives performing like new for years.