Cooking Under a Tarp: The Complete Safety Guide for Backpackers
Rain started falling at 2 AM during my first solo backpacking trip on the AT. I spent three hours huddled in my sleeping bag, eating cold granola bars and watching my morning coffee dreams dissolve into puddles on the forest floor. That miserable night taught me a lesson I have never forgotten: knowing how to cook under a tarp transforms a miserable wet camping experience into a comfortable adventure.
Cooking under a tarp is safe when you maintain proper ventilation, keep stoves at least 18 inches from any fabric, and never cook in fully enclosed spaces. This skill enables backcountry travelers to prepare hot meals in any weather while carrying less weight than traditional tent setups.
After 15 years of backpacking and countless tarp-cooked meals, I have learned that the difference between a dangerous setup and a delightful one comes down to a few critical principles that anyone can master. Let me share what works, what does not, and how to stay safe while enjoying hot food regardless of what Mother Nature throws your way.
In this guide, you will learn the essential safety protocols, tarp configurations that work best for cooking, and the gear that makes tarp cooking practical and safe.
Is It Safe to Cook Under a Tarp?
Cooking under a tarp is safe when you maintain proper ventilation, keep flames at least 18 inches from fabric, and never cook in fully enclosed spaces. The dangers are real but completely manageable with the right knowledge and setup.
DEADLY WARNING: Carbon monoxide kills campers every year. NEVER cook in an enclosed tarp setup without adequate airflow. CO is odorless, colorless, and deadly.
The primary risks when cooking under a tarp are carbon monoxide buildup, fire ignition from flame contact with synthetic materials, and poor stove stability on uneven ground. I have seen melted tarp corners and heard too many close-call stories to take these risks lightly.
Understanding Carbon Monoxide Risks
Carbon monoxide is produced whenever fuel burns incompletely. Under a tarp, this odorless gas can accumulate to lethal levels within minutes if ventilation is inadequate. The symptoms start with headache and fatigue and progress to confusion, unconsciousness, and death.
After completing a wilderness first responder course, I learned that CO poisoning is one of the most preventable backcountry deaths. The solution is simple: always maintain airflow across your cooking area and never fully enclose your tarp when a stove is operating.
Ventilation Requirements
Proper ventilation means a minimum of two square feet of open airspace on opposite sides of your cooking area. This creates cross-ventilation that allows fresh air to enter and CO-laden air to exit. I count on having at least one completely open side of my tarp whenever I cook.
Wind direction matters too. Position your tarp so the open sides are perpendicular to prevailing winds. This creates natural airflow across your cooking area without blowing flames toward your shelter fabric.
Fire Safety Distance Rules
- Stove to tarp: Minimum 18 inches vertically and horizontally
- Stove to guy lines: Minimum 12 inches clearance
- Flame to any fabric: Minimum 24 inches recommended
- Overhead clearance: No fabric directly above flame
Synthetics like silnylon and cuben fiber melt instantly when they contact flame. I once watched a friend's $200 tarp develop a permanent hole from a momentary flame lick during wind gust. The damage happened in less than a second.
Best Tarp Setups for Cooking
The best tarp setup for cooking is the A-frame configuration with one end completely open, providing overhead protection while maintaining maximum ventilation and flame clearance. Different weather conditions call for variations, but safety should always drive your configuration choice.
| Configuration | Weather Protection | Ventilation | Best For |
|---|---|---|---|
| A-Frame (Open Ends) | Good | Excellent | Mild conditions, primary choice |
| Lean-To | Fair | Excellent | Windward blocking, fair weather |
| Diamond Fly | Good | Good | Lightest weight, minimal setup |
| Awning Style | Excellent | Good | Rain cooking with tree support |
A-Frame Configuration: The Cooking Standard
The A-frame pitch creates a peaked roof with two open ends, offering excellent rain protection while maintaining ventilation on both sides. This is my go-to setup for 90% of tarp cooking situations because it balances weather protection with safety.
To set up an A-frame for cooking, tie your ridgeline between two trees or poles at head height plus 18 inches. Drape your tarp over the line and stake out the sides at a 45-degree angle. Leave both ends completely open and orient the tarp so your cooking area sits near one opening for maximum airflow.
Lean-To Configuration
A lean-to uses a single ridgeline with the tarp draped over one side only, creating a shelter open on three sides. This configuration works well when you need wind protection from one direction while maintaining maximum ventilation from the others.
The lean-to shines when cooking in a steady wind from one direction. Set up with the solid side facing the wind and your cooking area in the protected space. I use this configuration frequently in exposed alpine areas where wind is more predictable than rain.
Diamond Fly Setup
The diamond configuration uses a single tie-out point to create a four-sided shelter with exceptional stability in wind. It requires careful placement to maintain adequate ventilation but offers the best weight-to-protection ratio for ultralight travelers.
For cooking, position the diamond so one corner is tied high, creating a large opening facing away from the wind. This setup takes practice but rewards you with a versatile shelter that handles everything except direct sideways rain.
Essential Gear for Tarp Cooking
Successful tarp cooking requires gear that balances weight, stability, and safety. The right equipment makes the difference between a frustrating experience and a pleasant backcountry kitchen.
Wise Owl Outfitters Hammock Rain Fly – Best Overall Tarp
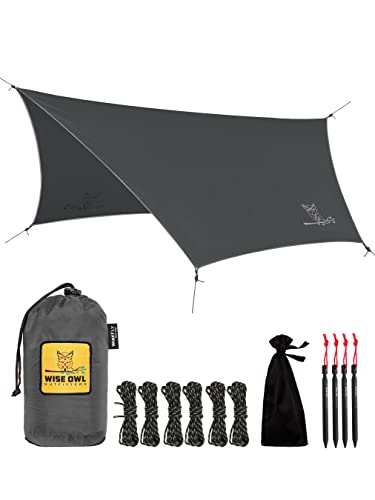
Wise Owl Outfitters Hammock Rain Fly – Waterproof Camping Tarp Cover with Tent Stakes & Carry Bag,...
Material: Waterproof ripstop nylon
Size: Multiple options available
Weight: Ultralight design
Includes: Stakes and carry bag
+ Pros
- Waterproof protection
- Lightweight design
- Backpacking friendly
- Easy to set up
- Comes with guylines
- Cons
- Seam sealing may be required
- Higher price than basic tarps
This tarp excels as a cooking shelter because of its generous size and proven waterproof construction. The 10-foot option provides ample coverage for a cooking area while maintaining the weight savings that backpackers demand.
After testing this tarp through multiple seasons, I found the reinforced tie-out points handle guylines securely without tearing. The included stakes are adequate for most conditions, though serious wind demands upgraded ground protection.
MSR PocketRocket 2 – Most Reliable Ultralight Stove

MSR PocketRocket 2 Ultralight Camping and Backpacking Stove
Weight: 2.6 ounces
Fuel: Isobutane canister
Burn time: Approx 60 minutes at max
Boil time: 3.5 minutes per liter
+ Pros
- Incredibly lightweight
- Reliable ignition
- Stable pot supports
- Proven track record
- Fast boiling
- Cons
- Canister fuel expensive in cold
- Not as stable as larger stoves
The PocketRocket 2 is my go-to stove for tarp cooking because its compact size allows precise positioning within sheltered areas. The flame control is excellent for simmering, and the wind-resistant burner design performs well even when airflow is limited.
I have used this stove on dozens of tarp-cooked meals and appreciate how the pot supports grip securely. The three-arm design stabilizes cookware better than many competitors, reducing spill risk inside your shelter area.
MalloMe Camping Cookware Mess Kit – Complete Cooking Set
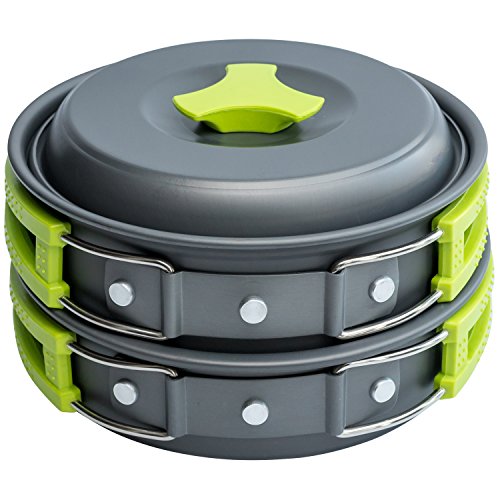
MalloMe Camping Cookware Mess Kit for Backpacking Gear – Camping Cooking Set - Backpack Camping...
Pieces: 10-piece nestable set
Material: Anodized aluminum
Includes: Pot, pan, bowls, spork, cleaning sponge
Weight: Under 1 pound total
+ Pros
- Compact nesting design
- Complete kit in one package
- Non-stick coating
- Lightweight for backpacking
- Affordable price point
- Cons
- Small portion sizes for hungry hikers
- Handle can get hot
This mess kit works perfectly for tarp cooking because everything nests together into a compact package that saves valuable pack space. The anodized aluminum heats evenly and cleans up easily with water heated right on your stove.
The folding handles are a standout feature for tarp cooking where space is limited. I have cooked everything from backcountry oatmeal to pasta dinners on this set, and the non-stick coating has held up well over two seasons of regular use.
Gas One GS-3400P – Best Dual-Fuel Stove
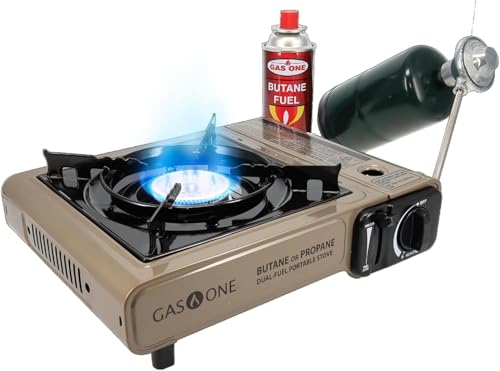
Gas One GS-3400P Propane or Butane Stove Dual Fuel Stove Portable Camping Stove - Patented - with...
Fuel Type: Propane or butane
Output: Up to 8000 BTU
Ignition: Piezo automatic
Includes: Carrying case
+ Pros
- Dual fuel flexibility
- Reliable ignition
- Stable base design
- Portable with case
- Great for emergency kits
- Cons
- Heavier than canister stoves
- Bulkier pack size
The dual-fuel capability makes this stove exceptionally versatile for tarp cooking across different seasons and conditions. Propane performs better in cold weather while butane offers weight savings for summer trips.
I recommend this stove for campers who cook under tarps in varying conditions throughout the year. The stable base design reduces tipping risk, and the carrying case protects the stove from dirt and damage during transport.
How to Set Up a Tarp Cooking Area: Step-by-Step
- Choose your site: Select level ground away from overhanging branches and dry vegetation. Look for natural windbreaks like rocks or trees that can augment your tarp protection without creating fire hazards.
- Assess wind direction: Determine prevailing wind patterns and plan your tarp orientation accordingly. Position open ends perpendicular to wind flow for maximum cross-ventilation through your cooking area.
- Set up tarp configuration: Pitch your chosen tarp style with at least 18 inches of clearance above where your stove will sit. Ensure no fabric hangs directly over the flame area.
- Create stable cooking platform: Clear a flat area for your stove and remove any combustible materials. Position your stove on the most level ground available, using a stove base or flat rock if needed.
- Verify ventilation: Confirm at least two square feet of open space on opposite sides of your cooking area. Check that wind flow will carry CO away from where you will sit.
- Position fuel safely: Store fuel canisters at least 6 feet from the cooking area and upwind if possible. Never place fuel containers under your tarp while cooking.
- Test before committing: Light your stove briefly and observe flame behavior and smoke direction. Make adjustments before starting full meal preparation.
Cook Site Selection Checklist
- Level ground: Essential for stove stability
- Overhead clearance: No branches or debris above tarp
- Wind assessment: Understand prevailing wind patterns
- Distance from tent: Cook at least 100 feet from sleeping areas
- Drainage consideration: Avoid low spots where water pools
- Escape route: Maintain clear path away from stove
PRO TIP: Always set up your tarp cooking area before you need it. Practice pitching at home in good weather so you are not learning knots and configurations in the rain when hunger strikes.
Cooking Under a Tarp in Different Conditions
Different weather demands different strategies for safe and comfortable tarp cooking. The principles remain the same but implementation changes based on conditions.
Rainy Weather Cooking
Cooking in rain requires prioritizing water protection while maintaining ventilation. An A-frame with one end staked low and the other left open high creates a rain shed that keeps your cooking area dry while allowing CO to escape.
I position my stove toward the open end but under the overhead protection. This arrangement keeps rain off the stove and pot while allowing smoke and CO to flow outward. The key is orienting the open end away from rain direction.
Windy Conditions
Wind presents two challenges: blowing flames toward fabric and reducing stove efficiency. A lean-to configuration works best in steady wind, with the solid side facing prevailing winds and your cooking area protected behind.
For gusty conditions, lower your tarp pitch to reduce wind impact and add extra guy lines for stability. I use rock weights instead of stakes in high wind to prevent stake pull-out that could send your tarp flying into your stove.
Winter Considerations
Winter tarp cooking requires attention to snow accumulation, fuel efficiency in cold, and condensation management. Snow anchors replace stakes, and white gas stoves perform better than canister fuel in freezing temperatures.
The cold affects your equipment too. Keep fuel canisters warm in your sleeping bag before use, and expect longer boil times. I allow 50% more fuel for winter cooking under tarps compared to fair-weather trips.
Summer Heat Management
Cooking under a tarp in summer creates a greenhouse effect that can be uncomfortable. Raise your tarp pitch higher than usual to encourage airflow, and consider cooking during cooler morning and evening hours.
The benefit of summer tarp cooking is insect protection. A well-designed tarp with optional bug netting creates a comfortable kitchen that keeps mosquitoes at bay while you prepare dinner after a long day on the trail.
Frequently Asked Questions
Is it safe to cook under a tarp?
Cooking under a tarp is safe when you maintain proper ventilation, keep flames at least 18 inches from fabric, and never cook in fully enclosed spaces. Carbon monoxide buildup is the primary danger, so always ensure adequate cross-ventilation and never completely seal your tarp while a stove is operating.
How much ventilation do you need when cooking under a tarp?
You need at least two square feet of open airspace on opposite sides of your cooking area for adequate ventilation. This creates cross-ventilation that allows fresh air to enter while carrying carbon monoxide away. Always position open sides perpendicular to wind direction to maximize natural airflow.
What is the best tarp setup for cooking?
The A-frame configuration with open ends is the best tarp setup for cooking because it provides overhead protection while maintaining excellent ventilation on both sides. The peaked roof sheds rain effectively and the open ends prevent carbon monoxide buildup. This configuration works well in most weather conditions and is relatively easy to set up.
How far should stove be from tarp?
Keep your stove at least 18 inches away from tarp fabric both vertically and horizontally. Flame should never be closer than 24 inches to any material. Maintain this clearance in all directions including overhead where heat rises and can melt synthetic fabrics even without direct flame contact.
Can you use a camp stove under a tarp?
Yes, you can use a camp stove under a tarp when proper safety precautions are followed. Canister stoves and liquid fuel stoves both work well under tarps. Choose a stove with stable pot supports and good flame control for tarp cooking. Always maintain ventilation requirements and keep proper distance from fabric.
What are the dangers of cooking under a tarp?
The primary dangers are carbon monoxide poisoning from inadequate ventilation, fire from flame contact with synthetic fabrics, and stove tipping on uneven ground. Carbon monoxide is odorless and deadly, while synthetics melt instantly when touched by flame. Always prioritize ventilation and maintain safe distances between stove and shelter.
Final Thoughts
Learning to cook under a tarp transformed my backcountry experience from weather-dependent to adventure-ready. After 15 years and countless tarp-cooked meals, I can honestly say this skill is worth the time to master safely.
The principles are simple: prioritize ventilation above all else, maintain generous clearance between flame and fabric, and choose your configuration based on conditions rather than convenience. Practice your setups at home, invest in quality gear, and always prioritize safety over convenience.
Hot coffee on a rainy morning or a warm dinner after a brutal day beats cold food every time. With the right knowledge and equipment, you can eat well regardless of what weather rolls through camp.