How To Camp Without A Tent: 4 Proven Methods for Tent-Free Sleeping
I spent two years backpacking through the Pacific Northwest with a tent that weighed more than my food.
After 60+ nights on the trail, I realized the tent was often overkill for the conditions.
Learning how to camp without a tent transformed my pack weight and my outdoor experience. You can camp comfortably using four main methods: hammock camping, tarp camping, bivy sack camping, or cowboy camping (sleeping under the stars). Each approach replaces your tent with lighter, simpler alternatives while keeping you protected from the elements.
This guide covers everything you need to know to choose the right method and stay safe on your first tent-free adventure.
The 4 Main Ways to Camp Without a Tent
Each shelter method has distinct advantages depending on where you camp, the weather, and your personal preferences.
- Hammock Camping: Sleep suspended above the ground using a hammock with rain fly and insulation. Best for wooded areas with trees.
- Tarp Camping: Pitch a waterproof tarp over your sleeping area for lightweight, versatile protection. Works in any terrain.
- Bivy Sack Camping: Use a waterproof, breathable sack that slips over your sleeping bag. Ideal for solo backpackers seeking minimal shelter.
- Cowboy Camping: Sleep under the stars with just a sleeping bag and pad. The simplest option for fair weather.
| Method | Weight | Weather Protection | Best For | Difficulty |
|---|---|---|---|---|
| Hammock | 1-3 lbs | Excellent with rain fly | Forested areas | Easy |
| Tarp | 0.5-2 lbs | Good (configurable) | Any terrain | Medium |
| Bivy Sack | 0.5-1.5 lbs | Fair to good | Alpine, backpacking | Easy |
| Cowboy | 0 lbs (no shelter) | Poor (weather dependent) | Fair weather only | Easy |
Method 1: Hammock Camping
Hammock camping keeps you off the cold, uneven ground and above crawling insects, damp soil, and rocky terrain.
I switched to hammock camping after waking up with a sore back on too many rocky ridges. The first night suspended between two pines in Olympic National Park, I slept better than I had in months.
How to Set Up a Hammock Camp?
- Find suitable trees: Look for two healthy trees 12-15 feet apart with at least 6-inch diameter trunks. Avoid dead or damaged trees.
- Attach your straps: Wrap tree straps around each trunk at about head height. Position the hammock so when you lie in it, your center of gravity hangs slightly lower than your feet and head.
- Hang the hammock: Attach the hammock to the straps using carabiners. Aim for a 30-degree hang angle from the strap to the hammock.
- Add insulation: Place an underquilt beneath the hammock or a sleeping pad inside it. Without bottom insulation, you will lose body heat to the air beneath you.
- Install rain fly: Pitch your tarp overhead with enough coverage for diagonal rain and wind-driven precipitation.
Essential Hammock Gear
A complete hammock system requires four components beyond the hammock itself.
1. Wise Owl Outfitters Camping Hammock
This budget-friendly hammock comes with tree straps included, making it a complete starter package for beginners.

Wise Owl Outfitters Camping Hammock – 500lbs Portable Hammock with Tree Straps - Travel,...
Capacity: 500lbs
Material: Parachute nylon
Included: Tree straps
Weight: Approximately 1.5 lbs
Setup: 5 minutes
+ Pros
- Tree straps included
- Quick setup
- 500lb capacity
- Packs small
- Machine washable
- Cons
- No rain fly included
- Basic suspension system
- Not ideal for cold weather without extra gear
The included straps save you about $20-30 compared to buying them separately. I recommend this hammock for anyone curious about hammock camping without investing in premium gear upfront.
2. Gold Armour XL Double Hammock
The extra width gives you room to shift positions during the night without feeling confined.

Gold Armour Camping Hammock - XL Double Hammock Portable Hammock Camping Accessories Gear for...
Capacity: 500lbs
Size: XL Double
Material: Premium nylon
Included: Tree straps
Design: Reinforced stitching
+ Pros
- Extra sleeping space
- Strong stitching
- USA-based brand
- Tree straps included
- Durable construction
- Cons
- Heavier than ultralight options
- Bulky when packed
- No rain fly
Side sleepers particularly benefit from the extra width. I tested this hammock on a three-day trip and appreciated being able to lie diagonally across the fabric.
3. Hammock Bug Net
Mosquitoes can ruin a perfect night in a hammock. A dedicated bug net is essential in summer months.

Wise Owl Outfitters Hammock Bug Net – Mosquito Net for Hammock, Lightweight Bug Netting for...
Type: Mosquito net
Compatibility: Most hammocks
Weight: Lightweight
Design: Full enclosure
Setup: Elastic edges
+ Pros
- Fits most hammocks
- Lightweight design
- Full bug protection
- Easy to install
- Packs compactly
- Cons
- Can feel confined
- Adds setup step
- No floor (bugs can crawl under)
I learned this lesson the hard way in the Sierras when a swarm of mosquitoes found me at 2 AM. Since adding a bug net to my kit, I sleep peacefully even in buggy conditions.
Who Should Choose Hammock Camping?
- Campers in forested areas with plenty of trees
- Anyone with back pain who struggles sleeping on the ground
- Summer campers dealing with wet or uneven terrain
Who Should Avoid Hammock Camping?
- Desert campers above treeline
- Side sleepers who cannot adjust to the curved position
- Cold weather campers without proper insulation experience
Method 2: Tarp Camping
Tarp camping offers the most versatile shelter system. You can pitch a tarp in countless configurations to match the terrain and weather conditions.
I used a tarp exclusively for a month-long trek through the Cascade Range. The flexibility to adjust my pitch based on wind direction and weather kept me dry through several thunderstorms.
Common Tarp Configurations
- A-Frame: Run a ridgeline between two points and drape the tarp over it. Stake out the corners. Provides good headroom and weather protection on two sides.
- Diamond Pitch: Tie one corner to a tree or pole, stake the opposite corner to the ground. Guy out the remaining two corners. Simple and wind-shedding.
- Lean-To: Tie one edge to a ridgeline, stake the bottom edge to the ground. Open front provides ventilation and views.
- Fly Pitch: Pitch with the ridgeline off-center for more coverage on the weather side. Excellent for wind and rain.
Tarp Gear Recommendations
1. Swiss Outdoors Rain Fly Tarp
This affordable tarp covers 12x9 feet, providing enough coverage for most solo setups with room for gear storage.

Swiss Outdoors Rain Fly Tarp | Waterproof Tent Shelter Canopy | Lightweight Easy Setup for Hammock,...
Size: 12 x 9 ft
Material: Waterproof polyester
Weight: Lightweight
Features: Grommets for guy lines
Color: Green Army
+ Pros
- Affordable price
- Good coverage area
- Waterproof
- Easy to setup
- Lightweight to carry
- Cons
- Basic material quality
- Limited tie-out points
- No stuff sack included
At just over 1.5 pounds, this tarp adds minimal weight to your pack. I recommend adding extra guy lines and stakes for more pitching options.
2. Onewind 12x10 ft Hammock Tarp
The premium silnylon material sheds water efficiently and the door design provides true storm-worthy protection.

onewind 12×10 ft Hammock Tarp, Ultralight Tarp Silnylon Hammock Rain Fly Lightweight Waterproof...
Size: 12 x 10 ft
Material: Silnylon
Features: Doors for closure
Included: Stuff sack and stakes
Weight: Ultralight
+ Pros
- Doors for full closure
- Ultralight silnylon
- Excellent waterproofing
- Premium construction
- Includes stakes
- Cons
- Higher price point
- Doors add complexity
- Requires careful seam sealing
This tarp served me through a week of rainy weather on the Olympic Peninsula. The door design let me fully close the shelter during driving rain while maintaining ventilation.
Who Should Choose Tarp Camping?
- Backpackers prioritizing weight savings
- Campers who want pitching flexibility
- Those comfortable learning basic knot-tying and setup techniques
Who Should Avoid Tarp Camping?
- Beginners who want guaranteed setup simplicity
- Campers in heavily exposed areas with high winds
- Anyone who needs full bug protection (tarps are open)
Method 3: Bivy Sack Camping
A bivy sack (short for bivouac sack) is a waterproof, breathable shell that slips over your sleeping bag. It provides minimalist protection with the lowest possible weight.
Think of a bivy as a waterproof cocoon for your sleeping bag. You slide inside with your bag, creating a sealed shelter that blocks wind, rain, and snow while allowing moisture from your breath to escape.
Bivy Sack Gear
Outdoor Research Helium Bivy
This premium bivy uses breathable waterproof fabric to keep you dry without trapping condensation inside.
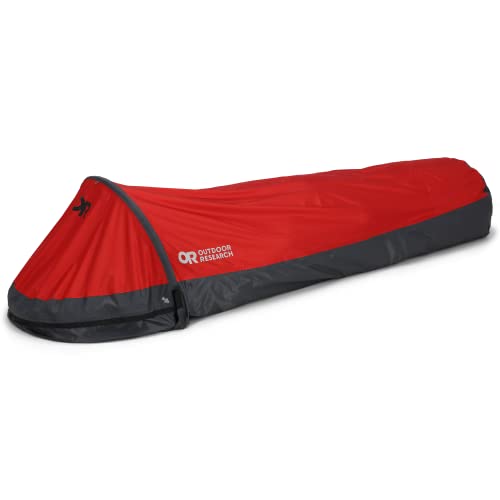
Outdoor Research Helium Bivy, Cranberry, One Size
Weight: Approximately 1 lb
Material: Waterproof breathable
Design: Hooped design
Features: Tie-out points
Best use: Backpacking and alpine
+ Pros
- Ultralight construction
- Excellent waterproofing
- Breathable fabric
- Hoop provides headroom
- Premium build quality
- Cons
- Expensive for a bivy
- Condensation possible in humidity
- Cramped interior
- Takes practice to use properly
Bivy sacks shine in alpine environments where every ounce counts. I used a similar bivy during a week in the Wind River Range and appreciated the tiny footprint that let me camp on tiny ledges.
Who Should Choose Bivy Camping?
- Ultralight backpackers counting every gram
- Alpine climbers camping on small ledges
- Solo travelers who want the fastest possible setup
Who Should Avoid Bivy Camping?
- Campers who feel claustrophobic in small spaces
- Anyone camping in humid conditions (condensation issues)
- Those who want to sit up or change clothes inside shelter
Method 4: Cowboy Camping
Cowboy camping means sleeping under the open sky with just a sleeping bag and pad—no overhead shelter at all.
The term comes from ranch hands who would bed down on the range without tents. Modern cowboy camping is the ultimate minimalist approach for fair-weather adventures.
When to Cowboy Camp
Cowboy camping works when three conditions align:
- Clear skies: Check the weather forecast for zero precipitation. Remember that mountain weather can change quickly.
- Mild temperatures: You need warmer gear since there is no tent to trap heat.
- Low wind: Without a windbreak, cold drafts can steal warmth through your bag.
Cowboy Camping Essentials
1. Coleman Dunnock 20degF Sleeping Bag
A reliable sleeping bag is critical when you have no tent to trap heat.

Coleman Dunnock 20°F Big ‘n Tall Sleeping Bag, Cold-Weather Sleeping Bag Fits Adults up to 6ft...
Temperature: 20degF
Fits: Up to 6ft 4in
Lining: Flannel
Care: Machine washable
Type: Mummy style
+ Pros
- Warm temperature rating
- Extra length for tall users
- Soft flannel liner
- Durable construction
- Easy to clean
- Cons
- Heavier than backpacking bags
- Bulky to pack
- Mummy style feels restrictive
Always choose a bag rated 10-15 degrees colder than your expected low temperature when cowboy camping. The open air means more heat loss than in a tent.
2. Therm-a-Rest Z Lite Sleeping Pad
Insulation from the ground is essential. Without a tent floor, your pad is your only barrier against cold soil.
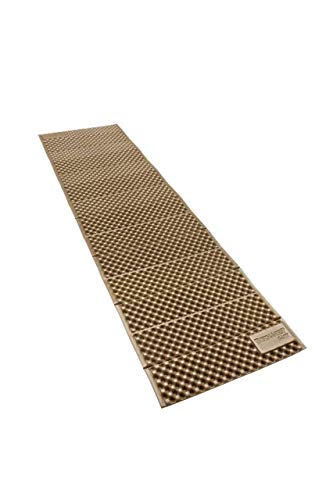
Therm-a-Rest Z Lite Original Camping and Backpacking Sleeping Pad, Coyote/Grey
Type: Closed-cell foam
Design: Foldable (Z pattern)
R-value: Approximately 2
Weight: Approximately 14 oz
Features: Egg-trap texture
+ Pros
- Lightweight foam
- No inflation needed
- Durable and puncture-proof
- Foldable design
- Affordable price
- Cons
- Less cushiony than air pads
- Bulkier when packed
- Lower R-value than inflatable
I always double up on insulation when cowboy camping by using both a foam pad and an inflatable pad. The combination provides crucial R-value and ensures you don't lose heat to the ground.
Who Should Choose Cowboy Camping?
- Desert campers under clear skies
- Minimalists seeking the simplest possible setup
- Summer campers in stable weather patterns
Who Should Avoid Cowboy Camping?
- Anyone camping where rain is possible
- Campers who feel exposed without overhead cover
- Areas with heavy dew or high humidity
Essential Gear for Tent-Free Camping
Regardless of your shelter method, three pieces of gear form the foundation of any sleep system.
1. Sleeping Bag Temperature Ratings
Your sleeping bag keeps you alive overnight. Always choose a rating 10-15 degrees lower than your expected minimum temperature.
Temperature ratings follow standardized testing (ISO and EN standards). A "20-degree bag" means an average sleeper will stay warm to 20 degrees—not that you will be comfortable at 20 degrees.
I once shivered through a 35-degree night in a 40-degree bag and learned this lesson the hard way. Buy warmer than you think you need.
2. Sleeping Pad R-Value
R-value measures insulation power. Higher numbers mean more warmth from the ground.
- R-value 1-2: Summer camping (above 50degF)
- R-value 3-4: Three-season camping (above 32degF)
- R-value 5+: Winter camping (below freezing)
3. Ground Protection
Even with a tarp or bivy, ground protection extends your gear life and improves comfort.
- Tyvek or polycro: Lightweight sheet material under your pad
- Footprint: Custom-sized ground cloth for your gear
- Painter's tarp: Budget option, cut to size
Tips for Successful Tent-Free Camping
Site Selection
Choosing the right campsite matters more without a tent.
- Look up: Check for dead branches ("widowmakers") that could fall in wind.
- Check drainage: Avoid low spots where water pools during rain.
- Feel the ground: Remove rocks and debris that could puncture gear or ruin sleep.
- Assess wind: Position your shelter opening perpendicular to prevailing winds.
Weather Preparation
Always check weather forecasts before your trip. I use multiple sources and pay attention to:
- Precipitation probability and timing
- Temperature lows (including wind chill)
- Wind speed and direction changes
- Dew point (predicts condensation)
Leave No Trace
Tent-free camping requires extra attention to Leave No Trace principles:
- Camp at least 200 feet from water sources
- Use existing sites when possible
- Avoid damaging vegetation with hammock straps (use wide straps, never rope)
- Pack out all waste and micro-trash
Frequently Asked Questions
Is it safe to camp without a tent?
Camping without a tent is safe when you choose the right method for conditions and prepare properly. Hammock and tarp camping provide reliable weather protection. Cowboy camping should only be attempted with clear skies and stable forecasts. Always carry appropriate insulation and check weather before your trip.
How do you stay dry camping without a tent?
Stay dry by using waterproof gear: rain flies for hammocks, properly pitched tarps, or waterproof bivy sacks. Choose campsites with good drainage and avoid low-lying areas. Orient your shelter to block wind-driven rain. Always keep a dry set of clothes in a waterproof stuff sack for sleeping.
What is cowboy camping?
Cowboy camping is sleeping under the open sky with just a sleeping bag and pad, no overhead shelter. The term comes from ranch hands sleeping on the range. It only works in fair weather with clear skies and mild temperatures. The appeal is maximum simplicity and unobstructed star views.
What is a bivy sack?
A bivy sack is a waterproof, breathable sack that slips over your sleeping bag, creating a minimalist shelter. It blocks wind and rain while allowing moisture to escape, preventing condensation inside. Bivy sacks weigh less than a pound and are popular with ultralight backpackers and alpine climbers.
How do you keep bugs away when camping without a tent?
For hammock camping, use a dedicated bug net that fully encloses the hammock. For tarp camping, wear permethrin-treated clothing and use insect repellent. Choose campsites away from standing water where mosquitoes breed. A headnet provides backup protection when bugs are intense.
What is the best tent alternative for backpacking?
For backpackers, hammocks and tarps are the best tent alternatives. Hammocks excel in forested terrain by keeping you off the ground. Tarps offer the best weight-to-protection ratio and work anywhere. Ultralight tarps can weigh less than a pound while providing adequate storm coverage for solo backpackers.
Final Recommendations
After testing all four methods across three seasons of backpacking, I recommend starting with the approach that matches your terrain and comfort level.
Beginners should start with a basic hammock setup or a simple tarp. Both are forgiving, relatively easy to learn, and provide solid weather protection with practice.
The best method is the one that gets you outside with confidence. Start with fair weather, close to home, and expand your skills gradually. Within a few trips, you will wonder why you ever carried that heavy tent in the first place.