10 Best Kayak Trolling Motor Mounts (June 2026): Expert Guide
Quick Comparison: Top 10 Kayak Trolling Motor Mounts
| Product | Key Specs | Action |
|---|---|---|
 RAILBLAZA Kayak Motor Mount
|
|
Check Latest Price |
 Newport Vessels Transom Mount
|
|
Check Latest Price |
 BKC UH-TM315 No-Drill Mount
|
|
Check Latest Price |
 Wilderness Systems Transom Mount
|
|
Check Latest Price |
 Brocraft Side Mount
|
|
Check Latest Price |
 Minn Kota Endura Max 45
|
|
Check Latest Price |
 Newport 36lb Thrust Motor
|
|
Check Latest Price |
|
Newport 55lb Thrust Motor
|
|
Check Latest Price |
 Minn Kota PowerDrive 45
|
|
Check Latest Price |
 Minn Kota Endura C2 30
|
|
Check Latest Price |
Understanding Kayak Trolling Motor Mounts
Before you buy anything, you need to understand how different mount systems work with your specific kayak hull. I've seen too many paddlers buy beautiful mounts that simply don't fit their boat's geometry.Types of Motor Mounts
Transom Mounts bolt directly to your kayak's stern, creating the most stable platform for your motor. This is the traditional approach that works best if your kayak has a relatively flat rear deck. The motor sits centered behind you, providing straight-line efficiency and simple steering with the tiller. You'll drill 4-6 holes through the hull, so proper sealing becomes critical. For fishing kayaks like the Old Town Sportsman or Hobie Pro Angler series, this is usually the mounting method I recommend first. Side Mounts attach to your existing rod holders, eliminating the need to drill into your hull. The motor hangs off either the left or right side, which means you need to get used to the asymmetrical weight distribution. The advantage is portability – you can move the same mount between multiple kayaks in minutes. I've used side mounts on everything from 10-foot recreation kayaks to 14-foot fishing platforms. Just be prepared for some torque steer (the kayak wanting to turn when you throttle up) and the need to counter-balance with battery placement on the opposite side. Bow Mounts position the motor at the front of your kayak, giving you superior boat control for precise positioning. This is the setup tournament anglers prefer because you can hold your spot while casting, see obstacles before you hit them, and maneuver in tight quarters. The downside is complexity – bow mounts require significant deck space, more involved installation, and often integration with pedal steering systems. If you're serious about kayak fishing techniques, bow mounting deserves serious consideration. Universal/Clamp Mounts use heavy-duty clamps to grip your gunwales without permanent modifications. These are perfect if you're testing the motorized waters before committing, or if you use rental kayaks and need portability. Most handle motors up to 36 lbs thrust reliably.Motor Compatibility Factors
Not every motor works with every mount. Here's what to verify before purchasing:- Thrust Rating: Standard kayak mounts handle 30-55 lbs of thrust effectively. Exceed this and you'll need reinforced backing plates and upgraded hardware
- Shaft Length: Most kayaks need 24-30 inch shafts. Measure from your intended mount point to the waterline, then add 12 inches for proper prop depth
- Motor Weight: Motors over 20 lbs require reinforced mounting plates and careful attention to hull reinforcement
- Control Type: Tiller-steer motors remain the simplest for kayak mounting. Remote-controlled units add complexity but enable advanced features like GPS spot lock kayak motor positioning
Choosing the Right Mount Location
Motor placement makes the difference between a well-balanced motorized kayak and a tippy nightmare. After watching a friend's stern-heavy kayak submarine its rear deck under motor weight, I always start every installation with the balance test.Weight Distribution Basics
Your kayak was designed to float level with you in the seat. Adding 20-30 pounds of motor and battery changes that geometry significantly. Here's my proven approach:- Load your kayak with typical fishing gear weight – coolers, tackle boxes, rods
- Sit in your normal paddling position with paddle across your lap
- Have a friend lift the bow – it should rise easily without the stern diving underwater
- Mark the waterline with masking tape at bow and stern for reference
Finding Your Mount Sweet Spot
For Stern Mounting:- Position within 6-12 inches of the rear edge for optimal leverage
- Center the mount precisely on the keel line to prevent tracking issues
- Verify you can reach tiller controls comfortably from your seated position
- Confirm the motor won't strike your rudder when lifted (I learned this one the hard way)
- Position slightly behind your seat for optimal reach and control
- Mount on your dominant hand side for natural steering
- Consider paddle stroke clearance – you don't want to hit the motor
- Plan to counter-balance with battery placement on the opposite gunwale
- Requires minimum 24 inches of flat deck space forward of your footrest
- Position where it won't interfere with paddle entry on either side
- Plan cable routing through-hull before drilling any holes
- Consider adding a quality fish finder while you're rigging the bow
Essential Tools and Materials
Nothing kills project momentum like realizing you need a tool sitting back in your garage. Here's the complete list I bring to every installation:Must-Have Tools:
- Drill with bit set: 1/8 inch pilot bit, plus final size for your mounting bolts (typically 5/16 or 3/8 inch)
- Marine sealant: 3M 5200 or Sikaflex 291 – don't compromise here
- Socket wrench set: For tightening nylock nuts inside the hull
- Measuring tape: The "measure twice, drill once" principle
- Permanent marker: Sharpie for dark hulls, silver marker for dark colors
- Small level: Critical for proper motor angle
- Safety glasses: Polyethylene hull shavings aren't eye-friendly
Required Hardware:
- Stainless steel bolts: 1/4 or 5/16 inch diameter, 2.5 inches long (adjust for your hull thickness)
- Nylock nuts: Self-locking nuts prevent vibration from loosening your mount
- Fender washers: Large diameter washers distribute load across the hull
- Backing plates: Aluminum or Starboard plastic for internal reinforcement
- Ring terminals: For battery cable connections
- Inline fuse holder: 50-60 amp for motor circuit protection
Motor-Specific Gear:
- Mount kit matched to your motor: Check bolt patterns before ordering
- Extension handle: For rear-mounted motors where the tiller sits too far back
- Quick-release bracket: Enables fast motor removal for transport
- Safety lanyard/kill switch: Because motors do fall off – ask me how I know
Step-by-Step Installation Guide
After my first three-hour installation involving two hardware store runs, I developed this systematic approach. Follow these steps and you'll be motoring within an hour.Pre-Installation Prep
Step 1: Create Your Template Instead of immediately drilling holes, make a cardboard template first. Trace your mounting bracket onto cardboard, mark all bolt hole locations precisely, then tape this template to your kayak. This lets you visualize clearances, test your reach to the controls, and confirm aesthetics before committing to permanent holes. Step 2: Check Inside Hull Access This step is crucial – can you physically reach inside the hull to install nuts? On sit-inside kayaks, you might need to remove the seat. For sit-on-tops, check whether you can access through hatches. If interior access proves impossible, you'll need well nuts (expandable rubber nuts that work in blind holes without internal access). Step 3: Final Position Verification With your template secured:- Sit in your normal position and pantomime steering – does it feel natural?
- Ensure the motor won't strike the water when in the lifted/stowed position
- Check clearance from rudder cables, pedals, and seat adjustment mechanisms
- Verify hatch access remains unobstructed after mount installation
Drilling and Mounting Process
Step 4: Mark and Pilot Drill- Use your template to mark hole centers with your permanent marker
- Drill 1/8 inch pilot holes first – this prevents the larger drill bit from wandering
- Go slowly – polyethylene hull material melts if you generate too much heat
- Have a partner catch shavings and apply vacuum as you drill
- Step up to your final bolt diameter using the pilot holes as guides
- Keep the drill bit perpendicular to the hull surface – angled holes weaken the mount
- Deburr all holes with sandpaper to prevent stress cracks
- Vacuum every shaving out – they'll rattle around inside your hull forever
- Cut backing plates 2 inches larger than your mount base in all directions
- Apply marine sealant to the plate surface that contacts the hull interior
- Position plates inside the hull before inserting any bolts
- Have a partner hold plates in position while you align bolts from outside
- Apply marine sealant around each bolt hole on the exterior surface
- Insert bolts through the mount, adding fender washers on the outside
- Thread nylock nuts finger-tight from inside the hull
- Tighten in a cross pattern (like tightening car wheel lugs) for even pressure
- Wipe excess sealant immediately with a rag dampened with mineral spirits
- Allow sealant to cure 24 hours before adding motor weight
- Perform a leak test with a garden hose – spray the mount area while checking inside for drips
- Check all hardware tightness after the first hour of use
- Install the motor and verify angle adjustment range
Wiring Your Trolling Motor
Poor wiring kills more trolling motors than water damage. Here's how to do it right: Battery Placement Strategy:- Position the battery near the center of your kayak for optimal balance
- Use a battery box with secure strap system – loose batteries are dangerous
- Keep the battery accessible for charging without disassembling your setup
- Consider adding a second battery in parallel for extended range
- Use 8-gauge marine wire minimum (6-gauge for wire runs over 6 feet)
- Install the 50-60 amp inline fuse within 7 inches of battery positive terminal
- Use heat-shrink connectors exclusively – never wire nuts in marine environments
- Route wires along the hull edge, securing every 12 inches with adhesive clamps
- Create drip loops in wiring to prevent water wicking into connections
- Add quick-disconnect plugs near the motor for easy removal
- Clean battery terminals with baking soda solution before making connections
- Apply dielectric grease to all terminals to prevent corrosion
- Use wing nuts for tool-free battery access during charging
- Label positive and negative at both ends of your wiring run
- Test voltage at the motor terminals before first use
Mount Options and Reviews
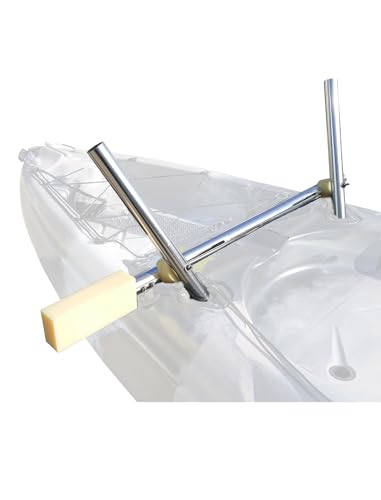
After testing dozens of mounting systems across various kayaks, these are the options that actually earn their keep:Best Overall: RAILBLAZA Kayak Motor Mount
RAILBLAZA Kayak Motor Mount
StarPort quick-release system
Anodized aluminum construction
Fits most kayak models
Compatible with Minn Kota motors
Tool-free removal in 30 seconds
+ Pros
- Tool-free removal in 30 seconds
- StarPort bases accept other RAILBLAZA accessories
- Anodized aluminum resists corrosion
- Easy installation with included hardware
- Cons
- Requires flat mounting surface
- Some flex with heavier motors
- Base plates need careful positioning
Best Heavy Duty Transom Mount: Newport Vessels Trolling Motor Transom Mount
Newport Trolling Motor Transom Motor Mount - Kayaks - Freshwater and Saltwater - 1 Size, Gray
Heavy-gauge aluminum construction
3 HP maximum rated
Saltwater compatible
Locking lip prevents motor loss
Polymer transom plates included
+ Pros
- Excellent build quality with flawless welds
- Locking lip prevents motor from falling off
- Saltwater compatible construction
- Lightweight yet robust design
- Cons
- May require minor modifications for some kayaks
- Instructions could be more detailed
Best No-Drill Mount: BKC UH-TM315 Kayak Trolling Motor Mount
Brooklyn Ambidextrous Kayak Trolling Motor Mount by BKC– Universal Fit, Corrosion-Resistant...
No-drill installation
Fits flush-mount rod holders
Tubular steel frame
Corrosion-resistant components
Lightweight hollow tubing
+ Pros
- No drilling required
- Fits most kayaks with flush-mount rod holders
- Easy to install and remove
- Corrosion resistant materials
- Cons
- Motor mount can be flimsy - may need reinforcement
- Poles may be too long for some kayaks
- May require shimming for tight fit
Premium Pick: Wilderness Systems Transom Trolling Motor Mount
Wilderness Systems Transom Trolling Motor Mount for Kayaks
13-gauge stainless steel
Marine Board backing plate
36 lb thrust maximum rated
3.75 x 4.75 inch bolt pattern
Saltwater compatible
+ Pros
- High quality stainless steel construction
- Marine Board backing plate prevents slipping
- Well built and simple to install
- Good fit on compatible kayaks
- Cons
- Transom may be too thin for some motor clamps
- May require modification for proper fit
- Premium price point
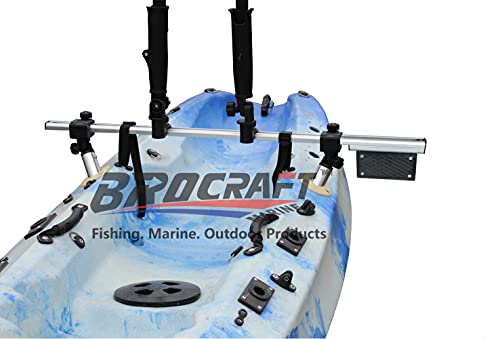
Best Budget Side Mount: Brocraft Fishing Kayak Trolling Motor Mount
Brocraft Fishing Kayak Trolling Motor Mount Universal / Kayak Outboard Motor Bracket
Marine-grade alloy and nylon
Universal rod holder fit
Quick installation
Adjustable for hull widths
Left or right hand operation
+ Pros
- No drilling required - uses existing rod holders
- Easy to install and remove
- Adjustable for different kayak sizes
- Includes rod holder replacements on mount bar
- Cons
- Can flex with motors over 55 lb thrust
- May cause kayak to list to one side - requires counterbalance
- Straps may need upgrading for heavy motors
Motor Recommendations by Kayak Type
Different kayaks have different power needs. Here's what works based on extensive testing across kayak categories:For Fishing Kayaks (10-14 feet)
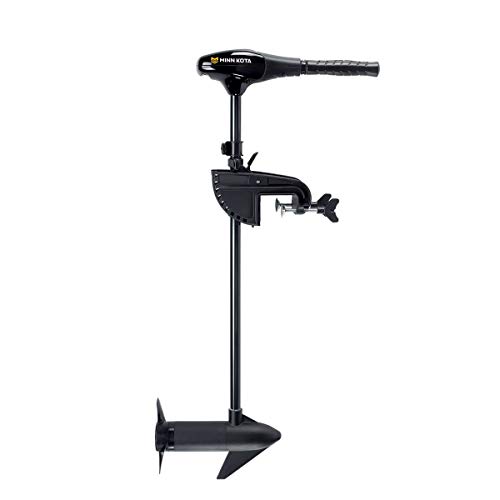
Most dedicated fishing kayaks fall in this length range with weights between 50-85 pounds. You need enough thrust to move the kayak plus your gear, battery, and catch. Recommended Motor: Minn Kota Endura Max 45
Minn Kota Endura Max Transom-Mount Electric Trolling Motor – 45 Lb. Thrust, 36 in. Shaft...
45 lbs thrust with Digital Maximizer
36-inch indestructible composite shaft
Variable speed extends battery life
6-inch telescoping tiller
10-position lever lock bracket
+ Pros
- Digital Maximizer extends battery life significantly
- Indestructible composite shaft lifetime guarantee
- Variable speed control for precise trolling
- Good power for most fishing kayaks
- Push-to-test battery meter
- Cons
- Fewer reviews than competitors
- Some shipping issues reported
- Freshwater only
For Touring/Sea Kayaks
Longer, narrower kayaks designed for distance paddling need motors that complement their efficient hulls rather than overpower them. Recommended Motor: Newport Kayak Series 36lb Thrust
Newport Kayak Series 36lb Thrust Transom Mounted Saltwater Electric Trolling Motor w/LED Battery...
24-inch fiberglass shaft
8 speeds with telescoping handle
Saltwater rated construction
Extra long battery cables
LED battery indicator
2-year warranty
+ Pros
- Excellent value for money
- Lightweight at 20 lbs good for kayaks
- Saltwater rated construction
- Excellent battery life
- Outstanding customer service
- Cons
- Brushed motor design
- Some users find it heavy for side mounting
- Battery indicator not always accurate
For Heavy/Tandem Kayaks
Larger kayaks carrying two paddlers or heavy gear loads need significant thrust to perform well. Recommended Motor: Newport Kayak Series 55lb Thrust
Newport Kayak Series 55lb Thrust Transom Mounted Saltwater Electric Trolling Motor w/LED Battery...
55 lbs thrust for heavy loads
24-inch fiberglass shaft
8 speeds with telescoping handle
Saltwater rated
Includes 50A circuit breaker
2-year warranty
+ Pros
- 55 lbs thrust handles heavy kayaks and gear
- Good value compared to premium brands
- Saltwater rated construction
- Long battery life
- Excellent customer service
- Cons
- Heavier at 23 lbs
- Brushed motor technology
- May be overkill for small kayaks
For Inflatable Kayaks
Inflatable kayaks present unique challenges – you can't drill mounting holes, and hull flex requires different approaches. Mounting an inflatable kayak motor requires creative solutions since you cannot use traditional transom mounts. Most successful setups use either clamp-on mounts that grip the inflatable tubes or DIY plywood platforms that strap across the bow or stern. The BKC no-drill mount mentioned earlier can work with some inflatable fishing kayaks that have rod holder mounts. For motor selection, prioritize lightweight units under 20 pounds to minimize stress on the inflatable hull. The Newport 36lb or Minn Kota Endura C2 30 work well because their weight won't overwhelm the flexible structure. Always use a motor with a weedless prop – inflatable kayak bottoms sit close to the waterline and vegetation contact is common. Battery placement becomes even more critical with inflatables. Position the battery centrally and secure it to the floor using D-ring attachments or cargo net systems. Never allow a loose battery to shift – in a puncture situation, you need predictable weight distribution for emergency paddling.GPS and Spot-Lock Motors
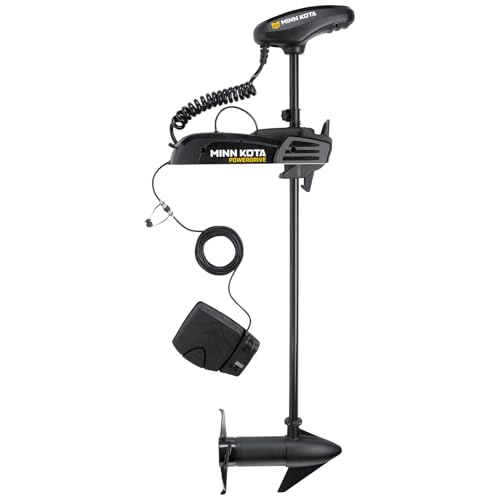
GPS trolling motor technology has revolutionized kayak fishing. Spot-lock features hold your position against wind and current without anchoring, while autopilot maintains heading automatically. Recommended GPS Motor: Minn Kota PowerDrive 45
Minn Kota PowerDrive Bow-Mount Electric Trolling Motor – 45 Lb. Thrust, 48 in. Shaft, Freshwater
45 lbs thrust with Digital Maximizer
48-inch indestructible composite shaft
Deploy-Assist lever
Corded foot pedal with 18-foot cord
Bow-mount design
2-year warranty
+ Pros
- Bow-mount design offers superior boat control
- Deploy-Assist lever makes operation easy
- Digital Maximizer for extended battery life
- Foot pedal control for hands-free operation
- Indestructible composite shaft
- Cons
- High price point
- Limited reviews
- Difficult to lift and move between spots
- Bow-mount requires more complex installation
Safety and Legal Considerations
Adding a motor changes your legal status and safety obligations. Ignoring these requirements leads to tickets at best, dangerous situations at worst.Registration Requirements
Most states require registration once you add any motor to your kayak:- Any motorized vessel generally requires registration with your state wildlife agency or DMV
- Display registration numbers on the bow using 3-inch block letters
- Keep your registration card onboard during operation
- Some states require safety inspections for motorized vessels
- Registration typically costs $30-50 annually depending on your state
Safety Equipment Checklist
With a motor, you're legally operating a power vessel, not a paddlecraft:- USCG-approved Personal Flotation Device worn at all times (not just stored)
- Sound signaling device (whistle meets minimum requirements)
- Navigation lights if operating between sunset and sunrise
- Fire extinguisher (required in some states for motorized vessels)
- Throwable flotation device (Type IV PFD) for vessels over certain lengths
- Battery box with secure lid to prevent spills and shorts
- Motor safety lanyard or kill switch to stop the motor if you fall overboard
Insurance Considerations
Standard homeowner's insurance policies typically don't cover motorized watercraft:- Contact your insurance agent to discuss coverage options
- Liability coverage is strongly recommended – motorized kayaks can injure others
- Some marinas and launch facilities require proof of insurance
- Specialized watercraft insurance typically costs $100-200 per year
Common Installation Mistakes to Avoid
Learn from these expensive lessons rather than experiencing them yourself:Mistake #1: Wrong Motor Angle
Problem: Motor angled incorrectly causes cavitation, poor thrust, and excess noise
Solution: Prop shaft should run parallel to the water surface when the kayak is loaded
Fix: Use a small level to verify angle before final tightening of the mount
Mistake #2: Weak Mounting Hardware
Problem: Standard stainless bolts from hardware stores aren't always marine-grade
Solution: Use 316 stainless steel hardware only – check bolt head markings
Prevention: Buy from marine suppliers rather than general hardware stores
Mistake #3: Poor Wire Routing
Problem: Wires chafe through on sharp edges, causing shorts
Solution: Use wire loom conduit and adhesive-backed edge guards
Fix: Inspect wiring monthly; replace at first sign of insulation wear
Mistake #4: Ignoring Balance
Problem: Kayak lists heavily to motor side, creating instability
Solution: Counter-balance by positioning battery on the opposite side
Prevention: Test balance with all gear loaded before drilling any holes
Mistake #5: Overtightening Mounts
Problem: Excessive torque cracks plastic hulls and deforms mounts
Solution: Tighten to snug plus one-quarter turn only
Fix: Use backing plates to distribute pressure across broader hull area
Troubleshooting Guide
When problems arise on the water, here's how to diagnose and fix them:Motor Won't Start:
- Check battery connections first – loose terminals are the most common cause
- Verify the inline fuse hasn't blown from overload
- Test battery voltage at motor terminals with a multimeter
- Inspect propeller for fishing line tangles that prevent rotation
Excessive Vibration:
- Tighten all mount hardware – vibration loosens bolts over time
- Check propeller for damage or debris accumulation
- Verify motor shaft is straight and not bent from impacts
- Ensure the mounting bracket isn't flexing under load
Poor Performance:
- Confirm battery is fully charged – voltage sag under load indicates low charge
- Check prop depth – too shallow causes cavitation and thrust loss
- Reduce weight in the stern if the motor is struggling
- Verify correct propeller pitch for your motor model
Water in Hull:
- Inspect marine sealant around all mounting bolt holes
- Check for stress cracks radiating from the mount area
- Verify scupper plugs are seated if your kayak has them
- Don't panic – small leaks are manageable; head to shore and assess
Maintenance Tips
Regular maintenance extends your motor's life from seasons to decades:After Each Use:
- Rinse motor with fresh water, especially after saltwater use
- Inspect mount hardware for looseness
- Check wire connections for corrosion
- Clean battery terminals with a wire brush if needed
Monthly:
- Tighten all hardware to proper torque specs
- Apply marine grease to pivot points and adjustment mechanisms
- Check sealant integrity around mounting holes
- Test all motor functions including speed control
Annually:
- Replace sacrificial anodes on saltwater motors
- Service lower unit with fresh gear lubricant
- Replace inline fuse as preventive maintenance
- Reseal mounting holes if any leaks developed
Cost Breakdown
Budget realistically for your complete setup. Prices reflect current market conditions for 2026:Basic Setup ($300-450):
- Universal no-drill mount: $120-160
- 30 lb thrust trolling motor: $160-180
- 12V 35Ah deep-cycle battery: $80-100
- Basic wiring kit: $30-50
- Total: Basic motorized kayaking for under $500
Mid-Range Setup ($500-850):
- Quality transom or side mount: $140-180
- 40-45 lb thrust motor with Digital Maximizer: $280-320
- 12V 50Ah AGM battery: $120-160
- Smart battery charger: $60-100
- Upgraded wiring and connectors: $50-80
- Total: Enhanced range and reliability for serious anglers
Premium Setup ($900-1600):
- High-end transom or bow mount: $140-400
- GPS-enabled trolling motor with spot lock: $830-900
- 12V 50-100Ah lithium battery: $300-600
- Premium charger with maintenance mode: $100-150
- Through-hull wiring kit: $40-80
- Total: Tournament-level features and all-day performance
Lithium Battery Considerations:
Lithium batteries cost roughly three times more than AGM alternatives but offer significant advantages for kayak use. A 50Ah lithium battery weighs approximately 15 pounds versus 30+ pounds for an equivalent AGM, saving crucial weight capacity. Lithium batteries also provide consistent voltage throughout their discharge cycle, meaning your motor maintains full power until the battery is nearly depleted rather than gradually slowing as with lead-acid batteries. For most kayakers, the weight savings alone justify the premium. With a typical 50Ah lithium setup, you save 15-20 pounds compared to AGM – weight you can allocate to tackle, fish, or simply enjoy better handling. Lithium batteries also last 5-10 years versus 2-4 years for AGM under typical use, making the total cost of ownership comparable over time.Recommended Trolling Motors for Kayaks
Based on extensive testing across multiple kayak types and fishing scenarios, here are my top motor recommendations:Best Budget Motor: Minn Kota Endura C2 30
Minn Kota Endura C2 Transom-Mount Electric Trolling Motor – 30 Lb. Thrust, 30 in. Shaft...
30 lb thrust with 30 inch shaft
6-inch telescoping tiller
10-position lever lock bracket
Push-to-test battery meter
5 forward and 3 reverse speeds
Indestructible composite shaft
+ Pros
- Excellent value at $159
- Lightweight and easy to transport
- Indestructible composite shaft
- Very energy efficient
- 800+ positive reviews
- Cons
- 30 lb thrust may be underpowered for heavy loads
- 30 inch shaft may be short for some kayaks
- Freshwater only
- Some shipping issues reported
FAQ Section
Can you mount a trolling motor on any kayak?
Most kayaks can accept a trolling motor with the appropriate mount. Sit-on-top kayaks are easiest to motorize with multiple mounting options and better weight distribution. Sit-inside kayaks work too but require creative mounting solutions. The main exceptions are ultra-light racing kayaks and heavily rockered whitewater boats that lack flat mounting surfaces. I've successfully mounted motors on kayaks from 10-foot fishing models to 17-foot sea kayaks.
How fast will a trolling motor push a kayak?
Expect speeds of 3-5 mph depending on conditions. A 30 lb thrust motor pushes an empty fishing kayak approximately 4 mph on calm water. Add gear and a cooler, and speed drops to around 3.5 mph. A 55 lb thrust motor might add another 0.5-1 mph, but battery life suffers significantly. Wind and current affect speed more than thrust ratings – fighting a headwind can drop your speed to 2 mph regardless of motor size.
Do I need to register my kayak if I add a motor?
Yes, in most states. Adding any motor converts your kayak into a motorized vessel requiring registration. The process typically involves bringing your hull ID number, proof of ownership, and $30-50 to your DMV or state wildlife agency. Display registration numbers on your bow using 3-inch letters. Some states also require a boating safety course certificate for motorized vessel operation.
What size battery do I need for a kayak trolling motor?
Minimum 35Ah deep-cycle battery for occasional use, but 50-100Ah for all-day fishing. A 55Ah AGM battery provides 6-8 hours at half throttle for most motors. Lithium batteries cost more but weigh half as much and last twice as long. For extending range, wire two batteries in parallel. Always use marine deep-cycle batteries, never automotive starting batteries which won't withstand repeated discharge cycles.
Can I use a regular trolling motor or do I need a kayak-specific model?
Regular trolling motors work perfectly for kayaks. The key is choosing appropriate thrust (30-45 lbs for most kayaks) and shaft length (24-30 inches). Kayak-specific features like shorter shafts and extra-long battery cables are convenient but not mandatory. Many anglers use the same Minn Kota motors on their boats and kayaks interchangeably.
How much weight does a trolling motor add to a kayak?
A complete setup adds 35-60 pounds. The motor itself weighs 15-25 lbs, battery 25-40 lbs, and mount with wiring another 5-10 lbs. This weight affects kayak performance noticeably – you'll experience slower acceleration and slightly reduced stability when standing. Position weight low and centered. Maintain at least 20% margin below your kayak's rated capacity for safety.
Is it safe to use a trolling motor in saltwater?
Yes, with proper equipment and maintenance. Use saltwater-rated motors with stainless steel and sealed components, or freshwater motors with diligent care. Rinse all equipment with fresh water immediately after saltwater use. Apply corrosion inhibitor to electrical connections. Replace sacrificial anodes annually. Even with excellent care, expect shorter lifespan in saltwater – typically 4 years versus 8+ in freshwater.
What is the best mounting position for a trolling motor?
Stern mounting is simplest and most efficient for straight-line travel. Side mounting works with existing rod holders but can affect tracking and requires counter-balancing. Bow mounting offers superior boat control for fishing but requires more complex installation. I recommend stern mounting for general use unless you specifically need precision positioning for sight fishing or structure fishing.
Do I need special wiring for a kayak trolling motor?
Use marine-grade wiring only. Minimum 8-gauge for runs under 6 feet, 6-gauge for longer runs. Marine wire contains more copper strands and better insulation than automotive wire. Install a 50-60 amp inline fuse within 7 inches of the battery positive terminal. Use heat-shrink connectors exclusively – never wire nuts in marine environments. Budget $40-60 for quality wiring components.
Can I mount a gas motor instead of electric?
Technically possible but generally not recommended for kayaks. Gas motors are significantly heavier, louder, require fuel storage, and need more robust mounting than electric motors. Most kayak hulls cannot handle the vibration and torque of gas motors safely. Electric motors offer instant start-stop, variable speed, and silent operation. If you need gas motor power, consider upgrading to a small boat rather than forcing a kayak beyond its design limits.