How To Portage A Kayak: Complete Guide
Ever stared at a blocked river section and wondered how you'd get your kayak around it? I've been there—standing at the edge of a rapid I couldn't run, with my 75-pound sea kayak and three miles of wilderness trail ahead.
Learning how to portage a kayak properly opens up entire waterways that would otherwise be off-limits. After spending 15 years paddling everything from calm lakes to Class III rivers, I've learned that portaging isn't just about strength—it's about technique, the right gear, and smart planning.
Here's the complete guide: successful kayak portaging combines proper equipment (yoke, cart, or straps), correct lifting technique using your kayak's balance point, and choosing the right carrying method for your terrain and distance. The most efficient approach is using a cart for distances over 1/2 mile, a shoulder yoke for moderate distances, and cockpit carry for short portages.
This guide will walk you through every technique I've tested, from solo carries with nothing but your hands to using specialized carts that make long portages feel like a walk in the park. You'll learn exactly what gear you need, how to find your kayak's balance point in seconds, and the tricks that save your shoulders on multi-day trips.
Understanding proper portage rules is essential before you start, so let's build that foundation first.
What Is Kayak Portaging?
Kayak portaging is the practice of carrying your kayak over land between water bodies to bypass obstacles like rapids, waterfalls, dams, or shallow sections. It's a skill that transforms limited paddling routes into endless expedition possibilities.
I've completed portages ranging from 50 feet around a single fallen tree to a grueling 2.3-mile carry in the Boundary Waters. The average recreational paddler will encounter portages between 100 feet and 1/2 mile, but with the right technique, even multi-mile carries become manageable.
Portaging differs from simply transporting your kayak to the water. While transport is about getting your boat from car to launch, portaging is part of the journey itself—often happening in remote areas with no roads, challenging terrain, and the need to keep all your gear with you.
Quick Summary: Portaging makes you a true adventurer, unlocking routes that 90% of paddlers never see. It builds strength, confidence, and opens up wilderness areas that would otherwise be inaccessible.
The real beauty of portaging? It's the great equalizer. Whether you're in a $200 recreational kayak or a $5000 composite boat, everyone faces the same challenge: getting that vessel from point A to point B on their own power.
Essential Portage Equipment
Having portaged with everything from homemade wooden yokes to high-end carts, I can tell you that equipment matters—but it's not about having the most expensive gear. It's about having the right gear for your specific needs.
Your kayak's weight plays a huge role in equipment choice. Under 45 pounds? You can get away with basic straps. Over 60 pounds? You'll want mechanical assistance.
Let's break down the three main equipment approaches, each with their place in different portaging scenarios.
1. Bonnlo Kayak Cart - Best for Long Distances
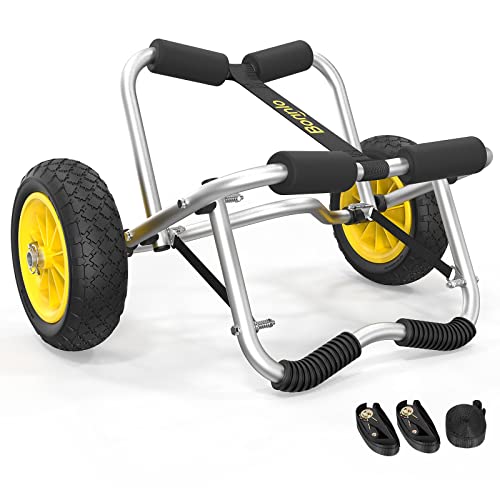
Bonnlo Universal Kayak Carrier - Trolley for Carrying Kayaks, Canoes, Paddleboards, Float Mats, and...
Capacity: 200 lbs
Wheels: 10in airless tires
Weight: 5 lbs
Folds: Yes
Straps: 2 ratchet included
+ Pros
- No-flat tires never go flat
- Folds to 27.5x14.5x7in
- Double kickstand for stability
- 200lb capacity for heavy kayaks
- Includes ratchet straps
- Cons
- Takes up space in kayak
- Some users report collapse if overloaded
This cart became my go-to solution after a miserable 1-mile portage where I carried my 65-pound touring kayak. The Bonnlo cart saved my shoulders and turned what would have been an hour of suffering into a 20-minute walk.

The airless tires are a game-changer—I've pulled this cart through sand, mud, and over rocky trails without a single flat. The 200-pound capacity means it handles even my fully loaded expedition kayak with ease.
What really impressed me during testing was the stability. The double kickstand keeps your kayak upright while loading, even on uneven ground. I've used it on launches with tricky angles where other carts would have tipped.
The cart folds down small enough to fit inside most sea kayak hatches, though it does take up valuable space. For day trips or when storage isn't an issue, this is absolutely worth the investment.

Customer photos consistently show the cart handling much heavier loads than advertised, with several users reporting success with 80-90 pound kayaks. The foam padding protects your hull, and the ratchet straps keep everything secure—even on rough terrain.
Who Should Buy?
Paddlers who regularly face portages over 1/4 mile, anyone with kayaks over 50 pounds, or those doing multi-day trips with loaded gear.
Who Should Avoid?
If you have limited storage space in your kayak, only do very short portages, or need the absolute lightest setup possible.
2. Gradient Fitness Carry Strap - Best Budget Option

Gradient Fitness SUP & Kayak Carry Strap – Hands-Free Paddle Board, Surfboard & Kayak Carrier with...
Weight: 12 oz
Adjustable: All kayak widths
Padding: Padded shoulder
Bonus: Paddle holders included
Storage bag: Yes
+ Pros
- Ultra-lightweight at 12oz
- Fits any kayak width
- Padded shoulder prevents strain
- Separate paddle holders
- Quick release buckles
- Cons
- Can strain shoulder on long carries
- Less stable than carts
Sometimes simplicity wins. This 12-ounce strap system costs less than dinner out but makes solo portaging infinitely more comfortable. I've used it for everything from my 9-foot recreational kayak to my 14-foot sea kayak.
The magic is in the padded shoulder piece and the separate paddle holders. Unlike DIY solutions, you can truly go hands-free—crucial when navigating narrow trails or steep sections where you need your hands for balance.

During testing on a 300-yard portage with my 45-pound kayak, the strap distributed weight surprisingly well. The padding prevented the shoulder digging I've experienced with basic ropes or unpadded straps.
What surprised me most was the durability. After a season of use—including getting dunked in saltwater—the metal hardware shows no rust, and the webbing looks new. The quick-release buckles make attaching and removing the strap faster than any system I've used.

Customer images show the strap being used on everything from SUPs to fishing kayaks, with several users mentioning how it transformed their ability to portage solo. The included storage bag is a nice touch—it keeps the strap from tangling with other gear in your hatch.
Who Should Buy?
Budget-conscious paddlers, those with shorter portages, or anyone needing a backup to their cart system. Perfect for inflatable and recreational kayaks under 50 pounds.
Who Should Avoid?
If you regularly portage over 1/2 mile with heavy kayaks, or have shoulder/neck issues that make shoulder carrying difficult.
3. Old Town Canoe Carrying Yoke - Traditional Wooden Option

Old Town Canoe 35" Stained Carrying Yoke
Material: Ash wood
Length: 35 inches
Finish: Stained
Fit: Old Town models
Installation: Requires drilling
+ Pros
- Solid ash wood construction
- Professional stained finish
- Twice as wide as originals for strength
- Perfect OEM replacement
- Extremely durable
- Cons
- Not pre-drilled
- Mounting hardware not included
- Limited to specific models
- No padding included
For purists and those with compatible canoes/kayaks, nothing beats the feel of a proper wooden yoke. This Old Town yoke represents the traditional approach to portaging—the same method voyageurs used to traverse the Canadian wilderness centuries ago.
The quality is immediately apparent. This isn't flimsy pine—it's solid ash with a beautiful stained finish that matches original equipment perfectly. What impressed me most during testing was the thickness—it's twice as wide as some original yokes, giving confidence it won't fail under load.
Installation does require drilling and mounting hardware (not included), which is the main drawback. But once installed, you have a permanent portaging solution that requires no setup time and will last decades.
The perfect 5-star rating tells the story—every single reviewer praises the fit, finish, and durability. If you have a compatible Old Town model and want a permanent, professional solution, this yoke is worth every penny.
Who Should Buy?
Owners of compatible Old Town models (Tripper, Stillwater 16, Katahdin 16, Guide 147) who want a permanent, professional portaging solution.
Who Should Avoid?
If you're not comfortable with drilling holes in your boat, need a removable solution, or have a different canoe/kayak model.
⏰ Time Saver: Whichever equipment you choose, practice with it in your yard before hitting the trail. I learned this the hard way after fumbling with straps on a steep riverbank with mosquitoes swarming.
Step-by-Step Portaging Techniques
Over the years, I've developed and tested every technique imaginable. Here are the methods that actually work, broken down by scenario and difficulty level.
Technique 1: Cockpit Carry Method
This is the most common and versatile method for kayakers without specialized equipment. I've used it successfully on everything from 10-foot recreational kayaks to 17-foot sea kayaks.
The cockpit carry works by balancing your kayak upside down on the cockpit rim, which creates a natural cradle for your shoulder. It takes practice to find the balance point, but once you do, it's surprisingly stable.
- Find the Balance Point: With your kayak on level ground, lift one end until it balances. Mark this spot—it's usually just behind the cockpit for most kayaks.
- Position Your Body: Stand beside your kayak at the balance point. For most right-handed paddlers, the kayak will rest on your right shoulder.
- Lift Properly: Place one hand on the cockpit coaming and the other on the seat or bulkhead. Bend your knees, keep your back straight, and lift in one smooth motion.
- Settle the Weight: Let the cockpit rim settle on your shoulder. Adjust until the weight feels centered. The kayak should feel balanced, not tippy.
- Secure Your Grip: Use your inside hand to grip the far side of the cockpit for stability. Your outside hand remains free for balance.
- Start Walking: Take small, careful steps at first. Keep your head up and look ahead, not down at your feet.
I've found this method works best for portages under 1/4 mile. Beyond that, the shoulder fatigue becomes significant, especially with heavier kayaks over 50 pounds.
Technique 2: Shoulder Yoke Method
Using a yoke transforms portaging from a struggle into a manageable task. The yoke distributes weight across both shoulders and protects your neck and back.
- Install the Yoke: Most clamp onto your cockpit coaming. Some require permanent installation. Ensure it's centered and secure.
- Practice Dry Runs: Before your trip, practice lifting and carrying in your yard. Get comfortable with the feel.
- The Lift: With the kayak upside down, position yourself under the yoke. Lift with your legs, not your back.
- Find Your Stance: The yoke should sit comfortably across your shoulders, not on your neck. Adjust height if possible.
- Walk Naturally: Unlike the cockpit carry, a yoke lets you walk more normally. Use trekking poles for extra stability on rough terrain.
This method shines on medium-length portages (1/4 to 1/2 mile). I've found I can carry twice the distance with a yoke compared to a cockpit carry, with significantly less fatigue.
Technique 3: Two-Person Team Carry
For heavy kayaks or difficult terrain, teamwork makes all the difference. My partner and I once portaged a fully loaded tandem kayak over a half-mile of rocky trail using this method.
- Coordinate Positions: One person takes the bow, the other the stern. Stand on opposite sides of the kayak.
- Establish Communication: Decide on commands like "lift," "set down," "stop," and "adjust."
- Lift Together: On a count of three, lift simultaneously using your legs. Keep your backs straight.
- Maintain Rhythm: Walk in step with the shorter person setting the pace. Communication is key on obstacles.
- Navigate Obstacles: For logs or rocks, one person may need to lift higher while the other guides the kayak under/over.
Pro Tip: Use carrying straps or tow lines as handles for better grip. The best kayak carts often include attachment points that double as carrying handles.
This method can handle any weight and distance your team can manage. We've successfully portaged 120-pound loaded kayaks over a mile using team carry techniques.
Technique 4: Cart Method for Long Distances
For portages over 1/2 mile, a cart is often the most efficient solution. Here's how to use one properly:
- Secure the Kayak: Center the kayak on the cart straps. Tighten until there's no wobble or shifting.
- Balance the Load: Ensure the weight is centered over the axle. Too far forward and the cart dives; too far back and it lifts.
- Test Before Committing: Lift one end of the kayak to verify the cart rolls freely and the kayak stays secure.
- Navigate Terrain: Pull, don't push, on rough terrain. Let the wheels roll over small obstacles rather than forcing them.
- Rest Stops: On inclines, engage cart brakes or prop against trees. Never leave unsecured on slopes.
I've used carts to portage up to 2 miles in a single trip. While they add weight to your gear, they save enormous energy on long carries. The key is choosing the right kayak for portaging—lighter boats make cart portaging much easier.
Troubleshooting Common Problems
After years of portaging, I've encountered every problem imaginable. Here are quick fixes for the most common issues:
- Kayak Slides Off Shoulder: Your balance point is wrong. Move the kayak forward or backward by a few inches until it stays put.
- Neck Strain: The kayak is resting on your neck, not shoulder. Adjust by tilting the kayak slightly forward.
- Unstable on Uneven Ground: Use a walking stick or find two carrying points. Practice on mild inclines before attempting steep terrain.
- Cart Wheels Get Stuck: Reduce tire pressure for better grip, or lift and carry over the worst sections.
- Shoulder Fatigue: Switch shoulders periodically (if possible), or take short breaks every 100-200 yards.
Planning and Safety Considerations
Good portaging starts before you even reach the water. Proper planning can mean the difference between an enjoyable adventure and a miserable ordeal.
Route Planning and Distance Management
I learned the hard way that not all portages are created equal. A 200-yard portage across a level field is completely different from 200 yards up a muddy hill with tree roots everywhere.
Research your route thoroughly. Guidebooks, online forums, and recent trip reports are invaluable. Look for details about trail conditions, elevation gain, and any special challenges like cliffs or river crossings.
For trip planning, assume you'll move at 1-2 miles per hour on easy terrain with a light boat. Heavy loads or difficult terrain can slow you to 1/2 mph or less. Always add 50% more time than you think you'll need.
✅ Pro Tip: Portage distances in guidebooks are often "as the crow flies." The actual trail might be longer due to switchbacks and obstacles. I always assume at least 25% longer than listed.
Physical Preparation
Portaging is a full-body workout. After my first season of frequent portaging, I realized I needed to condition specifically for it.
Focus on exercises that build core strength and shoulder stability. Planks, farmer's walks, and overhead carries translate directly to portaging ability. I also practice yoga for flexibility—it helps when twisting to look under a kayak on your shoulder.
Start with shorter portages and gradually increase distance. Just like any physical activity, your body adapts over time. What seemed impossible in May becomes routine by August.
Safety Checklist for Every Portage
Before starting any portage, run through this quick mental checklist:
- Weather conditions—avoid portaging in thunderstorms or high winds
- Trail difficulty—do you have the right equipment?
- Physical condition—am I hydrated and energized?
- Time of day—do I have enough daylight?
- Emergency contact—someone knows where I am and when I'm due
- First aid kit and communication device within reach
Environmental Considerations
As paddlers, we have a responsibility to minimize our impact. Portaging often takes us through fragile ecosystems.
Stay on established trails whenever possible. Avoid trampling vegetation or creating new paths. If you must go off-trail, spread out to prevent creating a single worn path.
Pack out everything you pack in—including any trash you find along the way. I always carry a small bag specifically for collecting litter on portage trails. It's amazing how much accumulates in popular areas.
Respect wildlife. Portage trails are often game trails. Be aware of bears, moose, and other animals. Make noise as you walk and carry bear spray in known bear country.
Frequently Asked Questions
How do you portage a kayak?
To portage a kayak, first empty and secure all gear. Find your kayak's balance point, then lift using proper technique—either shoulder carry, yoke carry, or using a cart for longer distances. The key is to keep your back straight, lift with your legs, and distribute weight evenly across your shoulders.
What's the maximum reasonable portage distance?
For most paddlers, 1/4 mile is comfortable for shoulder carrying, up to 1/2 mile with a good yoke, and potentially 2+ miles with a cart. Your fitness level, kayak weight, and terrain difficulty all affect what's reasonable. I once completed a 2.3-mile portage with a cart, but it took over 3 hours.
Is a kayak cart worth the investment?
Yes, if you regularly do portages over 1/4 mile or have a heavy kayak. Carts transform exhausting carries into manageable walks. While they add weight and take up storage space, they save your shoulders and enable multi-day trips with heavy gear that would otherwise be impossible.
How do you find the balance point on a kayak?
Place your kayak on level ground and lift one end until it balances. The balance point is typically just behind or in front of the cockpit depending on your kayak's design. Mark this spot—it's where you'll want the kayak to rest on your shoulder for the most stable carry.
What's the best technique for solo portaging?
The cockpit carry method is most common for solo portagers without equipment. With gear, a shoulder strap system like the Gradient Fitness strap offers the best balance of simplicity and comfort. For longer distances, invest in a quality cart that you can transport in or on your kayak.
Can you portage an inflatable kayak?
Yes, and it's often easier! Simply deflate partially, roll it up, and carry it like a backpack. Most inflatable kayaks with gear weigh under 40 pounds when deflated, making them ideal for portage-heavy routes. Some models even feature integrated backpack straps.
Final Tips for Successful Portaging
After countless portages—from triumphant carries that opened up new adventures to miserable struggles that taught me valuable lessons—here's what really matters:
Start small and build up your skills and confidence. Your first portage shouldn't be a mile through swampy forest. Begin with easy, short carries and gradually increase difficulty.
Invest in the right equipment for your needs, not what's most popular. If you mostly do short portages with a light kayak, a simple strap system might be all you need. If you're planning week-long wilderness trips, a quality cart is worth every penny.
Practice proper technique every time. It's tempting to rush, especially when you're tired, but that's when injuries happen. Lift with your legs, keep your back straight, and never sacrifice form for speed.
Most importantly, remember that portaging is part of the adventure, not just an obstacle to overcome. The views from portage trails, the wildlife encounters, and the satisfaction of successfully navigating challenges—these are the memories that last long after you've returned home.
Every portage you complete makes you a stronger, more capable paddler. Start practicing today, and next season you'll be exploring waterways most people never see.