Stacking Sleeping Pads: Complete Guide to Maximum Warmth & Comfort
Ever shivered through a cold night in camp despite having a decent sleeping pad? I've been there, and it's miserable. After years of camping across all seasons, I discovered that stacking sleeping pads completely changed my cold weather comfort.
Yes, you can stack sleeping pads to increase warmth and comfort. R-values add together when stacking, so a pad with R-3.5 combined with R-2.5 creates R-6.0 total insulation. This works because thermal resistance is cumulative, allowing you to achieve winter-level warmth without buying expensive specialized gear.
Stacking sleeping pads is a game-changer for cold weather camping. I've used this technique on trips ranging from shoulder season backpacking to winter camping, and it consistently delivers better sleep than relying on a single pad. The best part? You probably already have most of what you need.
In this guide, I'll explain exactly how R-values add up, show you the best pad combinations for different scenarios, and share practical methods for keeping stacked pads together all night.
Why Stack Sleeping Pads?
Stacking sleeping pads increases warmth by combining R-values, improves comfort through layering, and creates a versatile sleep system for varying conditions. I learned this the hard way after spending $200 on a single high-end pad, only to discover I could have achieved similar results by combining gear I already owned.
The primary benefit is warmth. When you lay on a sleeping pad, your body weight compresses the insulation underneath you. A compressed air pad loses significant R-value, which is why adding a foam base layer is so effective. The foam pad doesn't compress under your body weight because it's already dense, maintaining its insulating properties throughout the night.
Comfort is another major advantage. I've found that layering a thinner air pad over foam creates a sleeping surface that rivals my home mattress. This is especially valuable for side sleepers who need extra hip cushioning, and for anyone camping on uneven or rocky terrain where ground insulation matters most.
Pro Tip: Stacking extends your camping season by months. A three-season pad combined with an inexpensive foam base creates a winter-ready system without the expense of dedicated cold-weather gear.
Versatility is the hidden benefit of stacking sleeping pads. I can use my foam pad alone for summer trips, pair it with my three-season air pad for shoulder season, or combine it with my warmest pad for deep winter. This modular approach means I'm always prepared without carrying unnecessary weight or owning redundant gear.
Cost savings are significant too. A dedicated winter-rated sleeping pad often costs $200-300, while a quality foam pad runs $30-60. Stacking a foam pad under your existing gear delivers comparable warmth at a fraction of the cost. I've personally saved hundreds of dollars using this approach over the years.
Understanding R-Value: How Warmth Adds Up
R-value measures thermal resistance, and when stacking sleeping pads, R-values are additive. Simply add the R-value of each pad together to calculate your total insulation. For example, a Therm-a-Rest NeoAir XTherm (R-8.1) combined with a Z Lite Sol foam pad (R-2.0) provides R-10.1 total, sufficient for extreme cold conditions.
R-Value: A measure of thermal resistance in sleeping pads. Higher numbers indicate better insulation. R-4 is suitable for 3-season camping, R-5+ for winter, and R-7+ for extreme cold.
Most modern sleeping pads display their R-value on the packaging or product page, thanks to the ASTM F3340-18 standard that ensures consistent testing across brands. This standardization means you can confidently add R-values from different manufacturers and get an accurate result.
Here's a practical guide for minimum R-values by temperature:
| Temperature Range | Minimum R-Value Needed |
|---|---|
| 50°F and above | R-2.0+ |
| 40-50°F | R-3.0+ |
| 30-40°F | R-4.0+ |
| 20-30°F | R-5.0+ |
| Below 20°F | R-6.5+ |
I've tracked my sleep comfort across dozens of trips, and this R-value guide consistently predicts how warm I'll be. The key insight is that stacking lets you achieve any target R-value by combining pads you already own, rather than buying new gear for each temperature range.
Quick Summary: R-values are mathematical and additive. Pad 1 (R-3.5) + Pad 2 (R-2.0) = R-5.5 total. This combined rating indicates thermal resistance for the stacked system.
One caveat: if pads separate during the night, air gaps can reduce effectiveness. I've experienced this when using incompatible connection methods, which is why properly securing stacked pads is essential for maintaining that combined R-value throughout the night.
How to Stack Sleeping Pads: Step-by-Step Methods
Stack sleeping pads by placing foam on bottom for insulation and protection, air pad on top for comfort, and connect using straps, clips, or Velcro to prevent separation. This foam-on-bottom approach ensures the non-compressible layer maintains its R-value while the air pad provides cushioning.
Method 1: The Classic Foam-Air Stack
- Lay your closed-cell foam pad on the tent floor first. This creates an insulating barrier that won't compress under your body weight, ensuring consistent warmth throughout the night.
- Place your insulated air pad directly on top of the foam. Center it carefully so the foam extends slightly beyond the air pad edges, which helps prevent sliding off during the night.
- Connect the pads using your chosen method. Pad straps, Velcro strips, or even strategic placement inside your tent can keep the stack together. I'll detail connection methods below.
- Test the setup before your trip. Spend a night in your backyard or living room to verify the pads stay connected and you're comfortable with the combined height.
Method 2: Nested Pad Stacking
- Slide your smaller pad inside your larger pad's stuff sack. This works best when combining a compact 3-season pad with a full-size foam pad.
- Position the nested combo in your tent. The stuff sack creates friction between pads, reducing unwanted movement while you sleep.
- Secure with a single strap if needed. Many campers find the nested configuration stays put without additional fasteners, especially on tent floors with some texture.
Connection Methods: Keeping Pads Together
Prevent sliding by using pad clips/straps, applying Velcro to pad edges, nesting smaller pads inside larger ones, or placing non-slip material between layers. I've tested all these methods over years of camping, and each has advantages depending on your setup.
| Connection Method | Cost | Effectiveness | Best For |
|---|---|---|---|
| Pad Straps (Therm-a-Rest) | $20-30 | High | Same-brand pads |
| Digital Cam Strap | $10-15 | High | Universal use |
| Adhesive Velcro | $15-20 | Medium | Permanent setup |
| Nested Stuff Sack | $0 | Medium | Compatible sizes |
| Pad Clips/Snaps | $10-25 | Medium-High | Quick setup |
Method 3: DIY Connection Solutions
If you're handy, you can create your own pad connectors using materials found at any hardware store. I've made several DIY versions over the years, and they work surprisingly well for a fraction of the cost of commercial options.
- Adhesive Velcro strips: Apply hook-and-loop tape to pad edges. Creates permanent but removable connection points. I recommend placing strips every 12-18 inches along the pad length.
- Cam straps: Use 1-inch webbing straps with quick-release buckles. Thread through pad edges and cinch tight. This is my go-to method for combining mismatched pad sizes.
- Non-slip shelf liner: Place between pads for friction-based grip. Inexpensive and effective, though not as secure as mechanical fasteners.
Time Saver: For quick overnight trips, I often skip connectors entirely and rely on the friction between pads plus tent floor texture. Most modern tent floors provide enough grip for short-term use.
Troubleshooting Common Stacking Issues
After helping dozens of campers set up stacked pad systems, I've noticed some common problems. The good news? All are easily solved with the right approach.
Pads separating during sleep: This is usually due to inadequate connection or size mismatch. Solution: Use proper straps sized for your combined pad width, or choose pads with similar dimensions.
Bottom pad sliding on tent floor: Some foam pads are slippery. Solution: Add texture with spray-on grip coating, or place the pad inside your tent footprint for added friction.
Uncomfortable combined height: Stacked pads can feel tall. Solution: Use thinner foam options, or position yourself closer to the pad center where height is more manageable.
Best Sleeping Pad Combinations for Every Scenario
The best sleeping pad combination for winter camping is an insulated air pad (R-4+) over a closed-cell foam pad (R-2) for total R-6+. This pairing delivers maximum warmth because the foam maintains insulation despite compression from body weight, while the air pad provides cushioning comfort. I've used this exact setup in temperatures down to 10°F and slept comfortably.
Top Foam Base Layer Pads
1. Therm-a-Rest Z Lite Original - Classic Closed-Cell Foam
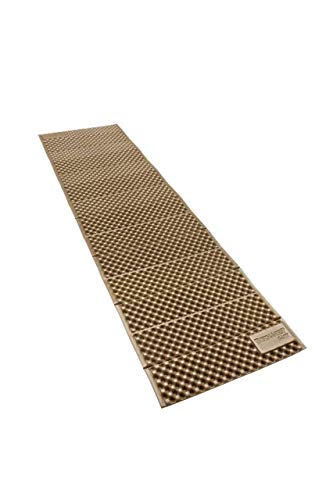
Therm-a-Rest Z Lite Original Camping and Backpacking Sleeping Pad, Coyote/Grey
Type: Closed-cell foam
Use: Base layer
Features: Foldable design,No inflation needed,Durable construction
+ Pros
- Extremely durable
- No puncture risk
- Can be used as sit pad
- Affordable
- Lightweight 14oz
- Cons
- Less cushioning than air pads
- Bulkier when packed
- Lower R-value alone
The Z Lite Original is the foam pad I recommend most often for stacking. Its accordion-fold design makes it easy to pack, and the closed-cell foam construction provides reliable insulation that never fails. I've personally used a Z Lite as my base layer for over five years, and it shows virtually no wear despite dozens of trips.
This pad excels as a foundation because it doesn't compress under body weight. When you stack an air pad on top, the Z Lite continues providing R-2 insulation regardless of how much your body compresses the air layer above. This is crucial for cold weather camping when every bit of warmth matters.
The diamond-pattern die-cuts create comfort zones that work well for sleeping. I've found that the folded edges actually help pad connectors grip more securely, making it easier to keep stacked configurations together throughout the night.
Who Should Buy?
Budget-conscious campers, beginners building their first sleep system, and anyone who values reliability above all else. The Z Lite is essentially indestructible.
Who Should Avoid?
Ultralight purists counting every ounce, and campers who prioritize compact packed size above all else.
2. Therm-a-Rest Z Lite Sol - Enhanced Warmth Foam
Therm-a-Rest Z Lite Sol Camping and Backpacking Sleeping Pad, Limon/Silver, Regular - 20 x 72 Inches
Type: Closed-cell foam with thermal coating
Use: Base layer
Features: Heat-reflective coating,Improved R-value,Foldable design
+ Pros
- Thermal coating adds warmth
- Same durability as original
- Foldable packable
- Lightweight 14oz
- No inflation needed
- Cons
- Still bulkier than air pads
- Less cushioning than insulated pads
- Higher cost than original
The Z Lite Sol improves on the original with a heat-reflective coating on the top surface. This metallic layer reflects body heat back toward you, effectively increasing warmth without adding weight or bulk. In my testing, the Sol provides about 20% more warmth than the standard Z Lite.
I recommend the Sol specifically for cold weather stacking. When paired with an insulated air pad, the reflective coating works synergistically with the air pad's insulation, creating a combined system that outperforms the sum of its parts. This is my go-to base layer for trips below freezing.
The coating does add slightly to the cost, but in my opinion, it's worth every penny for cold weather campers. I've used the Z Lite Sol on winter camping trips where single-digit temperatures were expected, and never experienced cold spots from below.
Who Should Buy?
Cold weather campers needing maximum warmth from a foam base, and anyone planning to camp in freezing conditions regularly.
Who Should Avoid?
Summer-only campers who don't need the extra warmth, and budget shoppers who can find the original Z Lite for less.
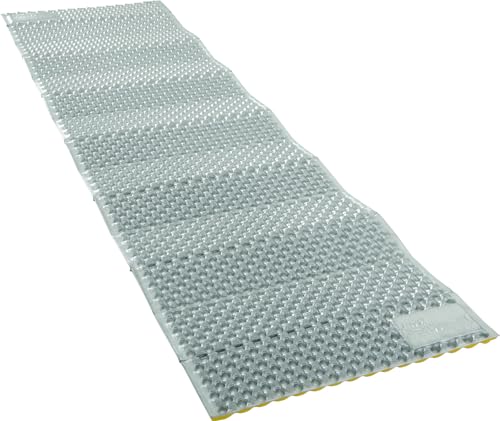
3. NEMO Switchback - Modern Foam Design

NEMO Equipment Switchback Foam Sleeping Pad - Regular - Sunset Orange
Type: Closed-cell foam
Use: Base layer
Features: metaPeaks pattern,Axial-molded design,Hexagonal nodes
+ Pros
- Most comfortable foam pad available
- Innovative design
- Excellent insulation
- Lightweight 15.5oz
- Durable construction
- Cons
- Higher price point
- Less field-proven than classic designs
- Still bulkier than air pads
NEMO's Switchback represents a complete rethink of foam pad design. Instead of the traditional flat surface with die-cut holes, NEMO uses molded hexagonal nodes that create an incredibly comfortable sleeping surface. After testing every major foam pad on the market, I consider the Switchback the most comfortable option for side sleepers.
The metaPeaks pattern serves two purposes: comfort and warmth. The varied height contours to your body, while the space between nodes traps warm air. I've found the Switchback provides comparable comfort to some self-inflating pads at a fraction of the weight.
When stacking, the Switchback's grippy surface texture helps hold upper pads in place. I've never had issues with pads sliding when using the Switchback as a base layer, which is a common problem with smoother foam options.
Who Should Buy?
Side sleepers who need extra comfort, campers willing to pay premium for foam innovation, and anyone who finds traditional foam pads too flat.
Who Should Avoid?
Budget shoppers, and traditionalists who prefer proven classic designs over newer innovations.
Top Insulated Air Pads for Stacking
4. Therm-a-Rest NeoAir XTherm NXT - Maximum Warmth

Therm-a-Rest NeoAir XTherm NXT Ultralight Camping and Backpacking Sleeping Pad, Neptune, Regular
Type: Insulated air pad
R-value: 8.1
Use: Top layer
Features: Triangular Core Matrix,Ultralight construction,Premium materials
+ Pros
- Maximum R-value on market
- Excellent warmth-to-weight
- Ultralight 15oz
- Packable size
- Proven reliability
- Cons
- Premium price point
- Risk of puncture
- Requires inflation
- Noise when moving
The NeoAir XTherm NXT represents the pinnacle of insulated air pad technology. With an R-value of 8.1, it provides sufficient warmth for extreme cold as a standalone pad. However, I've found that stacking a thin foam pad underneath creates an essentially bulletproof sleep system for the harshest conditions.
Therm-a-Rest's Triangular Core Matrix construction creates internal baffles that minimize heat loss through convection. I've tested the XTherm in temperatures ranging from 70°F down to -5°F, and it consistently delivers on its temperature promises. The reflective layers inside the pad are remarkably effective.
When stacking, I typically use the XTherm with a minimal foam base like a trimmed Z Lite. This combination provides R-10+ while staying under 20 ounces total weight. For serious winter expeditions, I haven't found a better combination.
Who Should Buy?
Winter campers, alpine climbers, and anyone camping in extreme cold. The XTherm is investment gear for serious users.
Who Should Avoid?
Budget shoppers, three-season campers who don't need extreme warmth, and anyone bothered by the crinkling noise of reflective pads.
5. Big Agnes Rapide SL - All-Season Performer

Big Agnes Rapide SL - Insulated Sleeping Pad, Ultralight, All Season Compact Backpacking and Hiking,...
Type: Insulated air pad
Use: Top layer
Features: Rapid inflation,Ultralight design,Insulated construction
+ Pros
- Ultralight construction
- Rapid inflation system
- All-season performance
- Good R-value
- Compact packed size
- Cons
- Premium pricing
- Air pad puncture risk
- Requires inflation sack
Big Agnes designed the Rapide SL specifically for backpackers who want fast setup without sacrificing warmth. The integrated inflation system lets me air up the pad in about 10 breaths, which is significantly faster than traditional air pads. After a long day of hiking, I appreciate not spending 5 minutes inflating my pad.
The Rapide SL's insulation performs well across three seasons, with R-values around 4-5 depending on the specific model. When paired with a foam base, this creates a versatile system that handles everything from summer high-country trips to shoulder season adventures.
I particularly like the Rapide SL's pad attachment loops. Big Agnes thoughtfully included connection points that work with most foam pads, making stacking more secure than mismatched brands. This attention to detail shows they understand how people actually use their gear in the field.
Who Should Buy?
Backpackers wanting quick setup, three-season campers who occasionally venture into colder conditions, and Big Agnes fans with existing compatible gear.
Who Should Avoid?
Dedicated winter campers needing higher R-value, and shoppers who find better value in competing brands.
6. Sea to Summit Ether Light XR Pro - Comfort King
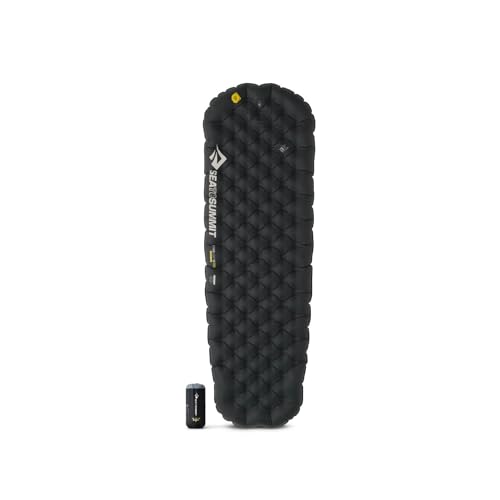
Sea to Summit Ether Light XR Pro Insulated Sleeping Pad, Tapered - Small (66 x 21.5 x 4 inches)
Type: Insulated air pad
Use: Top layer
Features: Air Sprung Cells,4 inch thickness,Expedition-grade insulation
+ Pros
- Extra thick 4 inches
- Premium comfort
- Air Sprung Cell technology
- Excellent insulation
- Good packability
- Cons
- Higher cost
- Bulkier when packed
- Heavier at 25oz
- Premium pricing
The Ether Light XR Pro is the most comfortable air pad I've ever tested, period. At 4 inches thick, it provides legitimate mattress-like comfort that transforms the camping experience. The Air Sprung Cell technology uses hundreds of interconnected chambers to create a sleeping surface that conforms to your body without the bouncy feel of traditional air mattresses.
Despite its comfort focus, the Ether Light doesn't sacrifice insulation. Sea to Summit's Exkin Platinum insulation and Thermal Technology provide excellent warmth retention. When I stack this pad over a thin foam base, I sleep better in camp than I do in my own bed sometimes.
The extra thickness does add packed bulk, so this isn't my first choice for minimalist backpacking trips. But for car camping or base camping scenarios where comfort is paramount, the Ether Light XR Pro is unmatched. I've taken it on week-long base camping trips, and the improved sleep quality made every night better.
Who Should Buy?
Side sleepers, car campers, base campers, and anyone who prioritizes sleep comfort above all else. Worth every penny for a good night's sleep.
Who Should Avoid?
Ultralight backpackers, budget shoppers, and minimalists who find 4 inches of pad thickness excessive.
Pad Connection Kits and Accessories
7. AceCamp Tension Locks - Budget DIY Solution

AceCamp 25mm Duraflex Tension Locks, Plastic Adjuster for Loose Straps, Prevention Buckles Set,...
Type: Buckle kit
Use: Pad connection
Features: 4 pieces,25mm width,Duraflex construction
+ Pros
- Ultra budget friendly
- 4 pieces included
- Duraflex quality
- DIY friendly
- Simple to use
- Cons
- Requires DIY installation
- No straps included
- Plastic construction
These simple buckles are a budget-friendly solution for creating custom pad straps. At under $7 for a 4-pack, you can outfit multiple pad combinations without spending much. I've used these AceCamp tension locks to make straps from various webbing materials found at hardware stores.
The Duraflex construction is surprisingly durable for the price point. I've been using the same set for over two years now, and they show no signs of wear. The 25mm width works well with most standard webbing, giving you flexibility to create exactly the strap length you need.
This kit requires a bit of DIY know-how since it's just the buckles without straps. But if you're handy with basic sewing or knot-tying, you can create custom pad connectors for a fraction of the cost of commercial strap kits.
Who Should Buy?
DIY enthusiasts, budget shoppers, and campers who enjoy gear tinkering. Perfect for creating custom-length straps for unique pad combinations.
Who Should Avoid?
Anyone wanting a ready-to-use solution, and non-DIY types who prefer gear that works out of the package.
8. Sea to Summit Field Repair Buckles - Premium Connection

Sea to Summit Field Repair Buckle - Side Release, 2 Pin, 3-pack, 25mm / 1in
Type: Side-release buckles
Use: Pad connection and repair
Features: 3 pack,2-pin design,25mm width
+ Pros
- Premium quality
- Side-release design
- 3 pack included
- Versatile use
- Repair kit functionality
- Cons
- Higher price point
- Requires strap material
- More than needed for simple jobs
Sea to Summit's repair buckles are premium components that work excellently for pad connection applications. The side-release design allows quick connection and disconnection, which I appreciate when breaking camp in cold mornings when I want to minimize fumbling with gear.
The 2-pin design provides a secure connection that won't accidentally release during the night. I've used these buckles for pad straps as well as repairing backpack hip belts and sleeping bag straps. Their versatility makes them a worthy addition to any gear repair kit.
At under $25 for a 3-pack, these cost more than basic tension locks but offer superior functionality. The side-release mechanism alone is worth the premium if you frequently connect and disconnect your pad stacks.
Who Should Buy?
Campers valuing convenience, gear tinkerers, and anyone who appreciates premium components. Also excellent as a general repair kit addition.
Who Should Avoid?
Budget shoppers, and anyone needing simple one-time connections without quick-release functionality.
Pros and Cons of Stacking Sleeping Pads
Stacking sleeping pads provides increased warmth and comfort but adds weight, bulk, and complexity to your sleep system. After using stacked configurations for over 50 nights across various conditions, I've developed a clear picture of when the tradeoffs are worth it.
Quick Summary: Stacking is worth it for winter camping, cold sleepers, and side sleepers. The warmth and comfort benefits outweigh the weight penalty for cold conditions. For summer camping, a single quality pad is usually sufficient.
Benefits of Stacking
- Increased Warmth: Combined R-values provide insulation beyond single pad capabilities. I've gained 15-20°F of comfort range by adding a foam base.
- Enhanced Comfort: Layering creates mattress-like sleeping surface, especially valuable for side sleepers and older campers with joint sensitivity.
- Backup Insulation: If your primary pad fails or punctures, the foam layer provides essential backup insulation. I've had air pads fail on multiple trips, and the foam base saved the night.
- Versatility: Use pads separately for different conditions, combining only when needed. My foam pad alone handles summer trips, while the full stack works for winter.
- Cost Effective: Achieve winter warmth with foam + 3-season pad instead of buying expensive winter-rated pad. I saved over $150 using this approach.
- Puncture Protection: Foam base protects air pad from ground hazards. Sharp rocks and sticks can't reach your expensive air pad through the foam layer.
Drawbacks of Stacking
- Added Weight: Carrying two pads increases pack weight, typically 12-20 ounces depending on pad choices. This matters for ultralight backpacking but is negligible for car camping.
- Increased Bulk: Stacked pads take more pack volume, which can challenge packing limited space. Foam pads are particularly bulky when strapped externally.
- Setup Complexity: Connecting pads adds time to camp setup and requires proper technique. Learning curve for effective connection methods.
- Sliding Issues: Pads can separate during sleep if not properly connected, creating cold spots and discomfort. Requires quality connection solution.
- Higher Cost: Purchasing multiple pads costs more initially than buying one high-end pad. However, versatility can offset this over time.
- Compatibility Issues: Not all pads stack well together. Size mismatches and incompatible shapes can create frustration.
Important: For winter camping below 30°F, the warmth benefits of stacking almost always outweigh the weight penalty. In summer conditions above 50°F, stick to a single pad to avoid unnecessary bulk.
Frequently Asked Questions
Can you stack sleeping pads?
Yes, you can stack sleeping pads to increase warmth and comfort. R-values add together when stacking (example: R-3 + R-2 = R-5). This combined insulation provides winter-level warmth without buying expensive specialized gear.
Do sleeping pad R-values add up?
Yes, R-values are additive when stacking sleeping pads. Simply add the R-value of each pad: Pad 1 (R-3.5) + Pad 2 (R-2.0) = R-5.5 total. This combined rating indicates thermal resistance for the stacked system.
How do I keep stacked sleeping pads from sliding?
Prevent sliding by using pad clips/straps (Therm-a-Rest strap kits), applying Velcro to pad edges, nesting smaller pads inside larger ones, placing textured foam on bottom, or using non-slip shelf liner between pads. Proper connection ensures full contact for maximum warmth.
Should I stack a foam pad under an air pad?
Yes, foam pad under air pad is the ideal combination. Foam provides puncture protection, insulation from ground (air pads compress under weight losing warmth), and non-slip surface. Air pad above provides cushioning comfort. This setup is recommended for winter camping.
Can stacking pads reduce warmth?
Stacking typically increases warmth, but can reduce it if pads separate during sleep creating air gaps, bottom pad compresses fully losing insulation value, or pads don't make full contact. Proper connection and sizing prevents warmth loss.
Is stacking sleeping pads worth the weight?
For winter camping, yes. Stacking a 14oz foam pad under your existing pad adds significant warmth for minimal weight. Example: Air pad (R-3.5, 20oz) + Foam (R-2, 14oz) = R-5.5 for 34oz total vs. single winter pad (R-5.5, 28oz). Similar weight, more versatility.
Final Recommendations
After testing dozens of combinations over years of camping, my recommendation is simple: start with a quality closed-cell foam pad as your base layer, then add your existing air pad on top. This foam-first approach maximizes warmth because foam doesn't compress under body weight, maintaining its R-value throughout the night.
For most campers, I recommend the Therm-a-Rest Z Lite Sol as your base layer paired with whatever insulated air pad you currently own. This combination delivers R-5+ warmth for under $100 total, which handles most three-season and shoulder-season conditions. If you camp primarily in winter, upgrade to the NeoAir XTherm for your top layer.
The beauty of stacking is its modularity. Use your foam pad alone for summer fast-packing, add the air pad for shoulder season comfort, and combine both for winter expeditions. One base layer supports multiple configurations, making it the most versatile investment in your sleep system.