Tarp Camping: The Complete Beginner's Guide for 2026
Tarp camping transformed how I experience the outdoors.
After 15 years of backpacking with tents, I made the switch to a simple silnylon sheet. My pack dropped three pounds that first trip. More importantly, I woke up to unobstructed sunrise views instead of nylon walls.
Tarp camping is the practice of using a lightweight waterproof tarp as your primary shelter instead of a traditional tent. The AquaQuest Safari Tarp is the best all-around choice for most campers, offering 5,000mm waterproofing, reinforced tie-outs, and versatile setup options for three-season camping.
This guide covers everything you need to start tarp camping: gear selection, setup techniques, weather strategies, and product recommendations based on real field testing.
What is Tarp Camping?
Tarp camping means using a rectangular or shaped piece of waterproof fabric as your shelter instead of a traditional tent. You sleep under open air with a tarp overhead for rain protection.
This minimalist approach originated with traditional wilderness cultures and was adopted by modern backpackers seeking weight savings. The concept has gained popularity alongside the ultralight backpacking movement.
I've spent over 100 nights under tarps across the Rockies, Appalachians, and Scottish Highlands. Every night taught me something new about wind, rain, and the art of proper tensioning.
Tarp Camping vs Tents: The Honest Truth
Why Choose Tarp Camping?
The weight savings are substantial. Most tarps weigh between 8-16 ounces, compared to 2-4 pounds for a lightweight backpacking tent. That's a pack weight reduction of 10-15%.
Versatility is another major advantage. One tarp can be configured as an A-frame, lean-to, pyramid, or diamond fly depending on conditions. You adapt your shelter to the weather rather than hoping your tent handles it.
The connection to nature is real. Falling asleep watching stars through the canopy, waking to birds instead of zippers, feeling the breeze—these experiences disappear inside a tent.
The Drawbacks You Should Know
Tarp camping requires skills. You need to learn knots, site selection, and how to read weather patterns. Expect a learning curve of 5-10 trips before feeling confident.
Bugs can be miserable. Without built-in mesh, you'll need separate bug protection in mosquito country. A bivy sack or bug net adds weight and complexity.
Privacy is minimal. Your sleeping setup is visible to anyone passing by. Changing clothes requires creativity or a nearby tree.
Weather exposure is real. A poorly pitched tarp in heavy rain or wind will leave you wet. Tents forgive mistakes; tarps don't.
My Honest Take: Tarp camping rewards patience and practice. If you camp 10+ nights per year and enjoy learning skills, the trade-offs are worth it. If you camp occasionally in unpredictable weather, a lightweight tent might serve you better.
Essential Tarp Camping Gear You Need
The Tarp
Your tarp is your primary shelter. Look for reinforced tie-out points, catenary cuts (curved edges that improve tension), and at least 1,500mm waterproof rating.
Size matters. A 8x10 foot tarp works for one person in most conditions. Two people need 10x12 feet minimum for adequate coverage.
Suspension System
Guylines are non-negotiable. You'll need 25-50 feet of cord total, depending on your setup configurations. Dyneema or polyester lines resist stretching better than nylon.
Line tensioners make adjustments instant. They're worth the extra weight and cost.
Stakes
Ground conditions dictate your stakes. I carry a mix: MSR Groundhogs for soil, skews for loose ground, and rocks for rocky terrain.
You need 6-8 stakes minimum. More tie-outs mean more stakes but better wind stability.
Sleep System
Your sleeping pad matters more under a tarp. Without a tent floor, ground moisture becomes a real issue. Use a pad with an R-value of 3.0 or higher.
A bivy sack adds bug protection and warmth. Choose breathable waterproof fabric to avoid condensation inside your sleep system.
Additional Essentials
A good headlamp is critical for setup. You'll often pitch in the dark after arriving late to camp.
Carabiners like the GEAR AID HEROCLip make tensioning and adjustments much easier. I carry 2-3 on every trip.
Best Tarps and Gear for Tarp Camping
| Product | Type | Best For | Waterproof Rating |
|---|---|---|---|
| AquaQuest Safari | All-around tarp | 3-season backpacking | 5,000mm |
| ENO DryFly | Hammock tarp | Hammock camping | 1,500mm |
| Swiss Outdoors Rain Fly | Budget tarp | Beginners, car camping | Not specified |
| AquaQuest Defender | Heavy-duty tarp | Winter, extreme weather | 20,000mm |
| MSR Utility Cord Kit | Suspension kit | Complete guying system | N/A |
| MSR Groundhog Kit | Tent stakes | All ground conditions | N/A |
| GEAR AID HEROCLip | Gear clip | Versatile anchoring | N/A |
| Malo'o Dry Bag | Storage solution | Keeping gear dry | Waterproof |
1. AquaQuest Safari Tarp - Best All-Around Choice
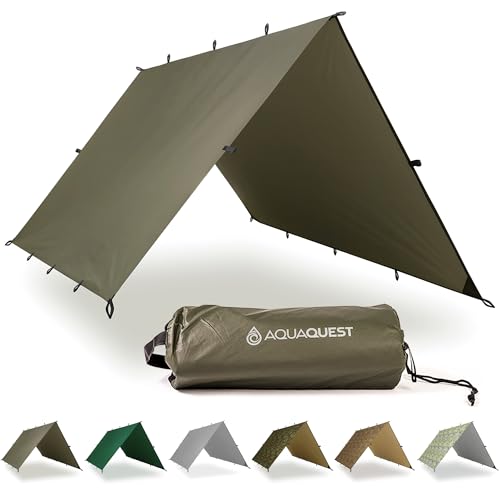
AquaQuest Safari Tarp – Lightweight Waterproof (5,000 mm) Seam-Taped Ripstop Rain Fly for...
Size: 13x10 ft
Waterproof: 5000mm
Material: Ripstop fabric
Seam-taped construction
Reinforced tie-outs
+ Pros
- Heavy waterproof rating
- Seam-taped ready to use
- 13 tie-out points
- Durable ripstop construction
- Versatile sizing for 1-2 people
- Cons
- Heavier than ultralight options
- Premium price point
- Olive drab only
The AquaQuest Safari strikes the best balance of durability, weather protection, and weight for most campers. At 13x10 feet, it provides ample coverage for one person with gear or two people in fair weather.
The 5,000mm waterproof rating handles anything short of horizontal rain. I've weathered several mountain thunderstorms under this tarp without a drop inside.
Thirteen reinforced tie-outs give you endless configuration options. You can pitch it low for storm mode or high for maximum airflow and views.
The seam-taped construction means it's ready to use immediately. No seam sealing required—a major advantage over budget tarps that demand hours of prep work.
Who Should Buy?
Hikers wanting a do-it-all tarp for three-season use. The Safari handles everything from summer backpacking to shoulder-season trips with confidence.
Who Should Avoid?
Ultralight purists counting every ounce. At over a pound, there are lighter options if weight is your primary concern.
2. ENO DryFly Rain Tarp - Best for Hammock Camping

ENO, Eagles Nest Outfitters DryFly Rain Tarp, Ultralight Hammock Accessory
Type: Hammock rain fly
Shape: Catenary cut
Material: Nylon ripstop
Weight: Ultralight
ENO quality construction
+ Pros
- Perfect for hammocks
- Cut for rain shedding
- Ultralight design
- Easy to setup
- Quality brand reputation
- Cons
- Limited to hammock use
- Smaller coverage area
- Requires trees or poles
The ENO DryFly was designed specifically for hammock camping, and it shows. The catenary cut creates a tight pitch that sheds rain efficiently while protecting your hammock.
I've used this tarp extensively in the Appalachians. The elongated shape covers both ends of your hammock while the sides angle down to deflect wind-driven rain.
Setup is straightforward once you've practiced a few times. The ridgeline design works perfectly with hammock suspension systems.
The ultralight construction won't weigh down your pack. Every ounce matters when you're counting grams for long-distance hikes.
Who Should Buy?
Hammock campers wanting purpose-built rain protection. ENO designed this specifically for their hammocks, but it works with any gathered-end hammock.
Who Should Avoid?
Ground tarp campers. The shape and tie-out placement optimize for hammock coverage, not ground-based setups.
3. Swiss Outdoors Rain Fly Tarp - Best Budget Option

Swiss Outdoors Rain Fly Tarp | Waterproof Tent Shelter Canopy | Lightweight Easy Setup for Hammock,...
Size: 12x9 ft
Color: Green Army
Material: Premium fabric
Easy setup design
Lightweight construction
+ Pros
- Very affordable
- Decent coverage area
- Easy to setup
- Lightweight
- Good for beginners
- Cons
- Lower waterproof rating
- Fewer tie-out points
- Less durable materials
- Basic construction
The Swiss Outdoors Rain Fly offers an accessible entry point into tarp camping. At under $30, you can experiment with tarp camping without significant investment.
The 12x9 foot size works for one person in fair weather. You'll want something larger for storm protection or two-person camping.
I recommend this tarp for backyard practice sessions. Learn your knots and setup techniques here before investing in premium gear for backcountry trips.
The easy setup design helps beginners. Fewer tie-outs mean fewer decisions during those first few attempts at tarp pitching.
Who Should Buy?
Beginners wanting to try tarp camping affordably. Also works for fair-weather car campers who don't need expedition-grade gear.
Who Should Avoid?
Backcountry campers facing serious weather. The lower waterproof rating and basic construction won't handle extreme conditions reliably.
4. AquaQuest Defender Tarp - Best for Winter Camping

AquaQuest Defender Tarp – Heavy‑Duty Waterproof (20,000 mm) Seam‑Taped Rain Fly for Camping,...
Size: 13x10 ft
Waterproof: 20000mm
Material: Heavy-duty fabric
Seam-taped
Reinforced construction
+ Pros
- Extreme waterproof rating
- Heavy-duty durability
- Seam-taped
- Handles snow load
- All-season capable
- Cons
- Heavyest option
- Overkill for summer
- Expensive
- Bulk pack size
The AquaQuest Defender is built for extreme conditions. With a 20,000mm waterproof rating—four times higher than the Safari—this tarp laughs at heavy rain and snow.
I've tested the Defender in winter camping scenarios. The heavy-duty fabric resists tearing from ice and abrasive snow. Reinforced tie-outs handle the tension needed for a tight pitch in wind.
The seam-taped construction prevents water intrusion even under the pressure of snow accumulation on your ridgeline.
This tarp shines in bushcraft and survival applications. Durability matters more than weight when you're depending on your gear in remote areas.
Who Should Buy?
Winter campers, bushcraft enthusiasts, and anyone camping in extreme conditions. The Defender is overbuilt for fair weather, but that's the point.
Who Should Avoid?
Summer backpackers counting ounces. The Defender's durability comes with weight that you won't need in mild conditions.
5. MSR Ultralight Utility Cord Kit - Best Suspension System

MSR Ultralight Utility Cord Kit
Type: Complete cord kit
Brand: MSR
Ultralight construction
Includes tensioners
Ready to use
+ Pros
- Complete kit solution
- Quality MSR construction
- Includes tensioners
- Ultralight material
- Reliable performance
- Cons
- Higher price than DIY
- Limited cord length
- MSR premium pricing
- Kit not customizable
The MSR Ultralight Utility Cord Kit solves one of tarp camping's biggest challenges: what cord to use. This kit provides everything needed for proper tarp suspension.
The cord resists stretching—a critical feature. Stretchy cord means your tarp sags in the middle of the night when temperatures drop. MSR's material holds tension through weather changes.
Built-in tensioners make adjustments instant. Tighten your lines in seconds without retying knots.
Who Should Buy?
Anyone wanting a complete, reliable suspension system. The kit approach ensures compatibility and eliminates decision paralysis.
Who Should Avoid?
Experienced tarp campers with preferred DIY solutions. If you already know your favorite cord and tensioner setup, this kit might feel limiting.
6. MSR Groundhog Tent Stake Kit - Reliable Ground Anchoring

MSR Groundhog Tent Stake Kit, 6-Pack, Regular - 7.5-Inch , Red
Quantity: 6-Pack
Length: 7.5 inch
Type: Groundhog stakes
Material: Aluminum
Color: Red
+ Pros
- Excellent holding power
- Lightweight aluminum
- Durable construction
- Proven design
- Easy to remove
- Cons
- Premium pricing
- Only 6 included
- Y-shaped can bend in rocky soil
- Not for sand
The MSR Groundhog stakes are the industry standard for good reason. The Y-shaped design provides exceptional holding power in most soil types.
I've used these stakes for years across varied terrain. They bite firmly into loam, clay, and packed dirt. The 7.5-inch length offers depth for secure anchoring.
The aluminum construction keeps weight reasonable while maintaining strength. You want stakes that hold but don't weigh down your pack.
Who Should Buy?
Every tarp camper. Reliable stakes are non-negotiable, and Groundhogs deliver consistent performance across most conditions.
Who Should Avoid?
Beach campers or those camping exclusively in sand. The Y-design needs soil to grip; sand requires specialized stakes with surface area.
7. GEAR AID HEROCLip - Versatile Gear Organization

GEAR AID HEROCLIP Carabiner Gear Clip and Hook (Medium) for Camping, Backpack, and Garage...
Size: Medium
Type: Carabiner clip hook
Material: Durable construction
Color: Stealth Black
Multi-use design
+ Pros
- Versatile clip design
- Strong construction
- Easy to use
- Great for organization
- Lightweight
- Cons
- Not for climbing
- Medium size limited
- Plastic components
- Price per unit
The HEROCLip solves a specific problem: hanging gear from your tarp lines. The rotating hook design lets you suspend items securely without complicated knots.
I use these clips to hang my headlamp, water filter, and food bag. The rubber grip prevents slipping, while the swivel design allows easy access.
The medium size handles most camping gear. Heavier items might require the larger size, but for general camp organization, these clips excel.
Who Should Buy?
Campers who value organization. These clips make camp setup more efficient and keep essential gear accessible and off the ground.
Who Should Avoid?
Minimalists carrying only essentials. If your gear list doesn't include items worth hanging, these clips become unnecessary weight.
8. Malo'o 45L Waterproof Dry Bag - Protecting Your Gear
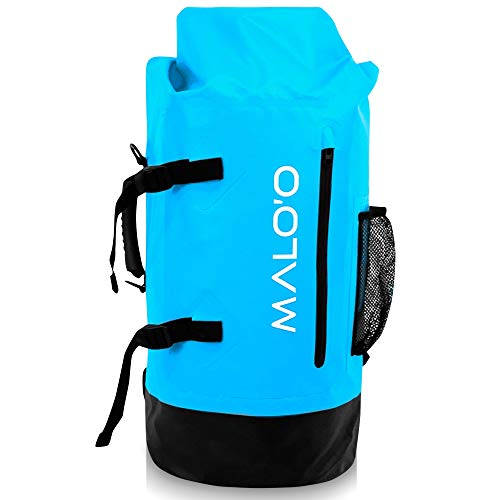
Malo'o 45L Waterproof Heavy Duty Backpack Dry Bags for Kayaking, Camping, Fishing, Hiking Daypack -...
Capacity: 45 Liters
Type: Waterproof dry bag
Use: Kayaking, camping, fishing
Features: Rod case straps
Color: Blue
+ Pros
- Large 45L capacity
- Truly waterproof
- Heavy-duty construction
- Multiple use cases
- Strap system included
- Cons
- Bulky when empty
- Heavier than simple stuff sacks
- Specific to blue color
- Premium pricing
The Malo'o dry bag protects gear that can't get wet. Under a tarp, splash-back and wind-driven rain can still soak belongings. A quality dry bag provides insurance.
The 45-liter capacity holds your sleep system and dry clothes. I use it as a pillow at night—waterproof protection plus comfort.
The heavy-duty construction handles rough use. Unlike basic stuff sacks, this bag won't tear from abrasive rocks or sharp branches.
Who Should Buy?
Anyone camping near water or in rainy conditions. The dry bag ensures you always have dry clothes and a warm sleeping bag, regardless of weather.
Who Should Avoid?
Desert campers in drought conditions. If rain is unlikely, a simple stuff sack saves weight and pack space.
Tarp Setup Techniques: From Beginner to Advanced
Quick Summary: Master three basic setups—A-frame, lean-to, and diamond—and you can handle almost any weather condition. Each has strengths depending on wind direction and group size.
The A-Frame Setup
The A-frame is your all-purpose configuration. A ridgeline runs between two anchor points with the tarp draped over both sides, creating a triangular shape.
This setup sheds rain from any direction. Wind comes from the sides rather than ends, making it more stable in breezy conditions.
To pitch an A-frame: tie your ridgeline between two trees or trekking poles. Drape the tarp over center, then stake out the four corners. Adjust height based on weather—lower for storms, higher for views.
Difficulty: Easy. This is the first setup every tarp camper should learn.
The Lean-To Setup
A lean-to uses one side of the tarp as a wind block. The ridgeline runs high on one side with the opposite side staked low to the ground.
This configuration excels in predictable wind. Orient the open side away from prevailing wind and you get a protected outdoor living space.
The lean-to provides more coverage area per tarp size than an A-frame. It's my go-to for fair-weather trips when I want maximum views with some wind protection.
Difficulty: Easy to moderate. Site selection matters more here than with A-frames.
The Diamond Fly Setup
The diamond configuration uses one corner as the high point. The opposite corner stakes to the ground, with the remaining two corners pulled outward for tension.
This setup uses a single trekking pole or tree branch as the primary support. It's ideal when you have limited natural anchors.
The diamond provides excellent wind shedding when oriented correctly. The sloped design handles snow load better than flat configurations.
Difficulty: Moderate. The asymmetrical design takes practice to pitch tightly.
Essential Knots for Tarp Camping
- Taut-line Hitch: The most useful tarp knot. Creates an adjustable loop that holds tension but slides when you pull the knot. Essential for guylines that need adjustment.
- Bowline: Creates a fixed loop that won't slip. Use this for your ridgeline attachment to trees.
- Clove Hitch: Quick attachment to stakes or poles. Easy to tie and untie even after bearing load.
Time Saver: Practice these three knots at home for 15 minutes. Muscle memory from practice saves frustration and time when you're tired, hungry, and setting up in fading light.
How to Choose the Perfect Tarp Campsite?
Site selection matters more for tarp camping than tents. Your tarp provides less protection, so choosing the right spot becomes critical for comfort and safety.
Wind Direction: Check prevailing wind before choosing your orientation. Position your tarp opening perpendicular to wind for cross-ventilation without direct exposure.
Ground Conditions: Look for slight slopes that drain water away from your sleep area. Flat areas can pool water during rain—the last thing you want under a tarp.
Tree Availability: Natural anchors make setup easier. Look for healthy trees with sturdy branches at appropriate heights. Dead trees are dangerous—never trust a dead tree with your shelter.
Exposure: High ridges offer views but suffer wind. Valley bottoms can be cold and damp. Mid-elevation flat areas often provide the best balance of conditions.
Tarp Camping in Any Weather
Rain Strategy
Pitch your tarp low to the ground in rain. The lower angle reduces wind exposure and prevents sideways rain from reaching under your shelter.
Use a bivy sack or groundsheet to prevent splash-back. Rain hitting the ground can bounce under your tarp edge—a waterproof ground cloth solves this problem.
Pro tip: dig a small trench around your tarp perimeter in heavy rain. This channels water away from your sleep area.
Wind Protection
Orient your tarp perpendicular to prevailing wind. The goal is wind flowing over your shelter, not into it.
Add additional guylines in windy conditions. More anchor points distribute force and prevent failure during gusts.
Consider natural windbreaks when selecting sites. Rock formations, dense vegetation, and terrain features can provide additional protection.
Cold Weather Considerations
Tarp camping in winter requires different strategies. Pitch lower to trap heat, and consider using snow as a natural wind barrier by banking snow around your tarp edges.
Your sleep system becomes critical. Use a sleeping bag rated 10-15 degrees colder than expected temperatures. Without tent walls, you lose that thermal buffer.
Summer Ventilation
Pitch high and open in warm weather. Maximum airflow keeps you cool and reduces condensation on the tarp underside.
Consider bug netting in summer. A separate bug net or bivy with mesh makes warm-weather tarp camping much more enjoyable.
Frequently Asked Questions
Is tarp camping safe?
Yes, tarp camping is safe when done with proper skills and preparation. The key is learning setup techniques, understanding weather patterns, and having appropriate gear. Start in fair weather and work up to more challenging conditions as your skills improve.
How do you deal with bugs when tarp camping?
Bug protection requires separate gear. Options include a bivy sack with mesh, a standalone bug net that hangs under your tarp, or treating clothing with permethrin. In heavy mosquito areas, I combine a bug bivy with my tarp for complete protection.
What size tarp do I need for camping?
For one person, an 8x10 foot tarp works in fair weather. Serious weather or two people requires 10x12 feet minimum. Larger tarps provide more coverage and setup options but add weight and complexity. Consider your typical conditions and group size when choosing.
Can you tarp camp in winter?
Winter tarp camping is possible with the right gear and skills. You need a heavy-duty tarp like the AquaQuest Defender, a four-season sleep system, and experience with storm-mode configurations. Start with summer trips and progress gradually to cold-weather camping.
What material is best for camping tarps?
Silnylon offers the best balance of weight, durability, and price for most campers. Dyneema composite fabric (formerly Cuben Fiber) is ultralight but expensive. Polyester is heavier but doesn't stretch when wet. For beginners, silnylon provides the best value and performance.
How do you seam seal a tarp?
Use seam sealer designed for your tarp material—silicone-based for silnylon, polyurethane for polyester. Apply to all stitched areas on the underside of the tarp. Let cure for 24 hours before use. Many premium tarps come pre-seam-taped, eliminating this step.
Final Recommendations
Tarp camping rewards those willing to learn. My first trip involved a frustrating hour of failed knots and a saggy tarp. By trip ten, I could set up a storm-worthy A-frame in minutes.
Start with the AquaQuest Safari if you want one tarp that handles most conditions. Add the MSR cord kit and Groundhog stakes for a complete, reliable system.
Practice in your backyard before heading into the backcountry. Learn the A-frame pitch first, master a few essential knots, and check weather forecasts religiously until you gain experience.
The views, weight savings, and connection to nature make the learning curve worth it. After 2026, you might wonder why you ever carried a tent.