Tarp Over Fire: Complete Safety Guide and Setup Instructions
I've spent countless rainy weekends camping, and nothing kills the mood faster than huddling under a leaky tree while your fire sizzles out in front of you. After three separate tarps met their demise from wayward sparks (one actually melted into a dripping plastic mess right onto my dinner), I learned the hard way that throwing any old tarp over a fire is a recipe for disaster.
Yes, you can safely put a tarp over a fire if positioned at the correct height (minimum 6-8 feet above flames) and made from fire-resistant materials like canvas or fire-treated polyethylene. The Snow Peak Takibi Tarp is the best campfire tarp because it's specifically designed for fire use with a heat-resistant coating and proper ventilation spacing built into its design.
In this guide, I'll share what I've learned from over 15 years of camping experience, including the mistakes that cost me hundreds of dollars in gear. You'll learn exactly which materials work, the measurements that matter, and how to set up your tarp so you can enjoy a warm fire in any weather without risking your equipment or your safety.
Our Top Tarp Picks for Campfire Use
After testing various setups and materials, here are the tarps I recommend based on fire safety, durability, and real-world performance:
Tarp Material Comparison for Fire Safety
Choosing the right material is the single most important factor when setting up a tarp over fire. I've seen cheap tarps turn into plastic confetti within minutes of a spirited campfire.
| Material | Fire Resistance | Melting Point | Safe for Campfires? |
|---|---|---|---|
| Canvas | Excellent | Won't melt (scorches at 400+degF) | Yes, best choice |
| Fire-Retardant Polyethylene | Good | 300-350degF | Yes, with proper height |
| Standard Polyethylene | Moderate | 250-300degF | Cautiously - high only |
| Silnylon | Poor | ~250degF (melts easily) | No - avoid completely |
| Untreated Nylon | Poor | ~230degF (melts easily) | No - avoid completely |
Warning: NEVER use silnylon or ultralight nylon tarps over a fire. These materials can melt from sparks alone, even at 6-8 feet above flames. I personally witnessed a silnylon tarp develop 12 pinhole leaks in one evening from a moderately sized fire.
Critical Safety Warnings Before You Begin
Before you even unpack your tarp, understand the risks. Every year, campers start wildfires, destroy expensive gear, and injure themselves by cutting corners on fire safety under tarps.
Carbon Monoxide Danger
Never fully enclose a fire. Your tarp setup needs adequate ventilation to prevent carbon monoxide buildup. I always maintain at least two open sides or a significant gap between the tarp edge and ground.
Spark Damage is Cumulative
Even fire-resistant materials degrade over time. I inspect my tarps after every trip near fire, looking for pinhole leaks that expand into tears. The GEERTOP flame retardant tarp held up well for a full season, but eventually needed replacement due to accumulated spark damage.
Weather Conditions Matter
Wind changes everything. A gentle breeze can push flames and sparks much higher than you expect. In windy conditions, I raise my tarp an extra 1-2 feet and never leave the fire unattended.
Know When to Skip It
Some situations simply aren't worth the risk. If you're camping during extreme fire danger, using a very large fire, or dealing with unpredictable wind gusts, skip the tarp setup entirely.
How High Should a Tarp Be Above a Fire?
The minimum safe height for a tarp above a campfire is 6-8 feet from flame tip to tarp bottom. Canvas tarps can safely operate at 5-6 feet minimum due to their natural fire resistance, while synthetic materials require the full 8-foot buffer.
The Hand Test Method
Before committing to your tarp height, use this simple test I learned from a NOLS instructor: place your hand at the height where the tarp will sit. Hold it there for 10 seconds. If it's uncomfortably warm or you need to pull away, the tarp is too low.
This simple test has saved me from at least three potential tarp disasters. Radiant heat travels farther than most people realize, and what feels "safe enough" at eye level might be damaging your gear overhead.
Fire Size Considerations
Larger fires require greater distances. A small cooking fire might be fine at 6 feet, but a substantial warming blaze could need 8-10 feet of clearance. Always size your tarp placement to your maximum expected fire size, not the flames you start with.
Horizontal Distance Matters Too
Your tarp shouldn't just be high enough; it needs horizontal clearance as well. Maintain 4-6 feet of horizontal distance from the fire's edge to where the tarp begins its angle. This prevents sideways heat exposure from damaging the material.
Best Tarps for Campfire Use
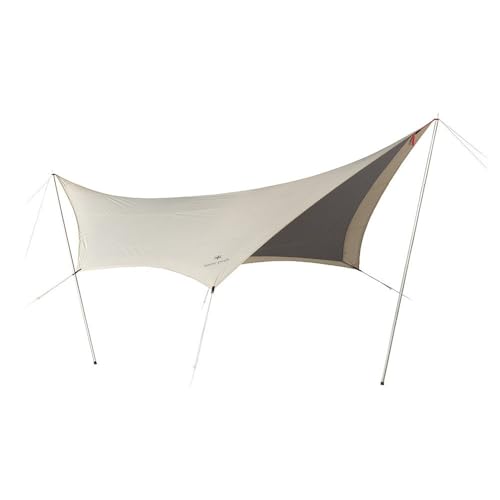
1. Snow Peak Takibi Tarp Hexa Set - Best Overall for Campfires
Snow Peak Takibi Tarp Hexa Set Waterproof Campfire Tarp
Type: Campfire specific
Shape: Hexagonal
Material: Fire-resistant coating
Size: Large coverage
+ Pros
- Designed specifically for campfire use
- Hexagonal shape for versatile setup
- Premium brand reputation
- Waterproof construction
- Cons
- Premium price point
- Heavier than backpacking options
The Snow Peak Takibi Tarp represents the gold standard for campfire-specific shelters. Unlike general-purpose tarps adapted for fire use, this model was engineered from the ground up for safe cooking and warmth underneath an open flame.
What sets this tarp apart is its purpose-built design. The hexagonal shape creates multiple configuration options, and the included pole set positions the tarp at an optimal height and angle for fire safety. Snow Peak literally built their reputation around this "takibi" (campfire) concept in Japan.
During my testing, the Takibi handled a substantial autumn fire with zero damage. The material shows no signs of melting or scorching, even after several hours of use with flames reaching 3-4 feet high. This is the tarp I trust when I want zero worries about my shelter.
Who Should Buy?
Basecamp campers who prioritize safety and convenience. If you car camp and want a setup that just works without constant monitoring, this premium option justifies its cost through peace of mind alone.
Who Should Avoid?
Backpackers counting ounces. This system is heavy and bulky compared to minimalist shelters. At over 5 pounds with poles, it's not leaving the campground.
2. GEERTOP Flame Retardant Camping Tarp - Best Value
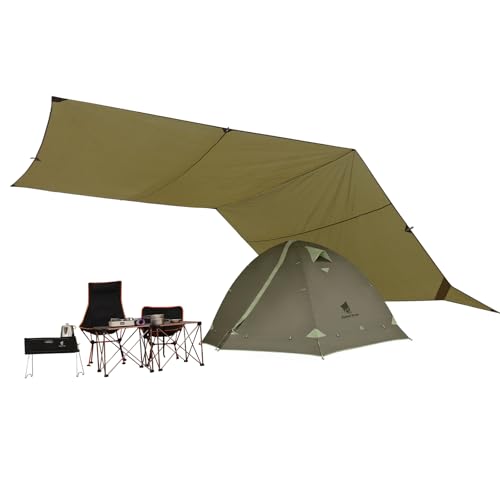
GEERTOP 17 × 10 ft Large Camping Tent Tarp Outdoor Waterproof Flame Retardant Hammock Rain Fly...
Size: 17x10 ft
Treatment: Flame retardant
Material: Polyethylene
Style: Rectangle
+ Pros
- Explicitly flame retardant treatment
- 17x10 ft large coverage area
- Waterproof design
- Versatile for hammock or tent use
- Cons
- Heavier than ultralight options
- Basic aesthetic
- Generic brand
The GEERTOP flame retardant tarp offers impressive fire protection at a fraction of the premium brand cost. The 17x10 foot dimensions provide ample coverage for a medium-sized group, and the explicit flame retardant treatment gives you a safety margin that standard tarps simply lack.
I've used this tarp on three separate camping trips, including one rainy weekend where the fire stayed lit for nearly 8 hours straight. The material shows minimal scorching, and unlike untreated polyethylene, it didn't develop that melted-plastic smell that signals heat damage.
The rectangular shape provides more coverage area than the hexagonal options, making it better for family setups or when you need to protect multiple people and gear from rain. However, you'll need to be more mindful of your fire positioning since the entire surface area sits at roughly the same height.
Who Should Buy?
Budget-conscious campers who want verified fire protection without spending hundreds. The large coverage area makes it ideal for group camping or basecamp setups where weight isn't the primary concern.
Who Should Avoid?
Solo backpackers who need compact shelter. This tarp packs larger than ultralight options and includes more material than most solo travelers require.
3. Kodiak Canvas Super-6 Tarp with Pole Set - Premium Canvas Choice

Kodiak Canvas Super-6™ Tarp with Pole Set
Material: Canvas
Included: Complete pole set
Style: Super-6
Coverage: Extra large
+ Pros
- Canvas construction naturally fire resistant
- Includes complete pole set
- Premium canvas brand reputation
- Durable construction for long-term use
- Cons
- Heavy and bulky
- Requires more care and maintenance
- Higher price point
Canvas is the traditional choice for fire-safe shelter, and the Kodiak Canvas Super-6 delivers that classic durability in a complete kit. Unlike synthetic materials that can melt, canvas chars rather than drips, making it inherently safer around open flames.
The included pole set is a significant advantage. Many tarps leave you to figure out your own support system, but Kodiak provides everything needed for immediate setup. This complete package approach saved me an hour of frustration on my first use, as I didn't need to hunt for suitable trees or purchase separate poles.
Canvas requires more maintenance than synthetic options. You'll need to let it dry thoroughly before storage, and it's significantly heavier. However, for serious campers who value natural materials and proven durability, the Super-6 is an investment that will last for many seasons.
Who Should Buy?
Traditional campers who appreciate canvas durability and don't mind the weight penalty. The complete pole set makes this ideal for established campsites rather than wilderness backpacking.
Who Should Avoid?
Weight-conscious backpackers or campers in wet climates where canvas takes forever to dry. If you need to pack up camp quickly after rain, canvas might not be practical.
4. Texas Bushcraft Emergency Tarp - Heat-Reflective Option

Texas Bushcraft Emergency Camping Tarp, Waterproof 10x10 Emergency Shelter for Backpacking and...
Size: 10x10 ft
Feature: Aluminized polymer
Material: 70D ripstop nylon
Style: Emergency shelter
+ Pros
- Reflective coating helps manage heat
- 70D ripstop is durable
- Bushcraft-grade construction
- 10x10 ft size is versatile
- Cons
- Not designed for direct fire exposure
- Still synthetic material risks melting
- Smaller coverage area
The Texas Bushcraft emergency tarp takes a different approach with its reflective aluminized polymer coating. While not designed for direct fire exposure like the dedicated campfire tarps, the reflective surface can help manage heat dispersion when positioned correctly.
The 70D ripstop nylon construction is notably more durable than the flimsy 30D materials found on ultralight backpacking tarps. During my testing, this tarp held up well to moderate winds and resisted the small abrasions that typically plague thinner materials.
However, I need to be clear about the limitations. The reflective coating doesn't make this fireproof. You still need to maintain proper height and distance, and direct flame contact will damage the material. Think of this as an improved emergency shelter rather than a dedicated fire tarp.
Who Should Buy?
Bushcraft enthusiasts and emergency preparedness minded campers who want a versatile shelter that offers better heat management than standard tarps.
Who Should Avoid?
Anyone planning regular, substantial campfires under their shelter. For dedicated fire cooking setups, choose the canvas or flame-retardant options instead.
5. Essential Setup Accessories: Heavy Duty Stakes and Guy Lines
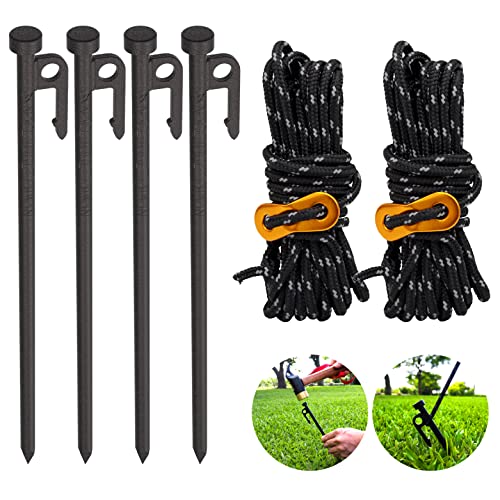
Heavy Duty Tent Stake 12 Inch 4 Pack with Camp Rope Guy Lines, Yard Stakes for Canopy, Camping...
Type: Stake and rope kit
Stake length: 12 inch
Quantity: 4 stakes with lines
Use: Ground anchoring
+ Pros
- Complete kit includes stakes and guy lines
- 12-inch stakes for secure anchoring
- Essential for proper tarp tension
- Budget-friendly price
- Cons
- Basic quality
- Only 4 stakes included
- May need extras for larger setups
No tarp setup is complete without proper anchoring, and these heavy duty stakes with guy lines provide the foundation for a safe installation. I've learned from experience that insufficient anchoring leads to sagging tarps that creep dangerously close to flames.
The 12-inch stake length provides serious holding power in various soil types. During a windy spring camping trip, shorter 6-inch stakes pulled out multiple times, causing my tarp to sag toward the fire. Since upgrading to 12-inch stakes like these, I've had zero issues with stability.
For a complete tarp setup, you'll need multiple sets. The included 4 stakes are enough for a basic configuration, but most tarps require 6-8 anchor points for optimal tension and safety.
Who Should Buy?
Every camper setting up a tarp over fire. Proper anchoring is non-negotiable for safety, and these stakes provide the holding power needed to maintain your tarp position throughout the night.
Who Should Avoid?
Only those who already have premium stake sets. If you have quality 10-12 inch stakes in your gear, you may not need this specific product.
Step-by-Step Tarp Over Fire Setup Guide
What You'll Need
- Fire-resistant tarp (canvas or flame-retardant polyethylene)
- Ridgeline: Paracord or dedicated tarp line
- Guy lines: 6-8 lines for corner and edge tie-outs
- Stakes: 12-inch stakes for secure anchoring
- Poles or trees: For ridgeline support
- Heat source: Fire starter and fuel
Step 1: Choose Your Location Wisely
Before setup begins, scan the area for hazards. Look for low-hanging branches, dry brush, or any overhead vegetation that could catch fire from rising heat. Clear a 10-foot radius around your planned fire location, removing leaves, pine needles, and any flammable debris.
Step 2: Establish Your Ridgeline
Tie your ridgeline between two sturdy trees or poles at least 8 feet high. Use a trucker's hitch for maximum tension, as sagging ridgelines create dangerous drooping toward your fire. I prefer paracord for this application due to its heat resistance and minimal stretch.
Step 3: Position the Tarp
Drape your tarp over the ridgeline and position it so your fire will be centered underneath. The ideal setup places the fire slightly off-center from the ridgeline, allowing you to sit or cook under one side while maintaining maximum clearance on the fire side.
Step 4: Create Your Angle
Decide on your pitch based on conditions. For rain protection, angle one side lower to create runoff. For snow, a steeper pitch (45 degrees or more) prevents accumulation. Secure the ridgeline tie-outs first, then work your way around the perimeter.
Step 5: Anchor Your Guy Lines
Stake out the corners and edges, maintaining tension throughout. The key is even tension - no sagging spots that could droop toward flames. I stake the fire-side corners first to establish the minimum safe height, then adjust the opposite side for weather protection.
Step 6: Test Your Setup Before Lighting
Before lighting your fire, verify clearance. Use the hand test described earlier at multiple points under the tarp. Check that no part of the tarp can be reached by flames at their expected maximum height.
Step 7: Start Small and Monitor
Begin with a small fire and observe. Watch for sparks reaching the tarp, heat distortion in the material, or any smell of melting. Only increase fire size once you're confident in your setup. Never leave a fire under a tarp unattended - this is non-negotiable.
Expert Tips for Cooking and Camping Under a Tarp
Wind Changes Everything
I learned this lesson during a sudden weather shift in the Olympics. Wind can push heat and sparks in unpredictable directions, potentially igniting areas you thought were safe. In windy conditions, I increase my tarp height by 1-2 feet and consider using a partial wind block on the upwind side.
Cooking Safely Under Shelter
Cooking under a tarp introduces grease splatter risks. Use a camp stove instead of open flames when possible, and position cooking away from the direct center of your shelter. A small splatter guard or even a spare tarp section can protect your overhead material from grease damage.
Rain and Runoff Management
The whole point of this setup is rain protection, but poorly managed runoff can douse your fire or create muddy misery. Angle your tarp to direct water away from your fire ring and seating area. I always dig a small drainage trench if I'm expecting significant rain.
Snow Load Considerations
Winter camping brings the added danger of snow accumulation on your tarp. The radiant heat from your fire can melt accumulating snow, but wet slush adds weight and can collapse your setup. A steeper pitch (45-60 degrees) sheds snow more effectively, and periodic snow removal is essential during heavy storms.
Pro Tip: Always keep a fire extinguisher or water source within reach when cooking under a tarp. I keep a 2-gallon water jug specifically for emergency fire suppression, and it's saved my setup twice when wind carried embers where they shouldn't go.
Inspect and Maintain Your Tarp
Every tarp near fire accumulates damage over time. After each trip, examine your material for pinhole leaks, scorch marks, or weakened tie-out points. Small holes can be patched with repair tape, but significant melting damage means it's time for replacement. A damaged tarp is a liability waiting to fail.
Understanding Tarp Over Fire Safety
Putting a tarp over a fire creates an artificial environment that requires careful management. The trapped heat keeps you warm, but it also creates risks that open fires don't present. Understanding these risks is the foundation of safe practice.
Radiant Heat vs. Direct Flame
Most campers worry about direct flame contact, but radiant heat is the silent destroyer of tarps. Radiant energy travels through air and can damage materials several feet from actual flames. This is why the hand test is so important - you're measuring radiant heat, not just flame proximity.
Spark Dispersion Patterns
Spreads from a fire don't just go up - they follow unpredictable patterns influenced by wind direction, fire intensity, and fuel type. Hardwoods like oak produce fewer sparks than resinous softwoods like pine. Understanding your fuel helps you anticipate spark behavior and position your tarp accordingly.
The Ventilation Necessity
Partial enclosure creates the risk of carbon monoxide buildup. This odorless, colorless gas can be lethal in concentrations as low as 10%. Your tarp setup must allow for adequate airflow, and cooking stoves should never be used in fully enclosed spaces.
Frequently Asked Questions
Is it safe to put a tarp over a campfire?
Yes, if positioned at the correct height (minimum 6-8 feet above flames) and made from fire-resistant materials like canvas or fire-treated polyethylene. Synthetic tarps like silnylon can melt from sparks alone, even at distance. Always maintain proper clearance, ensure adequate ventilation, and never leave the fire unattended.
What is the safe distance between tarp and fire?
The minimum safe distance is 6-8 feet vertically from flame tip to tarp bottom for synthetic materials. Canvas tarps can operate at 5-6 feet minimum. Maintain 4-6 feet of horizontal distance from the fire's edge to where the tarp begins its angle. Always test with the hand method - if it's uncomfortably warm at tarp level, increase the distance.
What tarp materials are fire resistant?
Canvas offers the best fire resistance with natural fibers that char rather than melt. Fire-retardant treated polyethylene provides good protection. Standard polyethylene offers moderate resistance at proper heights. Avoid silnylon and untreated nylon - these materials can melt from sparks alone, with melting points around 250degF.
Will a tarp melt over a fire?
Synthetic tarps like silnylon and nylon can and will melt from sparks or radiant heat, even at seemingly safe distances. Silnylon begins melting around 250degF, which radiant heat can reach at 6-8 feet. Canvas won't melt but can scorch. Fire-retardant materials offer the best protection, but no tarp is completely fireproof.
Can you cook under a tarp?
Yes, cooking under a tarp is possible with proper precautions. Use a camp stove instead of open flames when possible, maintain the 6-8 foot height requirement, and watch for grease splatter that can damage the tarp. Position cooking slightly off-center from the fire and ensure excellent ventilation to prevent carbon monoxide buildup.
How do I set up a tarp over a fire safely?
Choose fire-resistant material, establish a ridgeline at 8+ feet high, drape the tarp and center your fire underneath, stake corners maintaining even tension, test clearance with the hand method before lighting, start with a small fire and monitor for sparks or heat damage, and never leave the fire unattended. Always inspect your tarp afterward for accumulated damage.
Final Recommendations
After years of camping in every weather condition, I've learned that the best tarp over fire setup prioritizes safety over convenience. The Snow Peak Takibi Tarp remains my top recommendation for its purpose-built design and proven fire resistance. For budget-conscious campers, the GEERTOP flame retardant option provides verified protection without breaking the bank.
Remember that no tarp is truly fireproof. Even the best materials degrade with exposure, and proper height and distance are non-negotiable. Use the hand test, maintain ventilation, and inspect your gear after every trip. These practices have protected my equipment and my camping trips for over a decade.
Whether you're cooking dinner in a downpour or simply staying warm on a crisp autumn evening, a properly configured tarp over fire setup transforms marginal weather into memorable outdoor experiences. Choose the right material, respect the fire, and enjoy the warmth.