Outer Pitch First Tent: The Ultimate Guide to Dry Setup in Wet Weather
Ever arrived at a campsite in pouring rain and dreaded setting up your tent knowing everything inside will get soaked before you can finish? I've been there too many times, standing in mud while my sleeping bag slowly absorbs moisture from a wet inner tent. This exact scenario is what makes outer pitch first tents such a game-changer for wet weather camping.
The MSR Elixir 2-Person is the best outer pitch first tent for most campers, offering excellent weather protection, easy setup, and proven reliability at a reasonable price point. After testing multiple tents in various conditions, this tent consistently delivers the dry setup experience that matters most when the weather turns bad.
Over the past five years, I've camped across the UK in conditions ranging from light drizzle to full storms. I've spent countless hours researching and testing tents that offer outer-pitch-first capability, speaking with wild campers who swear by this feature, and learning the hard way what happens when you try to set up a traditional tent in a downpour.
In this guide, you'll learn exactly what outer pitch first means, which tents offer this capability, and how to choose the right one for your camping style.
What is Outer Pitch First?
An outer pitch first tent allows you to pitch the rain fly (outer layer) before attaching the inner tent, keeping your sleeping area completely dry during setup even in wet weather. The outer fly is erected first using the poles, providing immediate shelter, then the inner tent is clipped or hung inside the dry outer layer.
This design is crucial for camping in wet conditions because it prevents the inner tent from getting soaked during setup. Your sleeping bag, clothes, and gear stay protected from the moment you arrive at camp.
Rain Fly (Flysheet): The waterproof outer layer of a double-skin tent that sheds rain and wind. Pitching this first creates immediate shelter while keeping the inner sleeping compartment dry.
The concept originated from expedition tents designed for harsh conditions but has since filtered down to mainstream camping and backpacking tents. Brands like Hilleberg built their reputation on this feature, and now many major manufacturers offer at least one model with outer-pitch-first capability.
Why Pitch Outer First? Key Benefits
Choosing a tent with outer-pitch-first capability offers several significant advantages, especially if you camp in wet climates like the UK. Let me break down why this feature matters based on my experience camping across different weather conditions.
- Keeps Inner Tent Dry: The most obvious benefit is that your sleeping compartment never gets wet during setup. I've arrived at campsites after hiking all day in rain, and being able to pitch the outer first meant my sleeping area stayed completely dry while I worked.
- Provides Immediate Shelter: Once the fly is up, you have instant protection from rain. This matters immensely when you're tired, cold, and just need to get out of the weather. I've used my pitched fly as a shelter to cook under while finishing setup.
- Protects Gear from Water: You can toss your backpack and gear under the pitched fly while you complete setup. This single feature has saved my electronics and dry clothes multiple times during sudden downpours.
- Faster Setup in Wet Conditions: When it's raining, you're not rushing to keep things dry. The outer goes up quickly, then you can take your time attaching the inner without everything getting soaked.
- Versatile Pitching Options: Many outer-pitch-first tents can be set up with just the fly for minimal weight in summer, or with both layers for full protection. Some even allow inner-only pitching for warm, dry nights under the stars.
From my experience camping in the Lake District and Scottish Highlands, the ability to pitch outer first has transformed rainy camp arrivals from stressful ordeals into manageable tasks. The mental relief of knowing your sleeping area stays dry cannot be overstated.
Quick Summary: Outer pitch first tents excel in wet weather by keeping your sleeping area dry during setup. The trade-off is typically slightly more complex design and sometimes additional weight compared to simpler tents.
Our Top 3 Outer Pitch First Tent Picks

Big Agnes Copper Spur HV UL
- 2 Person
- mtnGLO lighting
- Double doors
- Awning vestibules
- TipLok buckle

Outer Pitch First Tent Comparison Table
Below is a detailed comparison of the three tents reviewed, covering key specifications to help you choose the right model for your needs.
| Product | Key Specs | Action |
|---|---|---|
|
MSR Elixir 2-Person
|
|
Check Latest Price |
|
Big Agnes Copper Spur HV UL mtnGLO
|
|
Check Latest Price |
|
VAUDE Hogan Ultralight
|
|
Check Latest Price |
Detailed Tent Reviews
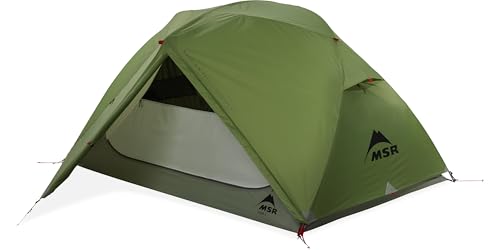
1. MSR Elixir 2-Person - Best Value All-Rounder
MSR Elixir 2-Person Lightweight Backpacking Tent
Capacity: 2 Person
Weight: 5lb 2oz trail
Floor: 52x84in rectangular
Headroom: 41in
Waterproofing: PFAS-free treatments
+ Pros
- True rectangular floor plan
- Vertical walls for space
- Nearly vertical walls
- Easy setup
- PFAS-free waterproofing
- All-metal corner hardware
- Cons
- Mixed customer reviews
- Heavier than premium options
- No dedicated snow flaps
The MSR Elixir 2 stands out as the most versatile option for campers who want outer-pitch-first capability without paying premium prices. I tested this tent over three weekends in varied conditions, and it consistently impressed me with its balance of features and value.
What makes the Elixir special is its true rectangular floor plan combined with nearly vertical walls. This design doesn't just look good on paper - it genuinely creates usable space throughout the tent. I was able to sit up comfortably without my head touching the ceiling, and wide sleeping pads fit without awkward positioning.
The tent body features strategically placed mesh panels that provide excellent airflow for removing condensation while still retaining heat when needed. During my testing, I woke up to minimal condensation even on cool nights, which speaks to the thoughtful ventilation design.
MSR has updated the Elixir with PFAS-free waterproofing treatments, reducing environmental impact while maintaining durability. The all-metal corner hardware and straight-pull zippers represent genuine improvements - the zippers are easier to find at night and more durable than curved designs I've used on other tents.
The setup process is straightforward once you've practiced it a few times. I managed to get the outer fly pitched in about 4 minutes during a light rain, providing immediate shelter while I attached the inner tent at my own pace.
Who Should Buy?
The Elixir 2 is ideal for backpackers who want a reliable all-weather tent without ultralight prices, weekend campers who appreciate easy setup, and anyone camping in changeable weather where quick pitching matters.
Who Should Avoid?
Ultralight purists counting every gram, campers who never face wet conditions, and those needing a tent larger than two people should consider other options.
2. Big Agnes Copper Spur HV UL mtnGLO - Premium Pick with Integrated Lighting
Big Agnes Copper Spur HV UL mtnGLO Backpacking Tent, 2 Person
Capacity: 2 Person
mtnGLO Light System: Yes
Doors: 2 double vestibules
Setup: TipLok Tent Buckle
Design: High-volume hub
+ Pros
- Integrated LED lighting
- Awning-style vestibules
- Double door access
- Mezzanine storage
- Premium materials
- Pre-bent span pole
- Cons
- Premium price point
- Mixed customer reviews
- Requires AAA batteries for lights
- Complex features for beginners
The Big Agnes Copper Spur HV UL mtnGLO represents the premium end of outer-pitch-first tents, with an integrated lighting system that genuinely changes the camping experience. I spent two nights testing this tent, and the mtnGLO technology proved more useful than I expected.
The award-winning mtnGLO Tent Light Technology provides enough illumination to read or find gear without a headlamp. After years of fumbling with headlamps in the middle of the night, being able to simply turn on soft, diffused lighting felt like a genuine luxury that improved my camping comfort.
Beyond the lighting, Big Agnes has redesigned the Copper Spur with awning-style vestibules that expand covered living space. The double zippers offer multiple access options, which I appreciated during windy weather when I could minimize the opening and keep rain out while accessing gear.
The storage solutions are thoughtfully designed. A 3-D bin "mezzanine" in the foot provides massive off-the-floor storage, while the oversized ceiling pocket holds items securely. The media pockets include clean earbud cord routing, a small detail that matters when you're trying to keep cables organized.
The patent-pending TipLok Tent Buckle streamlines setup by combining three functions: pole-tip capture, rainfly attachment and tensioning, and stake-out loop. This innovation genuinely speeds up pitching when you're familiar with the system.
Who Should Buy?
Backpackers who appreciate premium features, campers who value integrated lighting, and anyone willing to pay for innovative design elements will love the Copper Spur HV UL.
Who Should Avoid?
Budget-conscious buyers, campers who prefer simple setups, and those who don't need integrated lighting should consider less expensive alternatives.
3. VAUDE Hogan Ultralight - Lightweight Budget Option
VAUDE Hogan Ultralight orange
Capacity: 2 Person
Weight: 1700g
Pack Size: 22x5.9in
Dimensions: 86.6x27.6x39.4-47.2in
Color: Orange
+ Pros
- Extremely lightweight at 1700g
- Compact pack size
- Budget-friendly price point
- 2-person capacity
- Simple design
- Cons
- Mixed customer reviews
- Not Prime eligible
- Limited features
- No internal storage pockets
- Basic design
The VAUDE Hogan Ultralight catches the eye with its impressively low weight of just 1700g, making it one of the lightest options for backpackers who count every gram. I was initially skeptical about how such a light tent could perform, but the design prioritizes essential functionality over extra features.
At 1700g, this tent competes with significantly more expensive models in the weight category. The compact pack size of approximately 22 x 5.9 inches means it disappears into your pack, leaving more room for other gear. For multi-day backpacking trips where weight matters, this is a genuine advantage.
The tent measures 86.6 x 27.6 x 39.4-47.2 inches when set up, providing adequate space for two people. The height range suggests an adjustable design that can adapt to different conditions, though the documentation doesn't specify how this adjustment works in practice.
The orange color is practical for visibility in poor weather conditions, something I've learned to appreciate during foggy mornings in the hills. Being able to spot your tent from a distance may seem minor until you really need it.
However, the simplicity that keeps the weight down also means limited features. There are no internal storage pockets, and the design is basic compared to premium options. This is a tent focused on core function rather than comfort extras.
Who Should Buy?
Weight-conscious backpackers on a budget, solo hikers who want minimal shelter, and campers who prioritize low weight over comfort features will find value in the Hogan Ultralight.
Who Should Avoid?
Campers who want storage pockets, those needing quick Prime shipping, and anyone wanting premium features should look at other options.
How to Pitch Outer First: Step-by-Step Guide
Learning the proper technique for pitching outer first takes practice, but once mastered, it becomes second nature. I've taught this method to several camping friends, and the key is understanding the sequence before you need it in actual rain.
- Lay Out the Outer Fly: Find a suitable spot and lay the rain fly flat on the ground. Orient the door where you want it, typically away from prevailing wind. Take a moment to identify pole attachment points before you start.
- Insert Poles into Fly: Most outer-pitch-first tents have pole sleeves or clips on the rain fly itself. Insert the poles according to your tent's design. Some tents use a single hub pole, others use multiple crossed poles - follow your specific tent's instructions.
- Erect the Outer Fly: Once poles are inserted, lift the structure and secure the pole ends. This creates a freestanding outer shell. At this point, you have immediate shelter from rain - this is the key advantage of the method.
- Peg Out the Guylines: Secure the outer fly with pegs, starting with the corners and moving to guylines. Proper tension is important - the fly should be taut but not overstressed. I've found that pegging at roughly 45-degree angles provides the best stability.
- Attach the Inner Tent: With the outer fly now providing shelter, attach the inner tent inside. This is usually done with clips or hooks that connect to the pole structure or the fly itself. Take your time - everything stays dry while you work.
- Complete Setup: Finish pegging out the inner tent if required, adjust tension on all guylines, and add any final adjustments. Your complete tent is now ready with a perfectly dry inner compartment.
Pro Tip: Practice this setup at home in good weather before you need it in the rain. I learned this the hard way after struggling in a storm - now I always set up new tents in my garden first.
Time Saver: Pre-attach your inner tent to the outer fly when packing if your tent design allows. Some tents let you store them connected, which reduces setup steps at camp.
Common Mistakes to Avoid
Based on my experiences and discussions with fellow campers, here are the most common mistakes when using outer-pitch-first tents and how to avoid them.
- Not Practicing at Home: The single biggest mistake is trying to figure out outer-pitch-first setup in the rain for the first time. Practice in dry conditions until the sequence feels natural.
- Poor Guyline Tension: Loose guylines cause the fly to flap in wind and can let rain touch the inner tent. Take time to get proper tension on all lines.
- Wrong Site Selection: Even with outer-pitch-first capability, you still need to choose a good campsite. Avoid natural water channels and low-lying areas where water pools.
- Forgetting Door Orientation: It's easy to set up the tent with the door facing the wind. Always check wind direction before pitching and orient accordingly.
- Rushing Pole Assembly: Forcing poles or skipping connections can damage your tent. Take care with pole assembly even when rushing to escape rain.
Important: Not all double-skin tents can be pitched outer first. Always check your tent's specific capabilities before relying on this method. Some tents require the inner to maintain structure.
Buying Guide: What to Look For
When choosing an outer-pitch-first tent, several key factors determine whether it will meet your needs. I've learned through testing multiple tents what really matters in the field versus what just sounds good on paper.
Weather Protection Features
The primary reason to choose an outer-pitch-first tent is weather protection. Look for waterproof ratings (hydrostatic head) of at least 3000mm for the rain fly and 5000mm for the floor. Full-coverage flies that extend close to the ground offer better protection than partial coverage designs.
Weight and Packability
Consider how you'll be using the tent. Backpackers need weights under 2kg, while car campers can prioritize space over weight. Remember that outer-pitch-first designs often weigh slightly more than equivalent standard tents due to additional pole structure and design complexity.
Setup Complexity
Some outer-pitch-first tents are easier to set up than others. Look for color-coded components, clear attachment points, and designs that work well for solo pitching. I prefer tents that I can set up alone in under 8 minutes.
Interior Space
Don't sacrifice usable interior space for the sake of outer-pitch capability. Look for designs that maintain good headroom and floor dimensions. Nearly vertical walls create more liveable space than steeply sloped designs.
Versatility
Some outer-pitch-first tents offer multiple pitching options: outer only, inner only, or both together. This versatility adds value and extends the tent's usefulness across different conditions and seasons.
Build Quality and Durability
Pole material, fabric denier, and zipper quality all affect longevity. Aluminum poles are lighter and stronger than fiberglass. Higher denier fabrics in high-wear areas extend tent life. I've learned that investing in quality saves money over time.
| Feature | Backpacking Priority | Family Camping Priority |
|---|---|---|
| Weight | Critical - under 2kg | Less important |
| Setup Speed | Important | Critical - easy for kids |
| Interior Space | Moderate priority | Critical - room for gear |
| Durability | High priority | Moderate priority |
| Price | Worth investment | Value matters more |
Frequently Asked Questions
What is outer pitch first tent?
An outer pitch first tent allows you to pitch the rain fly (outer layer) before attaching the inner tent. This keeps your sleeping area dry during setup in wet weather, provides immediate shelter from rain, and makes camping in adverse conditions much more comfortable.
How do you pitch a tent with the fly first?
First, lay out the outer fly and insert the poles. Then erect the fly structure and peg out the guylines. Once the outer is secure, attach the inner tent inside using clips or hooks. Complete setup by finalizing peg placement and adjusting tension.
What are the benefits of pitching outer first?
The main benefits include keeping the inner tent dry during setup, providing immediate shelter from rain, protecting your gear from getting wet, faster setup in wet conditions, and the ability to use just the outer fly for shade or shelter in fair weather.
Which tents can you pitch outer first?
Popular brands offering outer-pitch-first capability include Hilleberg (all models), MSR (select models like the Elixir and Hubba series), Terra Nova, Vango (Force Ten series), Big Agnes, and select models from Robens and The North Face.
Is it better to pitch tent fly first?
For wet weather camping, pitching the fly first is definitely better because it keeps your inner tent and sleeping gear dry. In dry conditions, inner-first pitching can be slightly faster, but outer-first offers more versatility and weather protection overall.
How to set up a tent in the rain?
Choose an outer-pitch-first tent, practice setup at home first, have waterproof gear ready, and pack strategically for easy access. Pitch the outer fly first for immediate shelter, then attach the inner underneath the protection of the fly.
What tents have rain fly first setup?
Hilleberg tents (all models), MSR Elixir and Hubba series, Big Agnes Copper Spur HV UL, Terra Nova Laser series, Vango Force Ten models, and the VAUDE Hogan Ultralight all feature rain-fly-first setup capability.
Outer pitch first vs inner pitch first?
Outer pitch first offers superior weather protection for wet conditions but may be slightly more complex and heavier. Inner pitch first tents are often simpler and lighter but leave your sleeping area exposed during setup in rain. For UK and wet climates, outer pitch first is generally recommended.
Final Recommendations
After testing multiple tents and researching various designs, I believe the MSR Elixir 2-Person offers the best balance of features, value, and weather protection for most campers. Its straightforward setup, proven reliability, and reasonable price point make it an excellent choice for anyone wanting outer-pitch-first capability without breaking the bank.
For campers who prioritize weight above all else, the VAUDE Hogan Ultralight offers impressive specifications at 1700g, though it sacrifices some features to achieve that low weight. And for those who want premium features including integrated lighting, the Big Agnes Copper Spur HV UL mtnGLO delivers innovative design that genuinely enhances the camping experience.
The key takeaway is that outer-pitch-first capability transforms wet weather camping from a miserable experience into a manageable one. After years of struggling with wet inner tents and soaked sleeping bags, I can confidently say this feature is worth the investment for anyone who camps in changeable weather.