How to Make Toast When Camping: 5 Methods That Actually Work
Nothing beats waking up to the smell of a campfire and the crunch of perfectly toasted bread.
After 15 years of camping, I've learned that a good breakfast sets the tone for the entire day.
Quick Answer: To make toast while camping: 1) Use a folding campfire toaster over hot coals for even browning, 2) Spear bread with a toasting fork and hold over embers, 3) Place bread in a pie iron for enclosed heating, 4) Use a camp stove toaster for controlled heat, or 5) Use the stick method by spearing bread on a long green stick.
In this guide, I'll show you every method I've tested over dozens of camping trips.
You'll learn which equipment works best for your camping style and how to keep bread fresh for multi-day adventures.
Essential Camping Toast Equipment
The right equipment makes camping toast significantly easier and more consistent.
I've tested dozens of options over the years, and some methods work much better than others.
| Equipment Type | Price Range | Weight | Best For | Capacity |
|---|---|---|---|---|
| Folding Campfire Toaster | $10-25 | 5-8 oz | Family camping | 4 slices |
| Toasting Fork | $5-15 | 3-6 oz | Backpacking | 1-2 slices |
| Pie Iron | $15-35 | 1.5-3 lbs | Versatile cooking | 1-2 sandwiches |
| Camp Stove Toaster | $8-20 | 5-7 oz | RV/stove camping | 4 slices |
| DIY Stick Method | Free | 0 oz | Wild camping | 1 slice |
1. Coghlan's Camp Stove Toaster - Best Budget Option

Coghlan's Camp Stove Toaster – Stainless Steel, Lightweight, Portable and Compact Design for...
Capacity: 4 slices
Material: Stainless Steel
Weight: 5.6 oz
Collapsed Size: 6x6x3 inches
Fits: Most camp stoves
+ Pros
- Ultra-lightweight design
- Toasts 4 slices at once
- Collapses flat for storage
- Durable stainless steel
- Great value
- Works on most stoves
- Cons
- Requires close attention
- Uneven heat possible
- Small for large groups
This folding toaster has accompanied me on countless camping trips since I first discovered it a decade ago.
The stainless steel construction holds up well to high heat and rough handling.
I love how it collapses completely flat, taking up minimal space in my camp kitchen bin.
At just 5.6 ounces, backpackers can even justify packing it for longer trips.
The four-slice capacity works well for couples or small families needing breakfast simultaneously.
Who Should Buy?
Budget-conscious campers who want a simple, effective solution for toasting bread on camp stoves.
Who Should Avoid?
Large groups needing high throughput or campers who only cook over open fires.
2. Toas-Tite Sandwich Maker - Best for Versatile Cooking

Toas-Tite Handheld Sandwich Maker, Classic Sandwich Grill & Panini Press, Cast Aluminum Pie Iron...
Design: Classic 1945 retro
Material: Cast Aluminum
Weight: 1.65 lbs
Handle Length: 10 inches
Works: Stovetop and campfire
+ Pros
- Creates sealed pocket sandwiches
- Works on any heat source
- Long cool-touch handles
- Made in USA
- Versatile cooking options
- Durable cast aluminum
- Cons
- Higher price point
- Only makes one at a time
- Requires learning curve
The Toas-Tite has been around since 1945, and the design hasn't changed because it works perfectly.
I've used this for everything from basic toast to pocket pies and grilled cheese sandwiches.
The long 10-inch handles keep your hands safely away from the heat source.
Cast aluminum construction provides even heating without the weight of cast iron.
This pie iron creates sealed edges that hold in melting cheese and heated fillings.
Who Should Buy?
Campers who want more than just toast and appreciate versatile cooking equipment.
Who Should Avoid?
Budget campers or those needing to feed a large group quickly.
3. Coghlan's Cast Iron Camp Cooker - Best for Even Heating
Coghlan's Cast Iron Camp Cooker - Pre-Seasoned Pie Iron Sandwich Maker with Heat-Resistant...
Material: Pre-seasoned cast iron
Weight: 2.6 lbs
Cooking Surface: 4.25x3.25 inches
Handle: Removable steel rods
Capacity: 2 sandwiches
+ Pros
- Pre-seasoned ready to use
- Excellent heat retention
- Removable handles
- Two cooking cavities
- Durable construction
- Great value price
- Cons
- Heavier than aluminum
- Requires rust prevention
- Longer preheat time
- Handles can get hot
Cast iron delivers the most even heating of any material, and this pie iron comes pre-seasoned.
The removable handles make storage much easier in tight camp kitchens.
I've found the two-cavity design perfect for making two sandwiches simultaneously.
At 2.6 pounds, this isn't for backpackers but works wonderfully for car camping.
The heat retention means you can cook multiple sandwiches without reheating the iron.
Who Should Buy?
Car campers who value even heating and don't mind the extra weight.
Who Should Avoid?
Backpackers counting every ounce or campers who don't want to maintain cast iron.
Method 1: Campfire Toaster Method
Campfire toasting provides that authentic outdoor flavor you can't get any other way.
Campfire Toaster: A folding metal frame designed to hold bread slices above hot coals, allowing radiant heat to toast both sides simultaneously without direct flame contact.
Step-by-Step Instructions:
- Build your fire and let it burn down to establish hot coals (20-30 minutes)
- Open the folding toaster and place bread slices in the wire racks
- Position the toaster 3-4 inches above the coals using rocks or a log
- Toast for 1-2 minutes on the first side, watching closely
- Flip the toaster and toast the other side for 1-2 minutes
- Check doneness and remove when golden brown
Pro Tip: Always position your toaster over glowing coals, not open flames. Flames will burn the bread before it toasts properly.
Timing Guide:
| Bread Type | First Side | Second Side | Total Time |
|---|---|---|---|
| White bread | 45-60 seconds | 30-45 seconds | 1.5-2 minutes |
| Whole wheat | 60-75 seconds | 45-60 seconds | 2-2.5 minutes |
| Sourdough | 60-90 seconds | 45-60 seconds | 2-2.5 minutes |
| Bagels | 90-120 seconds | 60-90 seconds | 2.5-3.5 minutes |
Method 2: Toasting Fork or Stick Method
Sometimes the simplest method works best, especially when you're carrying minimal gear.
I've used this method more than any other during backpacking trips.
What You Need:
- Extendable toasting fork or a long green stick (3-4 feet)
- Bread slices cut to manageable size
- Hot coals or embers (not open flames)
Step-by-Step Instructions:
- Prepare your bread by cutting slices in half for easier handling
- Skewer the bread carefully through the crust, avoiding the center
- Hold over embers at a distance of 4-6 inches
- Rotate constantly for even browning (don't let any side face the heat too long)
- Watch closely - this method browns quickly
- Remove when golden and eat immediately while warm
Time Saver: If using a fork, toast 2-3 pieces at once by stacking them with slight spacing. Increase distance from heat accordingly.
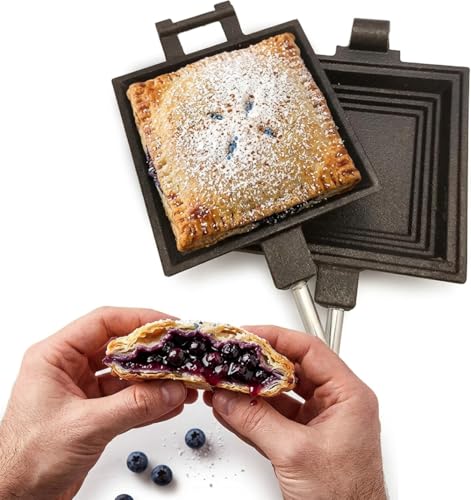
Method 3: Pie Iron Toast Method
Pie irons create the most versatile camping toast with sealed edges and endless filling possibilities.
This method transformed my camping breakfasts when I discovered it five years ago.
Step-by-Step Instructions:
- Preheat the pie iron in hot coals for 2-3 minutes
- Butter one side of two bread slices
- Place bread butter-side out against both plates of the iron
- Add fillings if desired (cheese, ham, vegetables)
- Close and latch the pie iron tightly
- Cook for 2-3 minutes per side over coals
- Check doneness and flip if needed for even browning
- Remove carefully - the iron will be very hot
Popular Pie Iron Toast Variations:
- Classic Grilled Cheese: Cheddar or American cheese between buttered bread
- Texas Toast: Thick bread with garlic butter and parmesan
- Pizza Toast: Mozzarella, tomato sauce, and pepperoni
- Breakfast Sandwich: Egg, cheese, and pre-cooked bacon
Method 4: Camp Stove Toaster Method
Camp stoves offer the most controlled heat for consistent toasting results.
This is my go-to method when I have my propane stove set up.
Step-by-Step Instructions:
- Set up your camp stove on a stable, level surface
- Light the burner and set to medium-low heat
- Place the folding toaster centered on the burner grate
- Add bread slices to the toaster racks
- Toast for 1-2 minutes on the first side, watching closely
- Flip the entire toaster using tongs or heat-resistant handle
- Toast second side for 1-2 minutes until golden brown
- Remove immediately to prevent burning
Important: Gas camp stoves heat faster than campfires. Start with lower heat and adjust up as needed. You can always increase heat, but you can't undo burnt toast.
Method 5: No-Equipment Toast Making
Sometimes you forget your gear or prefer minimalist camping approaches.
I've been in this situation more than once, and these methods work surprisingly well.
The Hot Rock Method:
- Find a flat, dry rock near your fire pit
- Place it near embers (not directly in flames) to heat up
- Test the temperature with a water drop - it should sizzle, not vaporize instantly
- Place bread directly on the hot rock surface
- Flip after 1-2 minutes when golden brown
- Toast other side for 1-2 minutes
The Green Stick Grill:
- Find fresh green sticks about 1 inch in diameter
- Split the ends to create a forked shape
- Weave bread slices between the split ends
- Prop over coals at a height of 4-6 inches
- Rotate frequently for even browning
The Ember Grate Method:
- Create a small grate using two parallel green sticks over embers
- Balance bread slices across the sticks
- Cook for 1-2 minutes per side
- Watch carefully as this method exposes bread directly to radiant heat
Choosing the Best Bread for Camping Toast
Not all bread holds up well to camping conditions.
I've learned through trial and error which breads work best.
| Bread Type | Shelf Life | Durability | Best For |
|---|---|---|---|
| Sourdough | 5-7 days | Excellent | Multi-day trips |
| Bagels | 7+ days | Outstanding | Extended trips |
| English Muffins | 5-7 days | Very Good | Trip variety |
| Tortillas | 10-14 days | Outstanding | Backpacking |
| Pita Bread | 7-10 days | Excellent | Pocket sandwiches |
| White Sandwich Bread | 2-3 days | Poor | Single-day trips |
Pro Tip: For trips longer than three days, choose sourdough, bagels, or tortillas. Soft white bread will crush and stale quickly, even with proper storage.
How to Keep Bread Fresh While Camping?
Proper bread storage prevents wasted food and disappointing breakfasts.
After countless crushed loaves, I've developed a reliable system.
Bread Storage Strategies:
- Choose sturdy bread that resists crushing (sourdough, bagels)
- Use airtight containers or heavy-duty freezer bags
- Store in cool, shaded spot - never in a hot car or direct sunlight
- Keep away from strong odors (fuel, onions, garlic)
- Freeze bread before trip for journeys longer than 3 days
- Use bread clips or twist ties to seal bags after each use
- Consider pre-slicing at home to avoid messy field cutting
Multi-Day Trip Strategy:
For a 5-day trip, I pack two types of bread: fresh sourdough for days 1-3, and bagels for days 4-5.
This rotation ensures I always have viable bread without carrying excessive weight.
Weather Considerations for Camping Toast
Weather conditions dramatically affect your toasting success.
Important: Wind is the biggest challenge for campfire toasting. Create a windbreak using rocks or position yourself to block prevailing winds.
Windy Conditions:
- Build a windbreak using rocks or your cooler
- Position toaster closer to coals for more consistent heat
- Use camp stove instead of campfire for better control
- Increase monitoring - wind causes uneven heating and hot spots
Rainy Weather:
- Set up a tarp over your cooking area for fire protection
- Cook under a canopy with proper ventilation
- Use camp stove inside a screened area if allowed
- Keep bread covered until ready to toast
High Humidity:
- Bread may feel soft even when toasted
- Increase toasting time slightly for desired crunch
- Store bread with desiccant packets if humidity is extreme
Camping Toast for Large Groups
Feeding a crowd requires strategy and the right equipment setup.
After managing breakfast for scout troops, I've learned efficiency matters.
Group Toasting Strategy:
- Set up multiple toasters - 2-3 folding toasters running simultaneously
- Assign a toast monitor - someone dedicated to watching the bread
- Create an assembly line - one person loads, one flips, one serves
- Use pie irons for filled toast options to add protein
- Pre-butter bread at home to save time
- Have toppings ready - butter, jam, peanut butter in squeeze containers
Group Equipment Recommendations:
- 3-4 folding toasters for groups of 6-8 people
- Multiple toasting forks for individual preference toasting
- 2-3 pie irons for variety and protein options
- Large camp stove with 2-3 burners for parallel toasting
Troubleshooting Common Camping Toast Problems
Even experienced campers face toast challenges.
Here are solutions to problems I've encountered countless times.
Burnt Edges, Raw Center:
- Cause: Heat too intense or toaster too close to flames
- Solution: Move toaster farther from heat source or use coals instead of flames
Uneven Browning:
- Cause: Uneven heat distribution or inconsistent flipping
- Solution: Rotate toaster 180 degrees halfway through each side
Bread Falling Through Rack:
- Cause: Bread too thin or racks too wide apart
- Solution: Use sturdier bread or double-slice thin bread
Soggy Toast:
- Cause: Humidity, stale bread, or insufficient heat
- Solution: Increase toasting time, use fresh bread, store properly
Bread Stuck to Toaster:
- Cause: Excessive butter or cheese melting onto rack
- Solution: Butter after toasting or use pie iron for filled toast
Frequently Asked Questions
How do you make toast when camping?
To make toast while camping, use a folding campfire toaster over hot coals for even browning, spear bread with a toasting fork and hold over embers, place bread in a pie iron for enclosed heating, use a camp stove toaster for controlled heat, or use the stick method by spearing bread on a long green stick.
What is the best camping toaster?
The best camping toaster depends on your style. Folding campfire toasters are versatile and affordable, pie irons offer multi-purpose cooking, and toasting forks work for any heat source and pack smallest. For families, the Coghlan's Camp Stove Toaster is the best budget option.
Can you make toast on a campfire?
Yes, campfire toasting works well with the right equipment. Build your fire and let it burn down to hot coals (20-30 minutes), place a folding toaster over the coals (not flames), and toast for 1-2 minutes per side. The key is using glowing embers rather than open flames.
How long does it take to make toast on a campfire?
Campfire toast typically takes 2-4 minutes total (1-2 minutes per side). Timing varies based on heat intensity, distance from coals, bread type, and desired toast level. Watch closely to prevent burning as campfire heat is less predictable than stove heat.
What's the best bread for camping toast?
Sourdough is the best all-around camping bread, staying fresh 5-7 days and resisting crushing. Bagels last 7+ days and are virtually indestructible. English muffins and tortillas also work well. Avoid soft white sandwich bread for trips longer than a day.
Final Recommendations
After testing every method extensively, my recommendation depends on your camping style.
For families and car campers, a folding campfire toaster offers the best balance of capacity, ease, and results.
Backpackers should stick with a lightweight toasting fork or the stick method to save weight.
If you want maximum versatility, invest in a quality pie iron that handles toast and so much more.
The key is practicing at home before your trip to perfect your technique.