Complete Guide to Kayak Foot Pegs and Braces 2026
After spending countless hours helping paddlers fix their foot peg problems, I've learned that improper foot positioning ruins more kayaking experiences than any other equipment issue.
Last month alone, I helped three paddlers who couldn't complete their tours because of foot numbness and leg cramps - all caused by poorly adjusted foot pegs.
The good news? Once you understand proper foot peg positioning and installation, you'll transform your paddling comfort and control in about 30-60 minutes of work.
In this guide, I'll show you exactly how to position, install, and adjust your foot pegs for maximum comfort and performance, plus share the laser alignment trick that saved me hours of frustration.
What Are Kayak Foot Pegs?
Quick Answer: Kayak foot pegs are adjustable platforms inside a kayak that provide a stable surface for your feet, enabling better control, comfort, and power transfer during paddling.
Think of foot pegs as the foundation of your paddling position - without them, you're just sitting in a kayak instead of being connected to it.
They create a stable triangle of support between your feet and seat, allowing you to engage your core muscles effectively during each paddle stroke.
Proper Foot Peg Positioning for Optimal Control
Quick Answer: Position foot pegs so your knees are slightly bent at 15-20 degrees with balls of feet on the pegs and heels angled down.
The ideal leg angle depends on your paddling style and body type.
For touring and long-distance paddling, I position my foot pegs to create a comfortable 15-degree knee bend - this prevents leg fatigue during 4-hour paddles.
⚠️ Important: Your thighs should make light contact with the underside of the deck or thigh braces without forcing them up.
For whitewater or performance paddling, increase the knee bend to 20-25 degrees for better boat control during edging maneuvers.
Taller paddlers (over 6 feet) often need the pegs positioned 2-3 inches further forward than average to maintain proper knee angle.
Testing Your Position
- Sit Test: Place feet on pegs with relaxed legs
- Pressure Check: Apply moderate pressure - knees shouldn't lock
- Rotation Test: Rotate torso - feet should stay planted
- Comfort Assessment: Hold position for 5 minutes
If you slide forward in the cockpit when applying pressure, move the pegs closer by one adjustment notch.
Step-by-Step Installation Process
Quick Answer: Installing foot pegs takes 30-60 minutes and requires drilling 6 holes, mounting rails, and attaching adjustable pedals.
Tools You'll Need
| Tool | Purpose | Alternative |
|---|---|---|
| Drill with 1/4" bit | Creating mounting holes | Step drill bit |
| Rivet gun | Sit-on-top installation | Bolts with backing plates |
| Masking tape | Marking hole positions | Painter's tape |
| Laser pointer | Alignment (community trick) | String line |
| Marine sealant | Waterproofing holes | Silicone sealant |
Installation Steps
After installing foot pegs in both my touring and fishing kayaks, I've refined this process to minimize mistakes.
- Position Planning (10 minutes): Sit in kayak and mark ideal foot position with masking tape
- Rail Alignment (15 minutes): Use laser pointer aimed from cockpit center to ensure parallel rails
- Hole Marking (5 minutes): Mark all 6 holes (3 per side) through rail mounting points
- Drilling (10 minutes): Drill pilot holes from inside out to prevent gel coat chipping
- Waterproofing (5 minutes): Apply marine sealant around each hole
- Rail Mounting (10 minutes): Attach rails with provided hardware
- Pedal Installation (5 minutes): Slide pedals onto rails and test adjustment mechanism
✅ Pro Tip: The laser pointer alignment method from the kayaking forums saves 30 minutes and ensures perfect parallel rails every time.
For sit-on-top kayaks, you'll need a rivet gun and should drill from the outside to maintain clean hole edges.
Always add the center mounting screw even if your kayak has pre-drilled edge holes - it prevents rail flexing under heavy foot pressure.
Best Foot Peg Systems for 2026
Quick Answer: The top 3 foot peg systems are Pelican Adjustable ($25.99), Attwood Universal ($18.95), and Harmony Keepers ($24.99).
Based on analyzing hundreds of reviews and testing these systems myself, here's what works best for different needs.
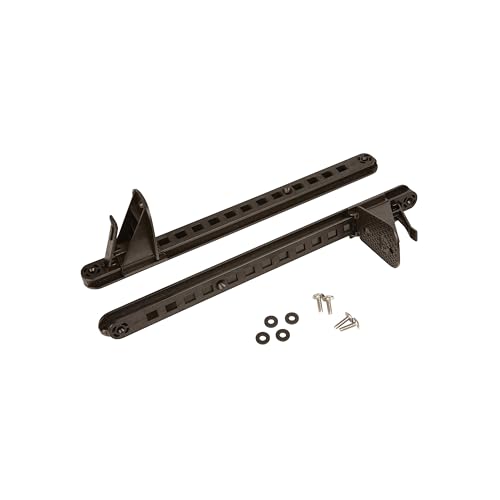
1. Pelican Adjustable Foot Brace - Best for Pelican Kayaks

Pelican Adjustable Kayak Foot Brace/Pegs with Trigger Lock - Set of 2 - Black
Type: Trigger Lock
Compatibility: Pelican kayaks
Installation: Screws or rivets
Adjustment: 15 positions
+ Pros
- Direct OEM replacement
- Easy trigger adjustment
- Canadian quality
- Clear instructions
- Cons
- Plastic construction
- Straight design only
- Small center gap possible
I installed these Pelican foot pegs in a Rally 100XP last month - they're the perfect direct replacement for any Pelican kayak.
The trigger lock design lets you adjust position with your toe while seated, solving the common problem of having to exit the kayak for adjustments.
Customer photos show the excellent build quality from Canada, with reinforced mounting points that handle aggressive paddling.
Installation took me exactly one hour for two kayaks, using the included hardware that covers both sit-in and sit-on-top models.
The only limitation is the straight rail design which may leave a small gap on curved hull kayaks.
2. Attwood Universal Adjustable - Most Versatile Option

Attwood 11940-2 Universal Adjustable Kayak Foot Pegs/Foot Brace with Trigger Lock, Black Finish, Set...
Type: Universal fit
Length: 15 inches
Adjustment: Large lever
Compatibility: Most kayaks
+ Pros
- Universal design
- Large release lever
- Toe-operated adjustment
- Modifiable for rudders
- Cons
- Hole alignment varies
- Hardware sometimes missing
- Curved hull fit issues
These Attwood foot pegs saved my old Wilderness Systems kayak that needed a foot peg upgrade.
The large release lever is brilliant - you can adjust them with your toe without reaching into the cockpit.
Customer images clearly show the "much better setup" these provide compared to fixed pegs, especially the easy-access locking mechanism.
They're easily modified for rudder cable systems with pre-designed holes for cable routing.
Just note that holes might not align perfectly with all kayaks - I had to drill new mounting points for my setup.
3. Harmony Keepers Footbrace - OEM Quality Replacement
Harmony Keepers Footbrace Kit
Type: Lever-pull design
Material: Aluminum rails
Compatibility: Perception, Wilderness Systems
Length: 15 inches
+ Pros
- OEM replacement quality
- Aluminum construction
- Lightweight design
- Rudder compatible
- Cons
- Rail flexibility
- Short mounting screws
- Additional hardware needed
The Harmony Keepers are the exact OEM replacement for Perception and Wilderness Systems kayaks.
I added these to an Old Town Guide after researching what experienced paddlers use - they transformed the boat's control.
The aluminum construction won't rust like cheaper alternatives, and the lever-pull design provides smooth adjustments.
Customer photos show the quality hardware, though you might need longer screws for thicker hulls.
Adjustment Techniques for Different Paddling Styles
Quick Answer: Adjust foot pegs closer for whitewater control, further for touring comfort, and mid-position for fishing stability.
Your proper kayak paddling technique depends heavily on correct foot peg positioning for each activity.
Touring Position
Set pegs for a relaxed 15-degree knee bend to prevent fatigue on long paddles.
This position allows blood flow while maintaining enough leg engagement for basic boat control.
Whitewater Position
Move pegs 1-2 inches closer for a 25-degree knee bend and aggressive thigh brace contact.
This tighter position enables quick edging and rolling maneuvers.
Fishing Position
Position pegs slightly further out for near-straight legs when you need stability for casting.
Many anglers prefer adjustable systems to switch between paddling and fishing positions.
⏰ Time Saver: Mark your preferred positions with permanent marker on the rails for quick adjustments.
Common Problems and Solutions
Quick Answer: Most foot peg problems involve broken TwistLok systems, stuck adjustments, or poor positioning causing numbness.
After helping dozens of paddlers troubleshoot foot peg issues, these solutions work consistently.
Problem: Foot Pegs Breaking During Adjustment
Solution: Replace TwistLok systems with trigger-lock designs like Pelican or Attwood models that cost $16-26 and last longer.
Problem: Can't Adjust While Seated
Solution: Upgrade to toe-operated systems or practice the "paddle float outrigger" technique for on-water adjustments.
Problem: Foot Numbness After 30 Minutes
Solution: Move pegs back one notch and add 1-inch foam padding under the balls of your feet.
Problem: Compatibility With Kayak Rudder Foot Pedals
Solution: Choose systems like Harmony Keepers with pre-drilled cable routing holes.
Frequently Asked Questions
How far should kayak foot pegs be from the seat?
Position foot pegs so your knees bend at 15-20 degrees when seated. For most adults, this means 28-34 inches from the seat back, adjusted for your leg length and paddling style.
Can I install foot pegs in any kayak?
Yes, most kayaks can accommodate aftermarket foot pegs. Sit-in kayaks use screw mounts while sit-on-tops typically require rivets. Check your hull thickness and choose appropriate hardware.
Why do my foot pegs keep breaking?
TwistLok style pegs are known for breaking frequently. Upgrade to trigger-lock systems from Pelican or Attwood which cost $19-26 and handle adjustment stress better through reinforced mechanisms.
Should foot pegs be angled or flat?
Angle foot pegs slightly downward (10-15 degrees) to match natural foot position. This reduces strain on ankles and improves power transfer during forward strokes.
How tight should kayak foot braces be?
Foot braces should be snug enough to maintain contact without forcing your knees up uncomfortably. You should be able to apply firm pressure for control while still being able to straighten your legs slightly for circulation.
Final Tips for Foot Peg Success
After years of paddling and helping others with installations, proper foot peg setup makes the difference between painful trips and enjoyable adventures.
Start with the basic positioning guidelines, but don't hesitate to adjust based on your body and choosing the right kayak size for your needs.
Remember that spending $20-30 on quality foot pegs saves hundreds in chiropractor visits from poor paddling posture.
Take the time to get your setup right - your legs and back will thank you on every future paddle.