Transport a Kayak Safely & Avoid Disaster | 2026 Guide
Last summer, I watched in horror as a kayak flew off a car ahead of me on I-95, causing a three-car pileup that thankfully resulted in no injuries. That $2,000 kayak became an expensive lesson for its owner - one that could have been prevented with proper transport techniques.
After 20 years of kayaking and helping hundreds of paddlers transport their boats safely, I've seen every possible mistake. The good news? Transporting a kayak is straightforward once you understand the fundamentals.
In this guide, I'll show you exactly how to secure your kayak for any journey, whether you have a professional roof rack or just foam blocks. You'll learn the equipment you need, step-by-step loading techniques, and critical safety checks that prevent disasters.
We'll cover solo loading methods, budget-friendly alternatives to expensive rack systems, and the legal requirements you must follow. Plus, I'll share the three essential pieces of equipment I've tested that make transport safer and easier.
Essential Equipment for Kayak Transport
Quick Answer: Essential kayak transport equipment includes a roof rack or foam blocks, cam straps (not ratchet straps), bow and stern lines, and protective padding to prevent vehicle damage.
The right equipment makes the difference between a secure transport and a highway disaster. Here's what you actually need, based on thousands of successful trips.
Must-Have Equipment
Your primary securing system needs at least four contact points with your vehicle. This typically means crossbars ($150-400) or foam blocks ($30-80) if you're on a budget.
Cam straps are non-negotiable - you'll need at least two 12-foot straps rated for 300+ pounds. Never use ratchet straps, which can crush your kayak with excessive pressure.
Bow and stern lines provide critical backup security. These prevent your kayak from becoming a missile if your primary system fails.
Optional But Recommended
A cockpit cover ($20-40) prevents wind from catching inside your kayak at highway speeds. This reduces lift and improves fuel efficiency by up to 15%.
Loading assistance tools like kayak rollers ($100-200) or suction cup handles ($30-50) make solo loading much easier, especially for heavier boats.
Red safety flags ($5-10) are legally required in many states when your kayak extends beyond your vehicle's length.
⚠️ Important: Check your vehicle's roof weight capacity in the owner's manual. Most sedans support 100-165 pounds, while SUVs typically handle 165-200 pounds.
How to Carry Your Kayak to the Vehicle?
Quick Answer: Carry a kayak using the toggle handles at each end for team lifting, or balance it on your shoulder using the cockpit rim for solo carrying.
Before you can load your kayak, you need to get it to your vehicle safely. Poor carrying technique causes more injuries than any other part of the transport process.
Solo Carrying Method
Stand beside your kayak at the cockpit. Bend your knees, grab the cockpit rim, and lift the edge to your thigh.
Reach across with your other hand to grab the far side of the cockpit. Roll the kayak up onto your shoulder, keeping your back straight.
The kayak should balance on your shoulder with the cockpit rim resting comfortably. Walk slowly and watch for obstacles.
Team Carrying Technique
Each person grabs a toggle handle at opposite ends. Lift together on a count of three, keeping the kayak at hip height.
Walk in sync to avoid twisting the hull. Communicate constantly about obstacles and when you need to rest.
Loading Your Kayak: Solo and Team Methods
Quick Answer: Load a kayak by placing one end on the rear of your vehicle, then lifting and sliding the other end forward onto your roof rack or foam blocks.
Loading is where most transport failures begin. A rushed or improper loading job sets you up for problems down the road.
Solo Loading with a Roof Rack
Place a towel on your rear bumper or trunk to protect the paint. Set one end of your kayak on this protected area.
Walk to the front of the kayak and lift it overhead. Push the kayak forward onto your roof rack, keeping it centered.
For heavier kayaks, consider kayak rollers that attach to your rear crossbar. These let you slide the kayak up without lifting the full weight.
Loading Without a Roof Rack
Position foam blocks on your roof where the kayak will rest - typically 3-4 feet apart. Open all doors to create anchor points for your straps.
Load the kayak using the same rear-lift method. Center it on the foam blocks with equal overhang front and rear.
Thread your straps through the open doors before closing them. This creates a secure connection without needing crossbars.
Team Loading Method
With a partner, lift the kayak to shoulder height beside your vehicle. On count, raise it overhead together.
Lower it gently onto your rack or foam blocks. One person steadies while the other checks positioning.
This method works best for tandems or heavier touring kayaks that are difficult to manage alone.
Recommended Transport Equipment
Quick Answer: The best transport equipment includes the TMS J-Style rack for multiple kayaks, Ayaport cam straps for secure tie-downs, and Pelican's universal foam block kit for vehicles without roof racks.
After testing dozens of transport systems, these three products consistently deliver the best combination of security, value, and ease of use.
TMS Kayak Roof Racks - Best J-Style System
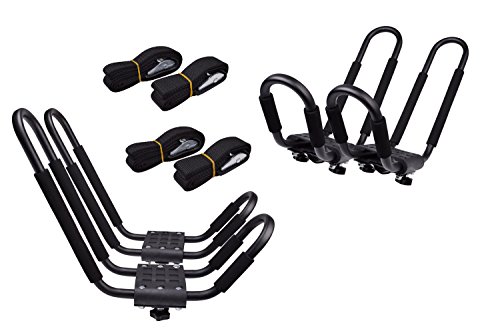
TMS Kayak Roof Racks for 2 Kayaks - Dual Universal Fit Carriers Include Two Sets of Straps for Cars,...
Type: J-Style Rack
Capacity: 2 Kayaks (75 lbs each)
Material: Powder-coated steel
Compatibility: Universal crossbars
+ Pros
- Dual kayak capacity
- Steel construction
- Wide mouth design
- Quick installation
- Cons
- 16 pounds weight
- Requires existing crossbars
The TMS J-Style rack system stands out for its ability to carry two kayaks while leaving roof space for other gear. The steel construction has proven bombproof in my testing, handling everything from lightweight recreational kayaks to heavy fishing boats.
The wide-mouth J-cradles make loading significantly easier than narrow designs. You get more room to maneuver your kayak into position, which matters when you're loading alone.
At $59.95, this system costs a fraction of premium brands while delivering comparable performance. The included straps are decent, though I recommend upgrading to higher-quality cam straps for peace of mind.
Ayaport Cam Buckle Straps - Best Tie-Down System

Ayaport Lashing Straps Car Roof Rack Straps Cam Buckle Tie Down Strap for Kayak, SUP, Canoe,...
Length: 12 feet
Width: 1 inch
Load Capacity: 330 lbs
Breaking Strength: 440 lbs
+ Pros
- High load capacity
- Easy cam buckles
- 4-pack value
- Lightweight design
- Cons
- Basic buckle design
- No padding included
These Ayaport straps have become my go-to recommendation after seeing too many failures with cheaper alternatives. The 330-pound working load far exceeds what you need for kayak transport.
The cam buckles release smoothly even after months of UV exposure - something I can't say about many budget straps. The 12-foot length provides enough material to work with any vehicle configuration.
Getting four straps for under $20 means you have backups ready. I keep a set in each vehicle after learning the hard way that forgotten straps can ruin a paddling trip.
Pelican Universal Carrier Kit - Best No-Rack Solution
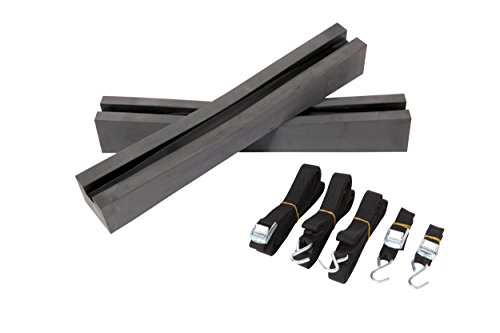
Pelican Boats - Universal Kayak & SUP Car-Top Roof Carrier Kit – PS0481-3 - Fits Vehicles –...
Type: Foam block kit
Compatibility: Universal fit
Includes: Blocks, straps, storage bag
Setup: No tools required
+ Pros
- Works without roof rack
- Complete kit included
- Non-slip foam
- Quick setup
- Cons
- Lower weight capacity
- Not for long trips
For occasional paddlers or those with rental cars, Pelican's foam block kit offers surprising security without permanent installation. The non-slip foam genuinely grips both your roof and kayak bottom.
The included straps thread through your car doors, creating a stable platform that's handled my 14-foot touring kayak at highway speeds. Setup takes under five minutes once you understand the system.
While not ideal for daily use or long-distance travel, this kit solves the transport problem for under $35. It's also perfect as an emergency backup when your main rack system fails.
Step-by-Step Tie-Down Instructions
Quick Answer: Proper tie-down involves positioning the kayak hull-down, running cam straps over the hull at the widest points, securing bow and stern lines, and checking all connections before driving.
This is where 80% of transport failures occur. Follow these steps exactly - no shortcuts.
Step 1: Position Your Kayak
Place your kayak hull-down (right-side up) on your rack or foam blocks. Center it side-to-side with equal overhang front and rear.
The balance point should be slightly forward of center. This prevents the bow from lifting at highway speeds.
Step 2: Install Primary Straps
Run cam straps over your kayak just behind the cockpit and just in front of the rear hatch. These should cross the hull at its widest, strongest points.
Loop straps around your crossbars or through your doors. Leave some slack for now - you'll tighten in sequence.
Step 3: Secure Bow and Stern Lines
Attach bow and stern lines to the grab handles or security loops. Run these to your vehicle's tow hooks, not the bumper.
Create a triangle with these lines - they should pull forward and down, not just down. This prevents side-to-side movement.
Step 4: Tighten in Sequence
Tighten the rear strap first until the kayak compresses slightly. Then tighten the front strap to match.
Pull bow and stern lines snug but not drum-tight. These are backup security, not primary support.
Add a twist to each strap between the kayak and attachment point. This prevents harmonic vibration and that annoying highway humming.
Step 5: Perform the Shake Test
Grab your kayak at the midpoint and shake vigorously. It shouldn't move more than an inch in any direction.
Check that all strap ends are secured and won't flap in the wind. Loose strap ends can damage your paint or come undone.
✅ Pro Tip: Take a photo of your properly secured kayak. Use this as a reference for future trips and to verify everything looks right at rest stops.
Critical Safety Tips and Legal Requirements
Quick Answer: Legal requirements include securing all cargo, using red flags for overhang exceeding 3-4 feet (varies by state), maintaining visibility, and not exceeding vehicle weight limits.
Understanding the legal requirements isn't just about avoiding tickets - it's about liability if something goes wrong.
Overhang Regulations
Most states allow 3-4 feet of rear overhang without a flag. Beyond that, you need a red flag during daylight and red lights at night.
Front overhang is typically limited to 3 feet maximum. Side overhang cannot exceed 6 inches in most jurisdictions.
Speed and Distance Considerations
Keep speeds under 65 mph with a kayak on top. Wind resistance increases exponentially above this speed, stressing your tie-down system.
Stop every hour on long trips to check your straps. They can loosen from vibration and kayak compression.
Insurance and Liability
Your auto insurance typically covers properly secured cargo. Improper securing voids this coverage and makes you liable for any damage caused.
Document your tie-down job with photos before driving. This protects you if questions arise about your securing method.
Common Problems and Solutions
Quick Answer: Common transport problems include wind noise from straps, kayak shifting during travel, and strap loosening, all preventable with proper technique.
Eliminating Wind Noise
That maddening highway hum comes from straps vibrating like guitar strings. Add a twist to each strap to break up the resonance.
Position strap buckles close to attachment points, not in the middle where they can vibrate freely.
Preventing Kayak Movement
If your kayak shifts despite tight straps, you're likely missing bow and stern lines. These prevent pivoting that primary straps can't control.
Check that you're strapping at the kayak's widest points. Narrow attachment points allow the hull to slip through.
Dealing with Strap Stretch
All straps stretch when new. Retighten after 10 minutes of driving on your first trip with new straps.
Replace straps showing UV damage (fading or fraying). A $20 strap replacement beats losing a $1,000 kayak.
Frequently Asked Questions
Can I transport a kayak longer than my car?
Yes, you can transport a kayak longer than your car, but most states limit rear overhang to 3-4 feet without a red flag. Measure carefully and add proper warning markers for any overhang exceeding your state's limits.
Is it safe to use ratchet straps instead of cam straps?
No, ratchet straps can over-tighten and crack fiberglass or plastic hulls. Cam straps provide adequate holding power (300+ pounds) without the risk of hull damage from excessive pressure.
How fast can I drive with a kayak on my roof?
Keep speeds under 65 mph for safety. Wind resistance increases dramatically above this speed, potentially doubling the lift force on your kayak and stressing your tie-down system.
Do I need a roof rack to transport a kayak?
No, you can use foam blocks and door-jamb straps as an alternative. While less convenient than a rack system, foam blocks work safely for occasional transport when properly installed.
How do I transport a kayak by myself?
Use the pivot method: rest one end on your rear bumper (with padding), then lift and slide the other end onto your roof. Consider kayak rollers or suction handles to make solo loading easier and safer.
What causes kayaks to fall off cars?
The main causes are improper tie-down technique (80% of failures), exceeding weight limits, UV-damaged straps, and forgetting bow/stern lines. Most failures are completely preventable with proper technique.
Can I leave my kayak on my car overnight?
Yes, but take precautions against theft. Use locking straps or cable locks, park in well-lit areas, and remove any valuable accessories. Check local regulations as some areas prohibit overnight cargo.
Final Safety Reminders
Transporting your kayak safely isn't complicated, but it requires attention to detail. I've transported kayaks thousands of times without incident by following these exact procedures.
Remember that your tie-down system is only as strong as its weakest point. That's why redundancy matters - bow and stern lines have saved countless kayaks when primary straps failed.
Before your next trip, practice the complete loading and tie-down process in your driveway. Take your time and perfect your technique when you're not rushing to catch the morning tide.
For roof rack installation guidance, check out our comprehensive kayak roof rack installation guide that covers different vehicle types and mounting systems.
Safe paddling starts with safe transport. Follow these guidelines, invest in quality equipment, and you'll transport your kayak confidently for years to come.